Castelvetrano Olive Recipe

This post contains affiliate links. As an Amazon Associate I earn from qualifying purchases.
I want you to imagine this: your guests arrive, and instead of a stressed host frantically finishing appetizers, you’re already relaxed with a stunning bowl of vibrant green tapenade sitting on your counter, ready to dazzle. That’s the power of making this Castelvetrano olive spread once and letting it do the heavy lifting throughout your entire gathering week. As a registered dietitian who’s spent over a decade helping Colorado families master festive meals, I’ve learned that the secret to stress-free entertaining isn’t complicated recipes—it’s smart, make-ahead dishes like this one. Make this on your prep day Sunday, and you’ll have an elegant appetizer ready for Monday night’s dinner party, Wednesday’s unexpected guests, and even Friday’s casual wine night. I can’t wait to share this festive, budget-friendly recipe with you!
Castelvetrano Olive Tapenade Meal Prep: Cook Once, Serve All Week
I discovered the magic of prepared appetizers quite by accident during my sister’s winter wedding planning season. She was juggling three jobs and two kids, and I watched her stress over hosting a small celebration dinner. That night, I made a big batch of this Castelvetrano olive tapenade on a quiet Sunday afternoon. By Monday, when her friends arrived, she had one stunning appetizer that required zero last-minute fussing. I watched her actually sit down and enjoy her guests instead of sweating in the kitchen. That moment changed how I approach entertaining entirely. Now, every time someone asks me how to make hosting easier, I recommend building your menu around make-ahead appetizers like this one.
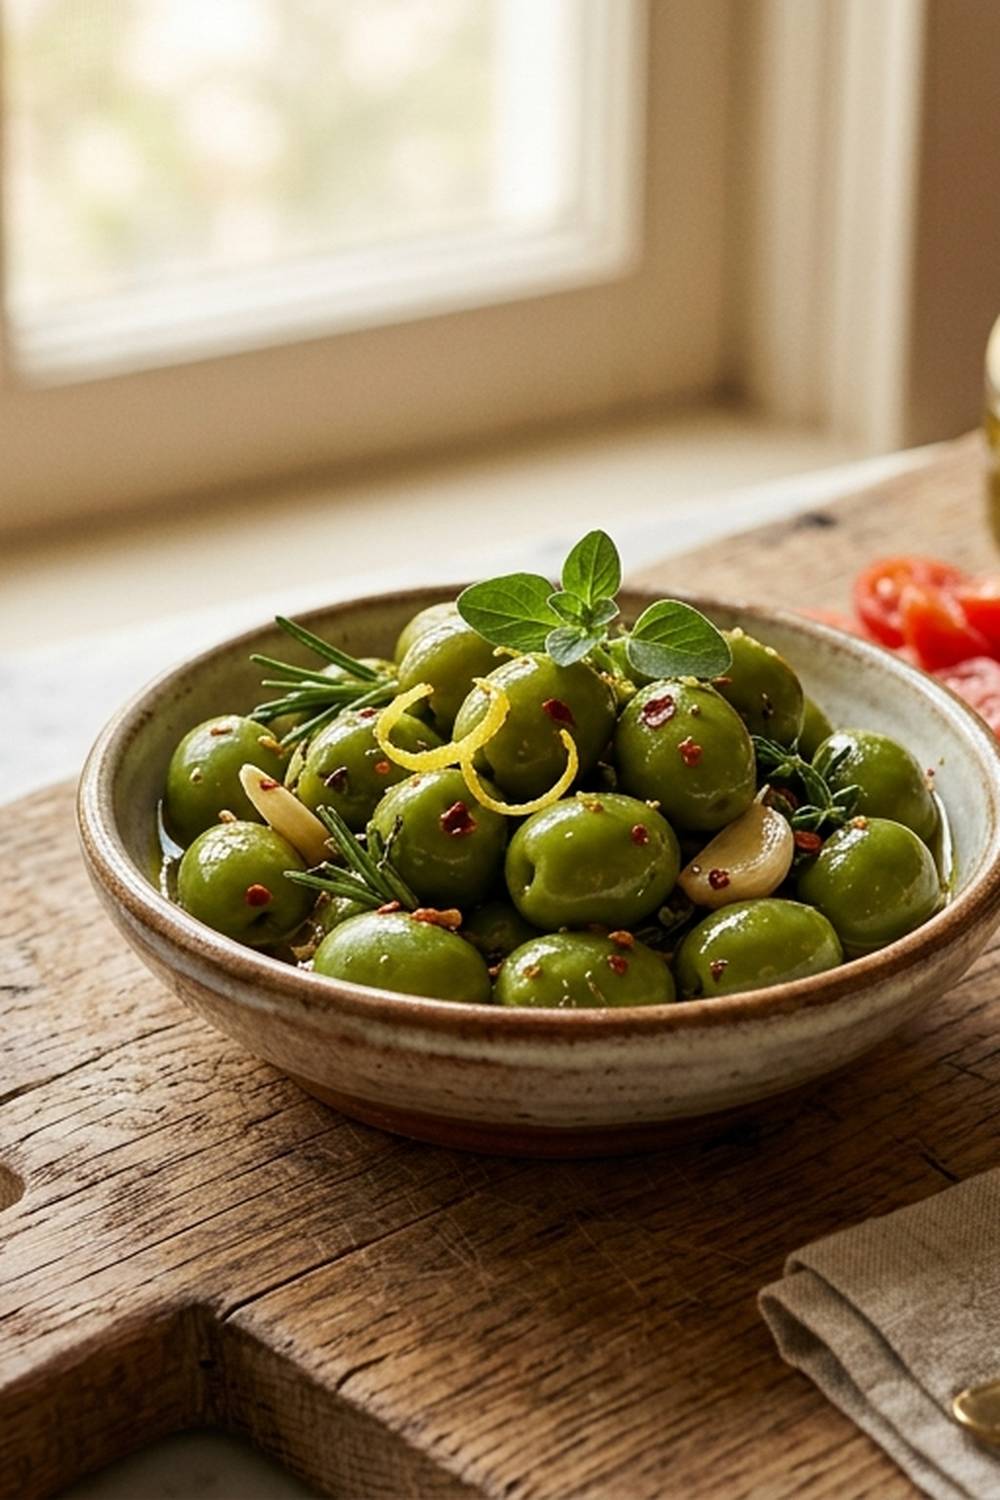
This Castelvetrano olive tapenade isn’t just delicious—it’s a professional-level appetizer that looks like you spent hours preparing it. The best part? It actually gets better as it sits, with flavors melding together beautifully over several days. The buttery texture of Castelvetrano olives (sometimes called Nocellara olives) combined with bright herbs and citrus creates something genuinely craveable that works for casual gatherings and elegant dinner parties alike.
Why This Recipe Is Perfect for Meal Prep
- Zero Reheating Required – This appetizer is naturally served at room temperature, saving you precious oven and stovetop space during your gathering. Simply pull it from the refrigerator 15 minutes before guests arrive.
- Flavor Development Over Time – Unlike many prepared foods that deteriorate, this tapenade actually improves as it sits in the refrigerator. The herbs infuse deeper into the oil, and the garlic mellows into something more refined by day three.
- Incredible Versatility – Serve it as a dip with crackers on Monday, spoon it onto toasted bread as a bruschetta base on Wednesday, mix it into cream cheese for a sandwich spread on Friday, or dollop it over grilled fish like our Lemon Baked Cod Recipe for dinner later in the week.
- Budget-Conscious Elegance – Castelvetrano olives are surprisingly affordable, especially compared to other fancy appetizers, yet they look and taste completely luxurious on your table.
- Naturally Gluten-Free and Vegan – This recipe accommodates multiple dietary needs without requiring special substitutions or extra preparation.
Your Weekly Gathering Plan With This Recipe
Here’s exactly how I use one batch of Castelvetrano olive tapenade across an entire week of entertaining, without repetition or boredom. Each serving is completely different depending on how you present and pair it, so your guests never feel like they’re eating the same appetizer twice.
- Monday Dinner Party – Serve it in a wide, shallow ceramic bowl with artisanal focaccia bread and a selection of crispy crackers. Drizzle the top with extra virgin olive oil and a sprinkle of fresh herbs for visual appeal.
- Wednesday Casual Gathering – Transform it into sophisticated bruschetta by toasting thick slices of baguette and spreading each one generously with the tapenade. Top with a small dollop of crème fraîche and a fresh basil leaf for contrast.
- Friday Wine Night – Swirl the remaining tapenade into softened goat cheese or cream cheese for a completely different texture and presentation. Serve with your favorite crackers or vegetable crudités for a lighter feel.
- Weekend Entertaining Bonus – Mix any remaining tapenade into Greek yogurt for a healthier dip option, or dollop it on top of grilled vegetables, fish, or even pasta as a finishing flourish.
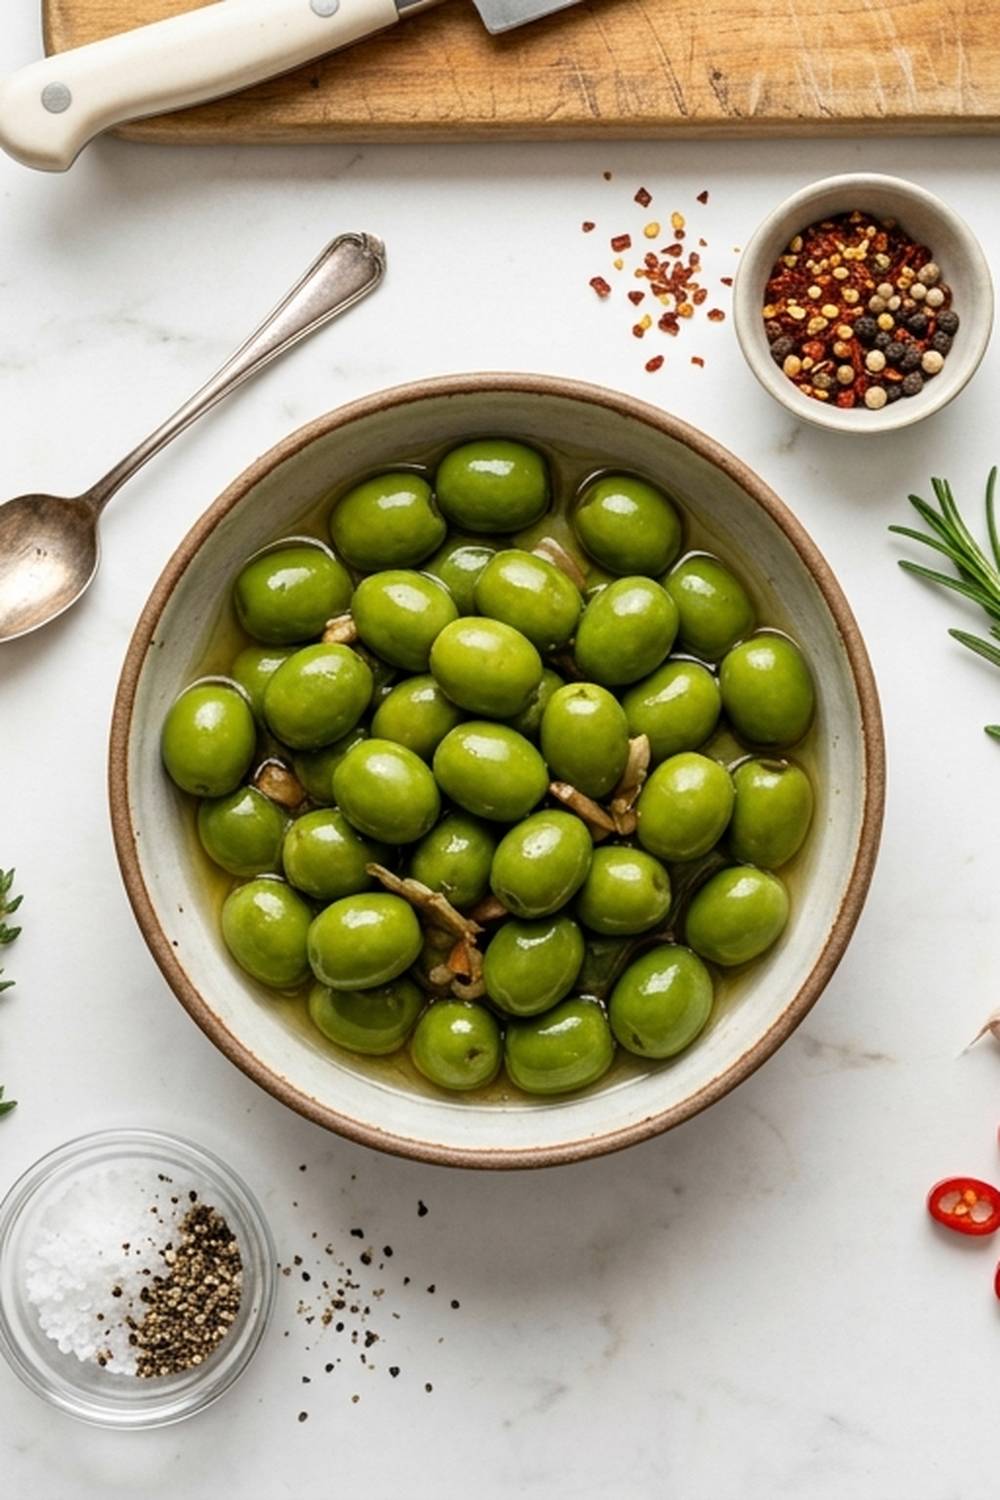
The Ingredients – Scaled for a Full Week of Entertaining
I’ve scaled these ingredients to serve 8-10 people across multiple gatherings throughout your week. This amount provides a generous appetizer portion for two medium gatherings, or smaller starter servings for three occasions. All ingredients are shelf-stable or refrigerator-friendly for at least five days, making this truly make-ahead friendly. For most of these items, I’ve included storage notes so you understand exactly how they’ll hold up in your refrigerator.
- 4 to 6 teaspoons red wine vinegar (or fresh lemon juice; both brighten the flavors and help preserve the mixture)
- 3 teaspoons dried oregano (the dried herb holds strong flavor throughout the week without deteriorating)
- 4 cups fresh mixed herbs, loosely chopped (basil, Italian parsley, and cilantro work beautifully alone or combined; cilantro adds brightness while parsley provides earthiness)
- ¾ to 3 teaspoons Aleppo chili flakes (or red pepper flakes as a substitute; adjust based on your heat preference and your guests’ tolerance)
- 30 ounces Castelvetrano olives, pitted (about nine cups; buy pre-pitted to save significant prep time, or pit them yourself using a cherry pitter for a budget-friendly option)
- Fresh black pepper to taste (grind it fresh just before mixing; pre-ground loses potency within days)
- 2 teaspoons Dijon mustard (adds subtle depth and acts as a natural preservative for longer storage)
- 3 garlic cloves, finely minced or grated on a microplane (fresh garlic keeps refrigerated for up to two weeks in an airtight container)
- 1 teaspoon honey or maple syrup (optional; balances the acidity and any bitterness from the oregano)
- 3 cups extra virgin olive oil (quality matters here; use your favorite cold-pressed oil for best results)
- 3 tablespoons fresh lemon zest, finely chopped (zest the lemon before juicing; store extra zest frozen in ice cube trays for future use)
- Sea salt to taste (approximately one teaspoon, but always taste as you go)
The Meal Prep Process: How to Make Castelvetrano Olive Tapenade in Bulk
I approach this tapenade like the professional system it truly is. You’re not just mixing ingredients—you’re creating a carefully balanced condiment that will serve your week. The entire process takes about 25 minutes from start to finish, and most of that is gentle knife work that honestly feels meditative. Break this into stages so you’re never rushed.
Step 1: Prepare Your Olives With Care
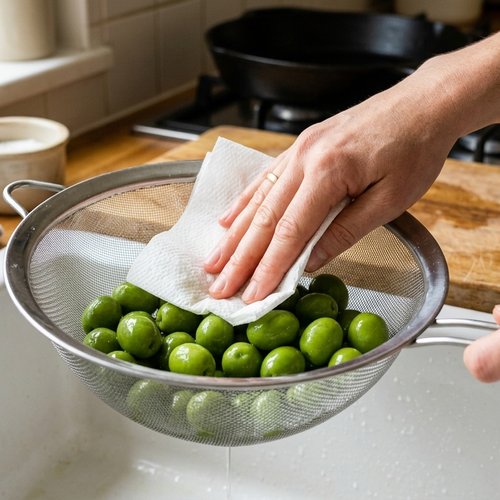
Start by draining your Castelvetrano olives thoroughly in a fine-mesh colander, pressing them gently with paper towels to remove excess brine and moisture. This step is essential for the final texture of your tapenade. Excess moisture creates a watery consistency that waters down your other flavors. Once drained, transfer the olives to your cutting board. I prefer slicing them rather than chopping because the thin slices create a more elegant presentation and the recipe stays visually interesting when served. Using a sharp chef’s knife, slice each olive lengthwise into thin pieces—this takes about 10-12 minutes for the full batch, but it’s worth the time investment. If you’re genuinely pressed for time, you can pulse the olives in a food processor, but pulse gently just three to four times to avoid creating a paste.
Step 2: Prepare Your Fresh Herbs and Aromatics
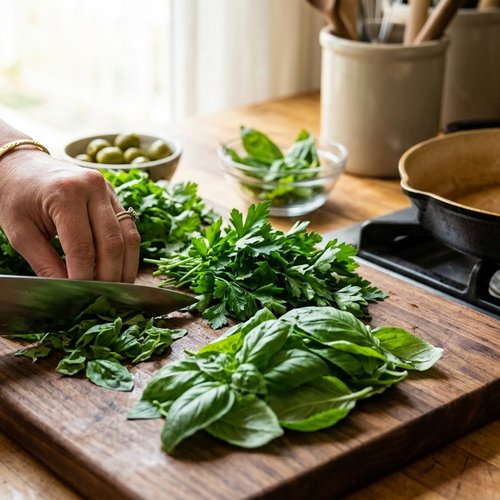
While your olives are draining, prep your fresh herbs. Wash and thoroughly dry your basil, parsley, and cilantro using a salad spinner or clean kitchen towel. Dry herbs are essential—wet herbs introduce moisture that will shorten your tapenade’s shelf life. Stack the leaves, roll them loosely, and slice them into thin ribbons. This technique, called chiffonade, creates a more refined presentation than chopped herbs. Mince your garlic finely on a cutting board or, if you prefer, use a microplane grater to create a paste-like consistency that distributes more evenly throughout the mixture. Zest your lemons while the fruit is still whole, then set the zest aside.
Step 3: Combine Your Base Mixture
Transfer your sliced olives to a large mixing bowl—I use a 6-quart stainless steel bowl because it gives me plenty of room to work. Add your minced garlic, fresh herbs, lemon zest, dried oregano, and Dijon mustard. Don’t add your oil yet; you want to combine your solid ingredients first so you can taste and adjust seasonings before the oil makes tasting more difficult. Gently fold everything together using a wooden spoon or silicone spatula, being careful not to bruise the delicate olive slices. This gentle approach keeps the tapenade visually appealing rather than becoming a mushy paste.
Step 4: Create Your Oil Infusion
Now pour your extra virgin olive oil over the mixture in three additions rather than all at once. After each addition, gently fold the oil into the other ingredients, making sure everything is evenly coated. The oil serves two purposes: it’s a flavor carrier and a natural preservative that extends your refrigerator storage time to five to seven days. Once all the oil is incorporated, add your Aleppo chili flakes and your first teaspoon of red wine vinegar. The vinegar adds brightness and acts as an additional preservative.
Step 5: Taste and Fine-Tune Your Flavors
This is where your instincts become important. Taste a small spoonful of your tapenade on a neutral cracker or plain bread. You should taste the briny olive flavor clearly, with the garlic noticeable but not overpowering, bright herbs coming through, and a subtle heat from the chili flakes. Adjust each element individually: add more garlic only if you want more savory depth, increase chili flakes if you want more heat, add more vinegar if you want more brightness, and sprinkle salt carefully if the overall flavor feels flat. Remember that the flavors will continue to develop over the next 24 hours, so err on the side of subtle now—you can always add more tomorrow, but you can’t remove it.

Step 6: Transfer to Storage Containers
Once you’re satisfied with your flavor profile, transfer your tapenade to clean glass containers with tight-fitting lids. Glass containers are superior to plastic for this application because they don’t stain and they allow you to see the beautiful color of your tapenade at a glance. I divide my batch into three medium containers rather than one large container—this approach minimizes air exposure every time you open a container, which extends freshness. Make sure there’s about a half-inch of oil on top of the tapenade in each container; this oil layer acts as a seal against oxidation and keeps your tapenade fresher longer.
Storage and Organization System
- Glass Storage Containers – Use three medium glass containers (16-ounce capacity each) rather than one large container. This approach minimizes air exposure and keeps your tapenade fresher for longer. The transparent glass lets you see exactly how much you have remaining and monitor color changes, which indicate freshness level.
- Strategic Portioning – Divide your batch into three portions: one for immediate use Monday through Wednesday, one for mid-week entertaining, and one for backup on Friday or weekend events. This ensures you’re never dipping into old tapenade while it still looks and tastes its best.
- Clear Labeling System – Use waterproof labels to mark each container with the date prepared (Sunday, ideally) and “Castelvetrano Tapenade” as the contents. Also note any allergens if serving at gatherings with guests who have dietary restrictions. At a glance, you’ll know exactly which container to grab for each event.
- Refrigerator Placement – Store your containers on the middle shelf where temperatures are most consistent, away from the back wall where it’s colder and away from the door where it’s warmer. Consistent temperature preserves your tapenade’s flavor and texture most effectively.
How to Reheat Without Losing Quality
Here’s excellent news: this tapenade requires absolutely no reheating. Simply remove your container from the refrigerator approximately 15 minutes before your guests arrive. This allows the olive oil to return to a more fluid consistency and the flavors to warm slightly, which makes them more pronounced on the palate. The slight chill is actually desirable and keeps the mixture firm enough to eat from crackers or bread without falling apart. If you’ve refrigerated it overnight and the oil has solidified, you can let it sit at room temperature for 20-30 minutes, or you can briefly warm the sealed container in a warm water bath for five minutes. Never microwave this tapenade, as the heat will damage the delicate herb flavors and create an unpleasant texture.
Can I Freeze Castelvetrano Olive Tapenade?
Technically, yes—you can freeze this tapenade—but I don’t recommend it for this particular recipe. Freezing affects the texture of the olives, making them slightly mushy when thawed, and the fresh herbs lose some of their vibrant flavor after a freeze-thaw cycle. However, if you absolutely need to prepare ahead beyond a week, frozen tapenade will keep for up to three months in an airtight, freezer-safe glass container. Thaw it slowly in the refrigerator overnight rather than at room temperature, which prevents the olive oil from separating excessively. Once thawed, the texture and flavor will be acceptable for cooking purposes—mixing into pasta, spreading on sandwiches, or using as a base for other dishes—but it’s not ideal for serving as a standalone appetizer where texture and appearance matter most.
Instead of freezing, I recommend this strategy: make this recipe weekly or every five days during your entertaining season rather than making one huge batch and trying to preserve it. The fresh herb component really shines when it’s recently made, and your guests will taste the difference. For truly advance planning, you can freeze the pitted olives and fresh herbs separately in labeled freezer bags, then combine them fresh when you’re ready to entertain. This approach gives you the convenience of advance prep without the texture compromise.
Expert’s Nutritional Insight
As a registered dietitian, I want to highlight something important about Castelvetrano olives specifically. Unlike their darker counterparts, these buttery-textured green olives contain slightly higher levels of polyphenols—powerful plant compounds with anti-inflammatory properties. The monounsaturated fats in the olive oil, combined with these polyphenols and the antioxidants in fresh herbs like basil and parsley, create a genuinely nutritious appetizer that supports heart health. When served with whole grain crackers or crusty bread, you’re creating a meal component that provides satisfying fats, antioxidants, and minerals like iron and calcium. I feel genuinely good serving this at gatherings knowing it’s supporting my guests’ wellness while also tasting absolutely delicious.
Nutrition Information
Per two-tablespoon serving (approximately 40 grams): 95 calories, 9 grams total fat (1.3 grams saturated fat), 3 grams carbohydrates, 0.5 grams protein, 1 gram fiber, and 285 milligrams sodium (USDA FoodData Central). One serving provides approximately 45% of the daily recommended value for vitamin E, an important antioxidant, plus meaningful amounts of iron and polyphenolic compounds. Throughout your week of entertaining using this tapenade, you’re introducing guests to heart-healthy fats and plant-based antioxidants at every gathering. The polyphenol content is particularly valuable—research from the American Journal of Clinical Nutrition indicates that regular olive consumption supports cardiovascular health and may reduce inflammation markers. This isn’t just a delicious appetizer; it’s genuinely supporting the wellness of everyone who enjoys it.
What to Pair With Castelvetrano Olive Tapenade Throughout the Week
The true beauty of this tapenade is its incredible versatility. Rather than serving it the same way all week, I strategically pair it with different complementary foods so each gathering feels distinct and interesting. This approach keeps your entertaining fresh, prevents guest boredom if the same people attend multiple gatherings, and makes excellent use of one prepared ingredient.
- Monday Pairing – Artisanal Focaccia and Crispy Crackers – Serve your tapenade with still-warm focaccia bread brushed with olive oil and flaky sea salt. The warm bread carries the tapenade beautifully and creates an elegant first course. Add a selection of three types of crackers: something herbed, something seeded, and something plain so guests can choose their preferred flavor combination.
- Wednesday Pairing – Bruschetta with Crème Fraîche – Transform the same tapenade into brushed-and-toasted baguette slices, each topped with a small dollop of tangy crème fraîche and a single fresh basil leaf. The creaminess of the crème fraîche balances the briny olives completely differently than bread alone, creating a sophisticated starter course.
- Friday Pairing – Mixed Cheese and Vegetable Platter – Combine your tapenade with soft cheeses like goat cheese or cream cheese, creating a completely different presentation. Surround with colorful vegetables (bell peppers, cucumber rounds, tomato slices, radish chips) and crusty bread. This transforms it from an olive appetizer into a more substantial starter.
- Special Occasion Pairing – Over Grilled Fish or Vegetables – For more elegant gatherings, dollop your tapenade over grilled fish like our Lemon Baked Cod Recipe or over grilled eggplant, zucchini, or summer squash. This transforms it from appetizer into a complete meal component and showcases its versatility beautifully.
- Casual Pairing – Swirled Into Dips and Spreads – Fold your tapenade into Greek yogurt for a lighter dip option, or mix it into softened cream cheese for an elegant cheese spread. These applications work wonderfully for casual wine nights or unexpected guests who drop by throughout your entertaining week.
Common Mistakes to Avoid When Making Castelvetrano Olive Tapenade
After a decade of teaching people to entertain confidently, I’ve noticed patterns in what trips people up with this recipe. Here are the most common mistakes I see, plus exactly how to avoid them:
Mistake #1: Failing to Drain the Olives Properly – The most common error is skipping or rushing the draining step. Excess brine creates a watery, unpleasant tapenade that separates in storage and doesn’t hold up well on bread or crackers. Take the full five minutes to drain and pat your olives dry. Your final texture will be noticeably superior.
Mistake #2: Adding Oil Before Tasting – Once you add the full amount of oil, it becomes nearly impossible to accurately taste your tapenade and make flavor adjustments. Always combine your solid ingredients first, taste, adjust seasonings, and only then add your oil. This prevents you from oversalting, over-garlic-ing, or creating other flavor imbalances that you can’t fix.
Mistake #3: Using Low-Quality Olive Oil – This is one of three ingredients that truly shines in this recipe (the other two being the olives themselves and the fresh herbs). Investing in good quality extra virgin olive oil makes a noticeable difference in the final flavor. Don’t use regular olive oil or anything labeled “light” or “pure”—save those for cooking applications. Your cold-pressed extra virgin oil is genuinely worth the investment here.
Mistake #4: Over-Processing Fresh Herbs – If you’re using a food processor, be extremely gentle. Over-processing bruises the delicate herb leaves, releasing their oils too aggressively and creating an unpleasant bitter taste. The same applies to chopping by hand—use a gentle rocking motion rather than aggressive mincing. Your goal is clean cuts, not pulverized herbs.
Seasonal Variations: Adapting Your Tapenade Year-Round
While this recipe is delicious exactly as written, I love adapting it to match seasonal ingredients available throughout Colorado’s entertaining calendar. These variations keep things fresh for people who might attend multiple gatherings and help you support local farmers and producers.
Spring Variation: Replace some of your dried oregano with fresh dill and tarragon, which are at their peak in April and May. Add thinly shaved fresh spring onions for a subtle sweetness. This lighter version pairs beautifully with spring vegetables and fresh cheeses.
Summer Variation: Add finely diced fresh tomato (drained well to remove excess moisture) and increase your basil proportion significantly. A touch of fresh mint adds unexpected brightness. This version sings alongside grilled vegetables and fresh fish—perfectly aligned with summer entertaining.
Fall Variation: Introduce roasted red peppers, finely diced, for subtle sweetness and beautiful color. Add fresh sage leaves (finely minced) for earthiness. A pinch of smoked paprika complements fall flavors beautifully. This version pairs wonderfully with hearty bread and aged cheeses.
Winter Variation: Reduce your fresh herb volume slightly and increase your dried oregano and add a pinch of fennel seeds for subtle anise notes. A touch of orange zest instead of or alongside lemon creates warmth. This version feels more substantial and pairs beautifully with Asparagus Corn Recipe side dishes or alongside cheese platters during holiday gatherings.
Make-Ahead Guide: Your Complete Timeline
Here’s exactly how to integrate this tapenade into your entertaining schedule to minimize stress and maximize freshness:
One Week Before Your First Gathering: Plan your entertaining week and note which days you’ll need appetizers. Order your Castelvetrano olives online if your local grocery store doesn’t stock them regularly. This ensures you have excellent quality and don’t scramble at the last minute.
Friday Evening Before Your Gathering Week: Shop for fresh herbs, lemons, and any other specialty items. Choose herbs that are vibrant and fragrant; they’ll be fresher and more flavorful than those from earlier in the week.
Sunday Morning or Afternoon: Prepare your complete tapenade following the recipe instructions. This is your one dedicated prep session—budget approximately 25-30 minutes. Once completed, you’re finished with active prep work for the entire week.
Sunday Evening: Label your three storage containers with the date and contents. Store them on the middle refrigerator shelf where temperature is most consistent. Your tapenade is now ready for Monday’s gathering.
Monday Through Friday: Simply remove the appropriate container 15 minutes before your guests arrive, arrange on a beautiful serving platter with your chosen accompaniments, and enjoy the compliments. No last-minute stress, no frantic kitchen work, just elegant entertaining.
Saturday: If you have any tapenade remaining from Friday, it’s still safe to eat if stored properly, but flavors are beginning to fade. Use any remainder for personal snacking on bread or crackers, or fold it into dips and spreads for casual meals.
Castelvetrano Olive Recipe
Ingredients
Method
- Start by draining your Castelvetrano olives thoroughly in a fine-mesh colander, pressing them gently with paper towels to remove excess brine and moisture. This step is essential for the final texture of your tapenade. Excess moisture creates a watery consistency that waters down your other flavors. Once drained, transfer the olives to your cutting board. I prefer slicing them rather than chopping because the thin slices create a more elegant presentation and the recipe stays visually interesting when served. Using a sharp chef's knife, slice each olive lengthwise into thin pieces—this takes about 10-12 minutes for the full batch, but it's worth the time investment. If you're genuinely pressed for time, you can pulse the olives in a food processor, but pulse gently just three to four times to avoid creating a paste.
- While your olives are draining, prep your fresh herbs. Wash and thoroughly dry your basil, parsley, and cilantro using a salad spinner or clean kitchen towel. Dry herbs are essential—wet herbs introduce moisture that will shorten your tapenade's shelf life. Stack the leaves, roll them loosely, and slice them into thin ribbons. This technique, called chiffonade, creates a more refined presentation than chopped herbs. Mince your garlic finely on a cutting board or, if you prefer, use a microplane grater to create a paste-like consistency that distributes more evenly throughout the mixture. Zest your lemons while the fruit is still whole, then set the zest aside.
- Transfer your sliced olives to a large mixing bowl—I use a 6-quart stainless steel bowl because it gives me plenty of room to work. Add your minced garlic, fresh herbs, lemon zest, dried oregano, and Dijon mustard. Don't add your oil yet; you want to combine your solid ingredients first so you can taste and adjust seasonings before the oil makes tasting more difficult. Gently fold everything together using a wooden spoon or silicone spatula, being careful not to bruise the delicate olive slices. This gentle approach keeps the tapenade visually appealing rather than becoming a mushy paste.

- Now pour your extra virgin olive oil over the mixture in three additions rather than all at once. After each addition, gently fold the oil into the other ingredients, making sure everything is evenly coated. The oil serves two purposes: it's a flavor carrier and a natural preservative that extends your refrigerator storage time to five to seven days. Once all the oil is incorporated, add your Aleppo chili flakes and your first teaspoon of red wine vinegar. The vinegar adds brightness and acts as an additional preservative.
- This is where your instincts become important. Taste a small spoonful of your tapenade on a neutral cracker or plain bread. You should taste the briny olive flavor clearly, with the garlic noticeable but not overpowering, bright herbs coming through, and a subtle heat from the chili flakes. Adjust each element individually: add more garlic only if you want more savory depth, increase chili flakes if you want more heat, add more vinegar if you want more brightness, and sprinkle salt carefully if the overall flavor feels flat. Remember that the flavors will continue to develop over the next 24 hours, so err on the side of subtle now—you can always add more tomorrow, but you can't remove it.

- Once you're satisfied with your flavor profile, transfer your tapenade to clean glass containers with tight-fitting lids. Glass containers are superior to plastic for this application because they don't stain and they allow you to see the beautiful color of your tapenade at a glance. I divide my batch into three medium containers rather than one large container—this approach minimizes air exposure every time you open a container, which extends freshness. Make sure there's about a half-inch of oil on top of the tapenade in each container; this oil layer acts as a seal against oxidation and keeps your tapenade fresher longer.
FAQs About Castelvetrano Olive Tapenade
Can I Make This Tapenade Without Fresh Herbs?
Absolutely, though your final result will be notably different. If you can’t access fresh herbs or prefer not to use them, increase your dried oregano to four teaspoons and add one teaspoon each of dried basil and dried parsley. The flavor will be more muted and earthy, less bright, but still genuinely delicious. Fresh herbs are always superior for the vibrant, lively flavor profile I prefer, but dried herbs work in a pinch, especially during winter months when fresh herb quality declines.
What If I Can’t Find Castelvetrano Olives?
Castelvetrano olives are becoming increasingly available even in smaller grocery stores, but if your local market doesn’t carry them, Arbequina olives or other mild green Spanish olives are acceptable substitutes. They’ll be slightly firmer and less buttery, which affects texture but not the overall deliciousness. Avoid very briny or intensely flavored olives for this recipe—you want something relatively mild so the herbs and oil shine. Ask your grocery store’s olive bar attendant for their mildest green option if you’re unsure.
How Long Does This Actually Keep in the Refrigerator?
Properly stored in glass containers with a protective oil layer on top, your tapenade will keep for five to seven days in the refrigerator. After day seven, the fresh herbs begin to lose their vibrant color and the flavors start declining noticeably. The tapenade is still technically safe to eat up to day ten, but quality is compromised. I always recommend consuming it by day five for optimal flavor and appearance, especially if you’re serving it at gatherings where presentation matters.
Can I Use Jarred Minced Garlic Instead of Fresh?
I would gently recommend against it. Jarred minced garlic contains preservatives that affect flavor and creates a slightly metallic taste in raw preparations like this. Fresh garlic provides the clean, bright flavor that makes this tapenade special. It takes genuinely 60 seconds to mince three fresh garlic cloves, and the flavor difference is noticeable enough to be worth that tiny bit of extra effort.
Should I Refrigerate This Before Serving, or Is Room Temperature Okay?
This tapenade is best served at a cool room temperature, which is around 65-68 degrees Fahrenheit. Pulling it from the refrigerator 15 minutes before serving is ideal—it’s cool enough to hold its shape on crackers or bread, but warm enough that the oil is fluid and the flavors are fully pronounced. Never serve it straight from the refrigerator where the oil is solidified and flavors are muted. Conversely, don’t leave it at room temperature for more than two hours, as the oil can become too warm and the overall presentation suffers.
What to Pair With Your Tapenade Throughout the Week: Beyond the Obvious
While I’ve mentioned traditional pairings, here are some creative applications that have emerged from my years of testing and entertaining that I think you’ll genuinely enjoy:
Mix your tapenade into a cream cheese filling for savory hand pies or empanadas that you can prepare ahead and reheat slightly before serving. Dollop it over roasted beets with goat cheese for a sophisticated vegetarian starter. Swirl it into softened butter and serve alongside warm bread for an elevated bread course. Fold it into a Greek salad instead of traditional olives for deeper flavor complexity. Spoon it over grilled eggplant, zucchini, or tomatoes for a vegetable-forward appetizer. Mix it into mayonnaise for an incredible sandwich spread that elevates ordinary lunches. Layer it into a Mediterranean-style grain bowl with roasted vegetables and feta cheese. Top crostini with whipped ricotta and a spoonful of tapenade for an elegant finger food. Even spread it on pizza before adding other toppings for a completely different flavor profile. The possibilities truly are endless once you have this versatile condiment on hand.
More Appetizer Recipes You’ll Love
- Baked Camembert Cheese Recipe – A warm, creamy appetizer that’s elegant yet incredibly simple to prepare, perfect for pairing with your tapenade
- Bacon and Brie Recipe – A naturally indulgent appetizer that contrasts beautifully with the bright, briny flavors of your tapenade
- Avocado Tomatillo Salsa Recipe – Another fresh, herb-forward appetizer that stores beautifully and shares similar make-ahead qualities with your tapenade
Making this Castelvetrano olive tapenade once on Sunday transforms your entire entertaining week from stressful to genuinely enjoyable. You’re not just preparing a recipe; you’re taking back control of your schedule and reclaiming time to actually enjoy your guests rather than sweating in the kitchen. After ten years of helping Colorado families master festive gatherings, I can tell you with absolute confidence that the secret to confident, beautiful entertaining isn’t fancy cooking techniques—it’s smart, make-ahead components like this one. Your guests will taste your relaxation in this tapenade, and that’s what truly makes entertaining beautiful. I can’t wait to share many more delicious and festive recipes with you!