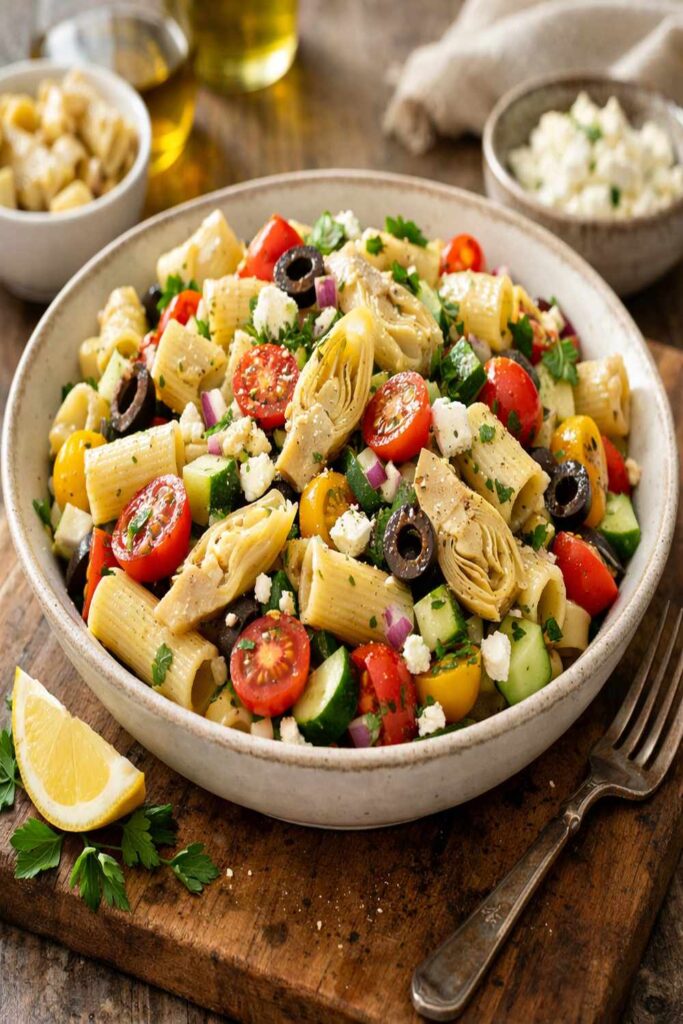
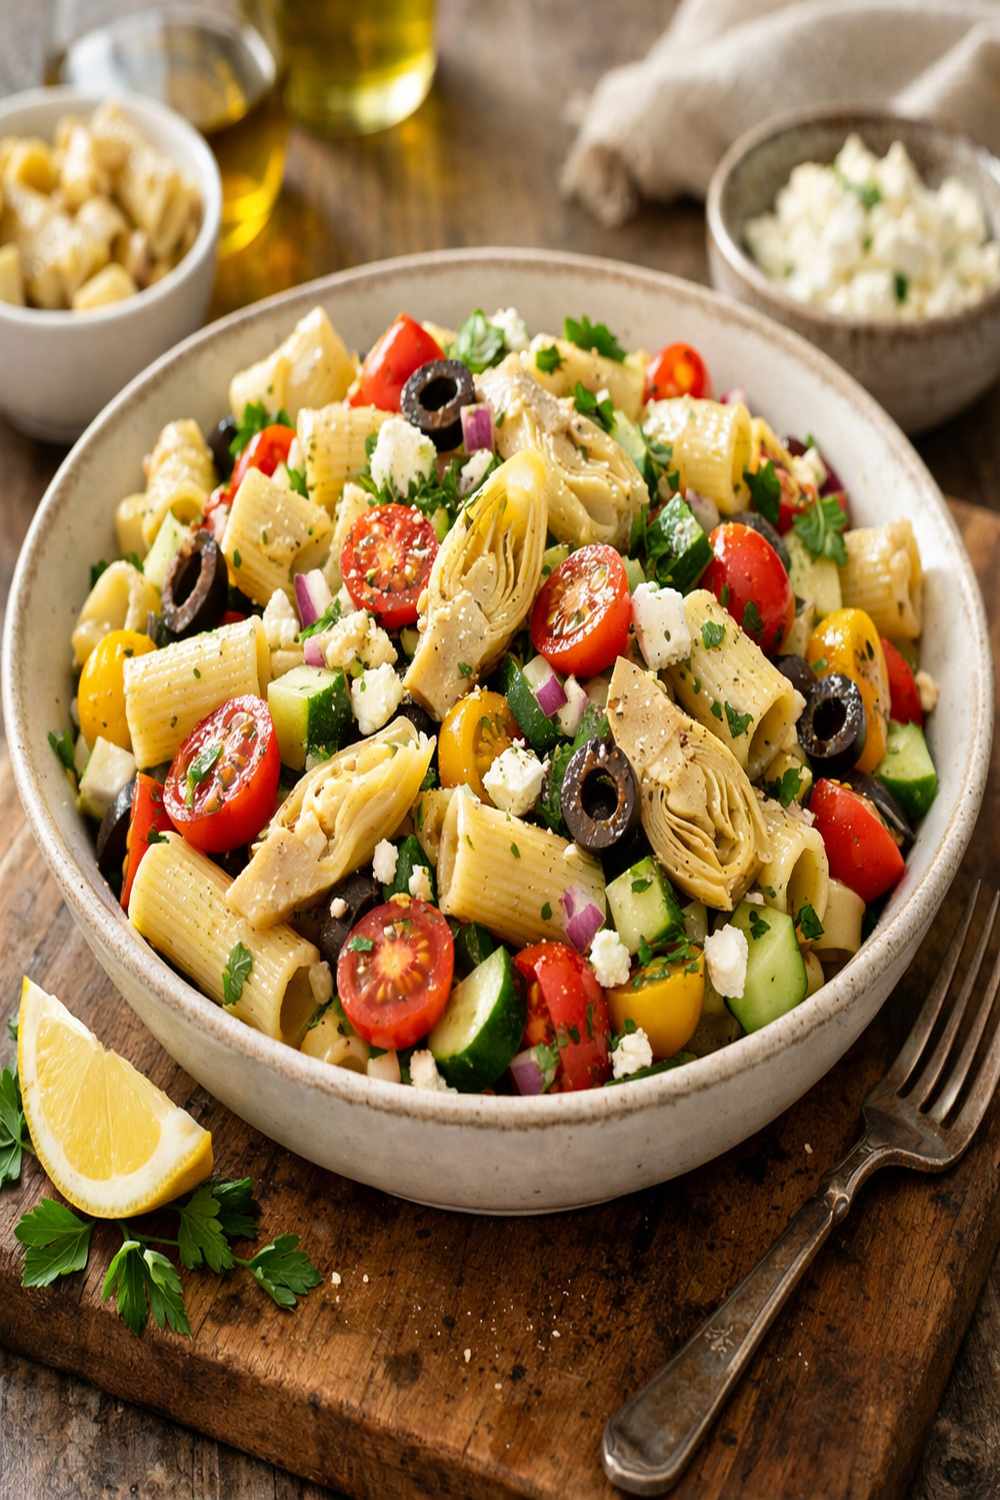
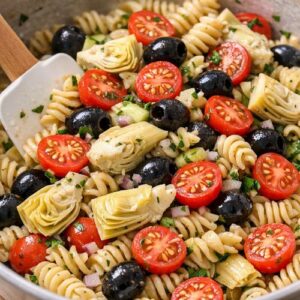
Artichoke Pasta Salad Recipe
This post contains affiliate links. As an Amazon Associate I earn from qualifying purchases.
Every holiday season, I watch hosts stress over bringing a dish that actually holds up during a potluck, tastes fresh rather than tired, and somehow manages to please both the adventurous eaters and the “I stick to classics” crowd. I spent years watching family members show up to my mother’s Denver gatherings with store-bought pasta salads that turned mushy by the time dessert arrived. Sound familiar? That’s exactly why I developed this artichoke pasta salad recipe—it’s a showstopper that gets better as it sits, celebrates fresh ingredients rather than hiding behind heavy mayonnaise, and honestly, it’s become my secret weapon for every celebration from small friendsgivings to large family reunions.
As a registered dietitian who’s spent the last decade helping Colorado families navigate festive meals without stress or guilt, I’ve learned that the best recipes are the ones that actually work in real life. This isn’t just a pasta salad—it’s an accessible, budget-friendly celebration of Mediterranean flavors that comes together in under 30 minutes of active time and tastes even better the next day.
Why Your Pasta Salad Falls Flat (And How to Fix It)
Most pasta salads fail for one simple reason: they’re drowned in heavy dressing that makes the noodles gummy and dulls every other ingredient into submission. I can’t count how many times I’ve seen beautiful fresh produce completely overwhelmed by an ocean of thick, creamy dressing that somehow manages to be both bland and overpowering at the same time.
The second saboteur? Timing. When you toss warm pasta with dressing immediately after cooking, you’re creating a starchy, bloated mess. The pasta continues absorbing liquid even after you’ve dressed it, which is why most homemade versions taste delicious on day one and like cardboard-soaked sponges by day two.
Here’s where my approach differs fundamentally. I cool the pasta completely before combining it with other ingredients, then use a light Italian-style dressing that coats rather than drowns. This means every element—the tender artichoke hearts, the briny olives, the peppery pepperoni—maintains its own identity while contributing to a cohesive whole. The result is a salad that tastes fresh and vibrant on serving day and somehow becomes even more flavorful by the next afternoon as the flavors meld together.
What Makes This Artichoke Pasta Salad Recipe Different?
The secret lies in respecting the temperature and timing of each component. By cooling the cooked pasta in ice water rather than letting it sit at room temperature, I’m stopping the cooking process immediately and preventing the exterior from becoming gluey. This technique is something I learned years ago when training with other nutrition professionals who specialize in large-scale meal preparation.
But here’s the professional insight that most home cooks miss: the quality of your dressing matters far more than the quantity. I use a light vinaigrette-style Italian dressing rather than creamy ranch or mayonnaise-based versions. This allows the salad to absorb flavor without becoming dense or heavy. For a crowd of eight people, you need just enough dressing to coat, not to submerge.
Finally, I build this salad in layers based on texture and density rather than just dumping everything together. Heartier ingredients like the cooled pasta and mozzarella pearls go in first, creating a foundation that can support the more delicate artichoke hearts without crushing them. This small technique prevents mushiness and keeps every bite interesting.
Before You Start: What You Need to Know
There are two critical pieces of knowledge that separate a “good” pasta salad from one that becomes the first dish to disappear at your gathering. Most recipes skip over these entirely, and that’s exactly why they fail.
- Ice water is your best friend—not optional, essential. After draining your cooked pasta, immediately rinse it under cold running water, then toss it with a small handful of ice cubes. This stops the cooking completely and prevents the starch from binding everything into a gluey mass. I learned this trick from professional caterers in Boulder who needed to prepare dozens of pasta salads in advance.
- Pat your ingredients dry before combining them. Excess moisture from canned artichokes or jarred olives will dilute your dressing and make the salad watery within hours. Use paper towels to gently blot each ingredient, particularly the mozzarella pearls. This small step is the difference between a salad that looks fresh on serving day versus one that looks like something pooled at the bottom of a bowl.
The Ingredients
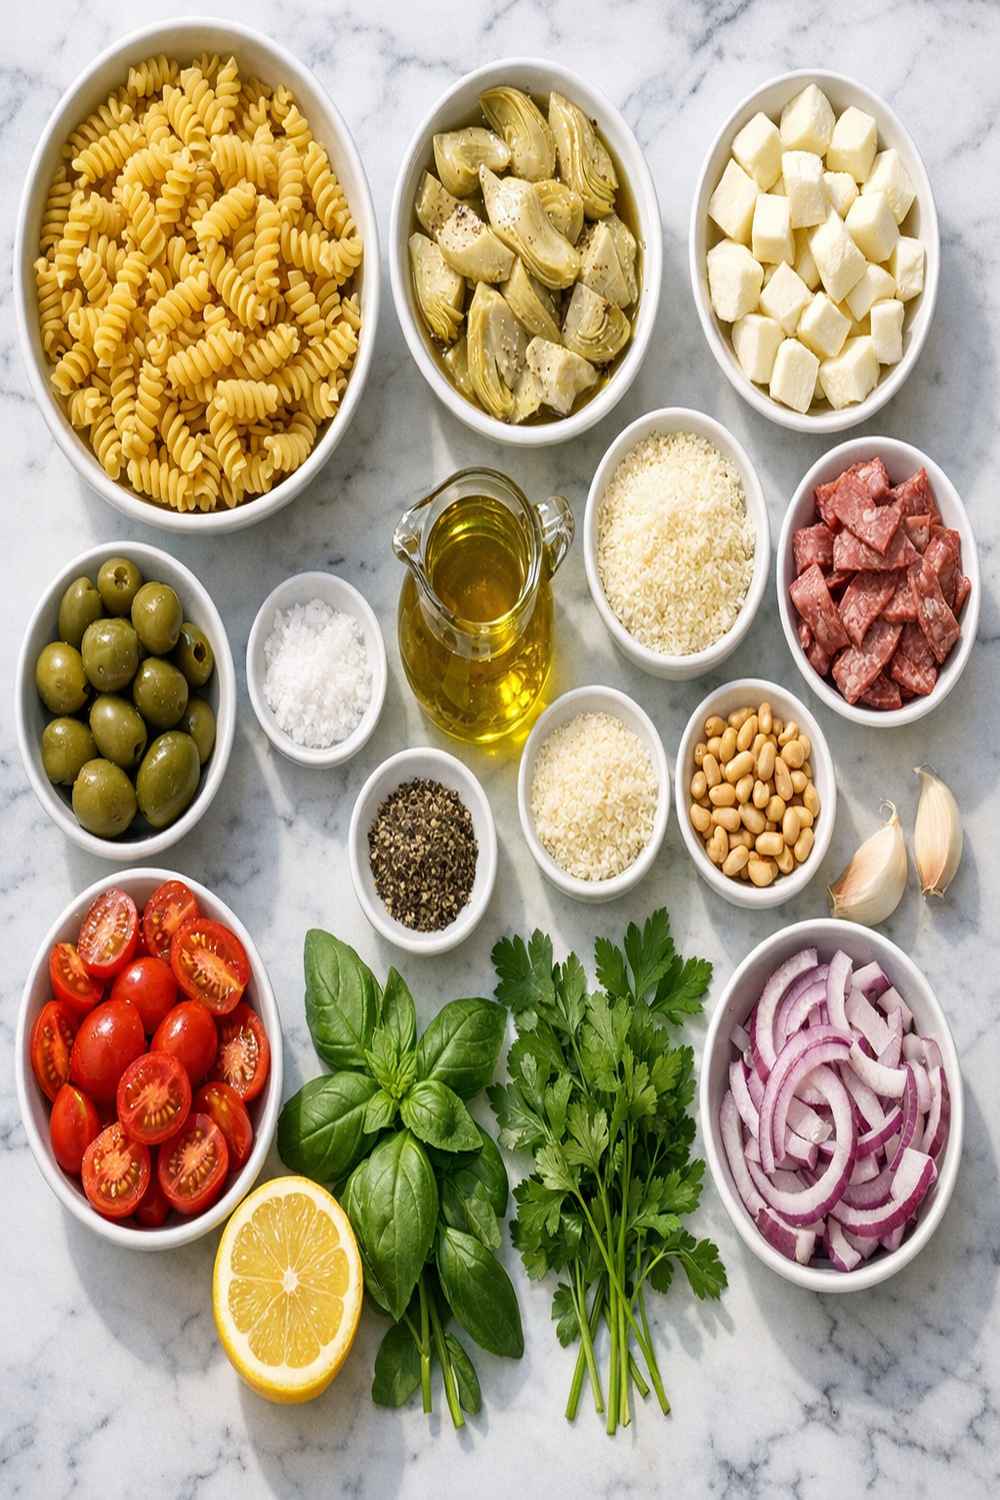
I’ve chosen each ingredient in this recipe deliberately, thinking about how it contributes nutritionally and how it plays with the other flavors. This isn’t a “throw whatever you have on hand” situation—every component earns its place on this list.
- 1 cup fresh mozzarella pearls (creates little pockets of creaminess without making the salad heavy)
- 1 teaspoon dried oregano (amplifies the Mediterranean feel and adds herbal notes that make this taste restaurant-quality)
- 1 cup fresh cherry tomatoes, halved (adds color, natural acidity to balance the dressing, and keeps everything tasting bright)
- 14 ounces canned or jarred artichoke hearts, quartered (packed with fiber and antioxidants while adding a sophisticated Mediterranean flavor)
- ¾ cup black olives, pitted and halved (brings salinity and complexity that makes people ask “what is that amazing flavor?”)
- ¾ cup deli ham, diced (lean protein that doesn’t overpower the more delicate artichoke flavor)
- ¾ cup pepperoni slices, chopped (the umami richness here transforms this from simple to celebratory)
- 2 cups light Italian dressing with herbs (I prefer versions with less than 5 grams of fat per 2-tablespoon serving for a fresher taste)
- 24 ounces garden spiral pasta (the ridged shape holds dressing beautifully and creates visual interest)
- 2 tablespoons fresh lemon juice (brightens everything and prevents oxidation, keeps those cherry tomatoes looking vibrant)
Expert’s Nutritional Tip: The artichoke hearts deserve special mention here. In my decade working with families around Colorado, I’ve noticed most people view pasta salad as a guilt-inducing indulgence. But this version? Artichokes bring inulin, a prebiotic fiber that supports digestive health, plus they’re naturally low in calories while being incredibly filling. This means you can enjoy a substantial portion without any nutritional remorse.
Step-by-Step: How to Make Artichoke Pasta Salad Recipe Without Fail
I’m going to walk you through this process with complete confidence because I’ve made this salad hundreds of times—for small family dinners, for large holiday potlucks, and for catering events across Denver and Boulder. Once you understand the “why” behind each step, you’ll be able to make this in your sleep.
Step 1: Cook Your Pasta to Perfect Doneness (Not Beyond)
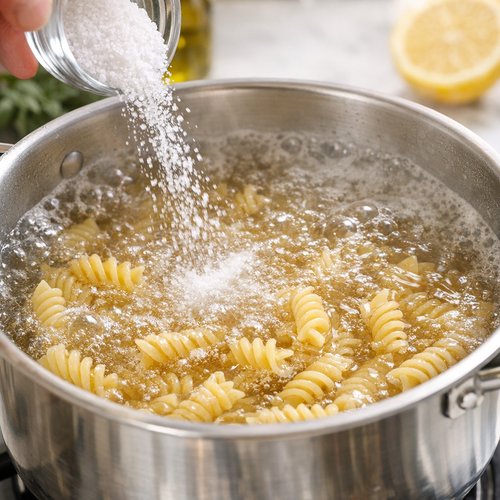
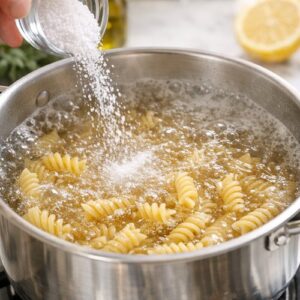
Bring a large pot of salted water to a rolling boil. The salt is important—it seasons the pasta itself rather than relying on dressing for all flavor. Add your spiral pasta and cook according to package directions, but here’s my professional advice: remove it one full minute before the package says it’s done. You’re aiming for al dente, which means there’s still the tiniest bit of resistance when you bite into a strand. This matters tremendously because the pasta will continue to soften slightly as it cools and then sits with the dressing.
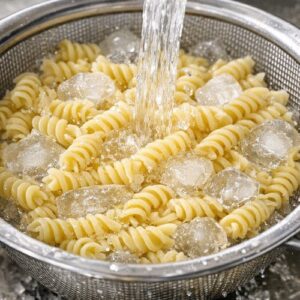
Step 2: Shock Your Pasta in Ice Water
This is the step that separates good from exceptional. Drain your cooked pasta into a colander immediately, then rinse it under cold running water while stirring gently with your fingers. Do not skip this step thinking warm pasta will cool on its own. Warm pasta continues cooking from residual heat, and the starch particles are actively trying to bind together into a gluey mess. Once the water running through is completely cold, toss the pasta with a handful of ice cubes and let it sit for 3-4 minutes, stirring occasionally. This halts all cooking instantly.

Step 3: Prepare Your Vegetables and Proteins
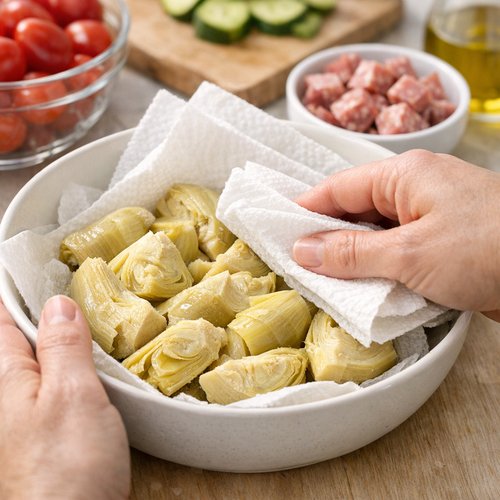
While your pasta is cooling, this is the perfect time to prep everything else. Drain your canned artichoke hearts completely and pat them dry with paper towels—this step prevents your salad from becoming watery. Cut any particularly large pieces into more uniform quarters so they’re not overwhelming in any single bite. Halve your cherry tomatoes lengthwise (this looks more elegant than random chops and helps them stay intact rather than bursting into mush). Pit your black olives if they’re not already pitted, and halve them. Dice your deli ham into ¼-inch pieces and chop your pepperoni into similar-sized pieces. Everything should be roughly the same size so the salad feels balanced and intentional.
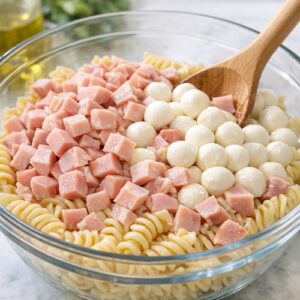
Step 4: Combine Your Cooled Pasta With Heartier Ingredients First
Transfer your completely cooled pasta to a large mixing bowl. Add the mozzarella pearls and the deli ham pieces. Toss gently to distribute evenly. By adding the heartier, sturdier ingredients first, you’re creating a foundation that can support the more delicate elements without crushing them. This is a technique I use constantly when creating multi-component salads—always build from sturdy to delicate.

Step 5: Add Artichokes, Olives, and Tomatoes With Intentionality
Now add the artichoke hearts, black olives, and halved cherry tomatoes. Toss everything together very gently—I use a rubber spatula rather than tongs or my hands because it’s kinder to the vegetables. You’re looking for even distribution without manhandling anything into submission. This should take about 20 seconds of gentle folding, not vigorous mixing.
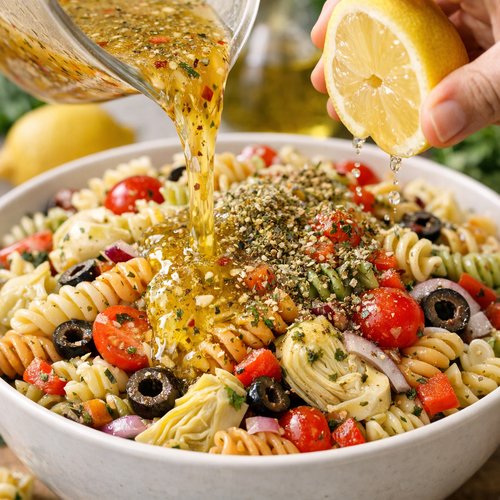
Step 6: Dress Your Salad (Not Drown It)
Pour your 2 cups of Italian dressing evenly over the salad, then add the fresh lemon juice and dried oregano. Here’s where most home cooks make their biggest mistake: they think “more dressing equals more flavor,” when actually the opposite is true. Start with 1½ cups of dressing. Toss gently but thoroughly, using that rubber spatula to fold everything together until the dressing is evenly distributed. Taste a bite. Does it taste balanced, or does the dressing overpower the other flavors? If you need more richness, add the remaining ½ cup and toss again. This conservative approach prevents you from creating a dressing-logged disaster that can’t be fixed.
Step 7: Chill Before Serving
Cover your bowl tightly with plastic wrap or transfer to a covered container and refrigerate for at least 2 hours, though overnight is genuinely better. This resting period allows the flavors to meld together beautifully. The pasta continues to absorb subtle flavors from the dressing, the artichokes soften slightly, and everything becomes more cohesive. I usually prepare this salad the morning of my event, which means I can check it off my list early and focus on other components without stress.

The Most Common Mistakes (And How to Avoid Them)
- Using warm pasta straight from the pot. Warm pasta actively absorbs dressing like a sponge and becomes gluey within hours. The starch is still swollen and reactive. Always cool your pasta completely in ice water before combining with other ingredients. I’ve seen this single mistake transform a beautiful salad into something nobody wants to eat by the time the main course is finished.
- Over-dressing the salad. “More is better” is the instinct that ruins most homemade pasta salads. You don’t need to submerge every noodle in dressing. Start conservative—you can always add more, but you can’t remove it. I recommend starting with 1½ cups of dressing for this recipe and adding more only if needed after tasting. A well-dressed salad should taste flavorful but not slick or heavy.
- Skipping the pat-dry step with your vegetables. Excess moisture from canned artichokes and jarred olives absolutely will dilute your dressing and create pooling liquid within hours. Use paper towels to gently blot each drained ingredient. This takes maybe 90 seconds and is the difference between a salad that looks fresh on day two versus one that looks abandoned.
- Mixing everything with your hands or aggressive tossing utensils. Your cherry tomatoes will burst, your artichoke hearts will break apart, and your mozzarella pearls will become smashed. Use a rubber spatula or salad spoon and fold gently. Everything should feel intentional and tender, not chaotic.
How Do I Know When It’s Done?
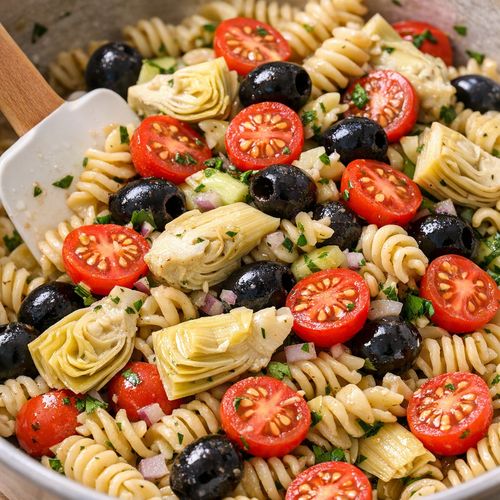
There’s no guesswork here—you’ll know when this salad is ready to serve. The pasta should be completely cool to the touch, never warm or even room temperature. When you scoop a serving, the dressing should be evenly distributed throughout without pooling at the bottom of the bowl—this tells you the ingredients absorbed the flavor evenly. Each component should maintain its own identity: you should see distinct artichoke hearts, recognizable pepperoni pieces, visible mozzarella pearls. Nothing should look mushed or merged into a homogeneous paste.
Taste a bite before serving to any crowd. The flavors should feel bright and layered—you taste the herbaceous oregano, the briny olives, the slight tang from the lemon juice, the richness from the pepperoni, and the earthiness from the artichokes. If everything tastes like “dressing with pasta,” you didn’t use enough restraint and need to remember this for next time. If it tastes bland, you may need to add a pinch more oregano or a touch more lemon juice (dressing can’t be added back, but small seasoning adjustments are forgiving).
Troubleshooting: When Things Go Wrong
- Your salad looks watery or has liquid pooling at the bottom. This happens when you didn’t pat your vegetables dry before combining them, or when you added too much dressing. If you’re more than 30 minutes from serving, carefully pour off some of the excess liquid using a slotted spoon to scoop salad while leaving liquid behind. For future reference, remember the pat-dry step—it’s small but transformative. If this happens again, invest in a salad spinner for rinsed vegetables, which removes excess moisture far more efficiently than paper towels alone.
- The pasta tastes mushy or gluey instead of tender with a slight bite. You likely cooked the pasta too long or didn’t cool it properly. For this batch, honestly, there’s no fix—you’ll need to start over. For next time, remove the pasta one full minute before the package directions suggest, and absolutely must use ice water for cooling. Room temperature water won’t stop the cooking process quickly enough.
- Everything tastes overly dressing-forward and the other flavors are muted. You used too much dressing. This is fixable: add another ½ cup of cooled cooked pasta to your existing mixture, which will absorb some dressing and restore balance. Alternatively, add more artichoke hearts, olives, and tomatoes in the same proportions—this increases flavor complexity without being wasteful.
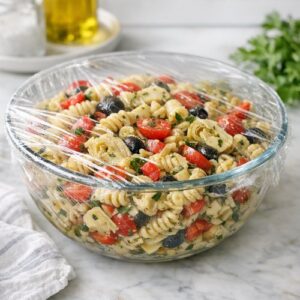
Can I Store Artichoke Pasta Salad Recipe?
Yes, and honestly this recipe improves with storage. Refrigerate in an airtight container for up to 3 days. The flavors continue developing, the pasta becomes more flavorful as it absorbs the dressing, and everything becomes more cohesive. I always make this salad at least the morning before I need it, and I’ve successfully prepared it 24 hours in advance for large events.
Just before serving, give it a gentle stir and taste again—you might find you want to add a splash more lemon juice or a whisper more oregano to brighten flavors that have mellowed slightly. Sometimes I add a handful of fresh arugula or baby spinach right before serving for added freshness and a slight peppery note.
Do not freeze this salad. The texture of the pasta becomes unpleasant when thawed, and the vegetables lose their integrity. This is a refrigerator-only preparation.
Make-Ahead Guide for Holiday Hosting: Here’s how I structure my prep schedule for major gatherings. Two days before the event, I purchase all ingredients and store them according to package directions. The morning of the event or the evening before, I cook the pasta, cool it completely, and store it in the refrigerator in a separate container. I prep all vegetables—washing, draining, and patting dry—and store them in labeled containers. About 8-10 hours before serving, I combine everything and dress the salad, which gives flavors time to develop. This approach means I’m not stressed the day of the event, and I can focus on hot components and last-minute details.
Nutrition Information
Per the USDA nutrient database, one serving (approximately 1½ cups) of this artichoke pasta salad contains roughly 385 calories, 14 grams of protein, 42 grams of carbohydrates, 18 grams of fat, and 6 grams of dietary fiber. The fiber content is particularly significant—it comes primarily from the artichoke hearts and whole grain pasta, making this a genuinely satisfying dish that keeps you feeling full.
What I love about this salad nutritionally is that it’s not a “light” salad that leaves you hungry an hour later. The combination of complex carbohydrates (pasta), lean protein (ham and pepperoni), healthy fats (olives and mozzarella), and fiber-rich vegetables creates a dish that stabilizes blood sugar and keeps energy consistent through a long day of holiday activities.
The artichoke hearts deserve special mention: they’re among the most nutrient-dense vegetables available, containing inulin (a prebiotic that supports gut health), antioxidants that fight inflammation, and potassium that supports heart health. In my professional experience, most people view pasta salad as indulgent. But this version? It’s genuinely wholesome.
What Can I Serve With Artichoke Pasta Salad Recipe?
This salad is wonderfully flexible depending on your gathering and season. I’ve served it alongside grilled proteins, as part of a vegetarian spread, and as the star of a potluck celebration. Here are my favorite pairings that I’ve tested countless times:
- Grilled chicken or fish. The bright, Mediterranean flavors of this salad pair beautifully with simply prepared proteins. Try it with herb-grilled chicken breast or a light garlic-based preparation. The salad’s freshness balances richer proteins perfectly.
- Crusty bread and whipped herb butter. Serve with thick slices of Italian bread and butter infused with fresh parsley and garlic. People will use this bread to soak up every last drop of dressing from their plate—it’s that good.
- Grilled vegetables like asparagus with corn for seasonal gatherings. Summer celebrations call for complementary grilled vegetables that maintain the fresh, Mediterranean theme.
- A simple green salad with vinaigrette. Don’t think pasta salad has to be the only salad on your spread. A light arugula or mixed green salad provides textural contrast and additional vegetables for balanced nutrition across your meal.
- Garlic bread or focaccia. For less formal gatherings, garlic bread is always welcome and pairs deliciously with this salad.
- For seafood-forward celebrations, try pairing with garlic shrimp prepared in 20 minutes for an elegant protein option.
Artichoke Pasta Salad Recipe
Ingredients
Method
- Bring a large pot of salted water to a rolling boil. The salt is important—it seasons the pasta itself rather than relying on dressing for all flavor. Add your spiral pasta and cook according to package directions, but here's my professional advice: remove it one full minute before the package says it's done. You're aiming for al dente, which means there's still the tiniest bit of resistance when you bite into a strand. This matters tremendously because the pasta will continue to soften slightly as it cools and then sits with the dressing.
- This is the step that separates good from exceptional. Drain your cooked pasta into a colander immediately, then rinse it under cold running water while stirring gently with your fingers. Do not skip this step thinking warm pasta will cool on its own. Warm pasta continues cooking from residual heat, and the starch particles are actively trying to bind together into a gluey mess. Once the water running through is completely cold, toss the pasta with a handful of ice cubes and let it sit for 3-4 minutes, stirring occasionally. This halts all cooking instantly.
- While your pasta is cooling, this is the perfect time to prep everything else. Drain your canned artichoke hearts completely and pat them dry with paper towels—this step prevents your salad from becoming watery. Cut any particularly large pieces into more uniform quarters so they're not overwhelming in any single bite. Halve your cherry tomatoes lengthwise (this looks more elegant than random chops and helps them stay intact rather than bursting into mush). Pit your black olives if they're not already pitted, and halve them. Dice your deli ham into ¼-inch pieces and chop your pepperoni into similar-sized pieces. Everything should be roughly the same size so the salad feels balanced and intentional.

- Transfer your completely cooled pasta to a large mixing bowl. Add the mozzarella pearls and the deli ham pieces. Toss gently to distribute evenly. By adding the heartier, sturdier ingredients first, you're creating a foundation that can support the more delicate elements without crushing them. This is a technique I use constantly when creating multi-component salads—always build from sturdy to delicate.
- Now add the artichoke hearts, black olives, and halved cherry tomatoes. Toss everything together very gently—I use a rubber spatula rather than tongs or my hands because it's kinder to the vegetables. You're looking for even distribution without manhandling anything into submission. This should take about 20 seconds of gentle folding, not vigorous mixing.
- Pour your 2 cups of Italian dressing evenly over the salad, then add the fresh lemon juice and dried oregano. Here's where most home cooks make their biggest mistake: they think "more dressing equals more flavor," when actually the opposite is true. Start with 1½ cups of dressing. Toss gently but thoroughly, using that rubber spatula to fold everything together until the dressing is evenly distributed. Taste a bite. Does it taste balanced, or does the dressing overpower the other flavors? If you need more richness, add the remaining ½ cup and toss again. This conservative approach prevents you from creating a dressing-logged disaster that can't be fixed.

- Cover your bowl tightly with plastic wrap or transfer to a covered container and refrigerate for at least 2 hours, though overnight is genuinely better. This resting period allows the flavors to meld together beautifully. The pasta continues to absorb subtle flavors from the dressing, the artichokes soften slightly, and everything becomes more cohesive. I usually prepare this salad the morning of my event, which means I can check it off my list early and focus on other components without stress.
Notes
FAQs
Can I Make This Salad Without Mozzarella Pearls?
Absolutely. If you don’t have mozzarella pearls or prefer to avoid dairy, you have several delicious options. Crumbled feta cheese provides a similar creamy texture with more pronounced flavor—use about ¾ cup. Alternatively, diced provolone cheese works beautifully and adds a slightly smoky note. For a dairy-free version, you can simply omit this ingredient and add another ½ cup of diced bell pepper (red or yellow) for additional crunch and sweetness. The salad will still be delicious, just with slightly less richness. This is actually something I do frequently when hosting mixed gatherings with different dietary preferences.
Is This Recipe Suitable for a Vegetarian Diet?
The version as written contains deli ham and pepperoni, so it’s not vegetarian. However, it’s incredibly easy to adapt. Simply omit both meats and increase your mozzarella pearls to 1½ cups, or add 1 cup of diced roasted chickpeas for protein and additional heartiness. You could also substitute the meat with sun-dried tomatoes (about 1 cup, chopped) or roasted pine nuts (¾ cup) for texture and richness. The artichoke hearts and olives already provide substantial flavor, so the salad remains delicious and satisfying without the meat components.
Can I Use Frozen Artichokes Instead of Canned?
Yes, though with one important caveat: frozen artichokes must be thawed completely and drained very thoroughly. Pat them completely dry with paper towels, otherwise excess moisture will dilute your dressing. Frozen artichokes sometimes have a slightly softer texture than canned, which is fine but slightly different. I’ve successfully used both, and while I slightly prefer the firmer texture of canned artichokes for this application, frozen ones work if that’s what you have available. One full 10-ounce package of frozen artichokes equals approximately 14 ounces of canned.
What’s the Best Italian Dressing to Use for This Recipe?
I recommend looking for dressings with fewer than 5 grams of fat per 2-tablespoon serving and no high-fructose corn syrup. Brands like Ken’s Lite Italian, Kraft’s Light Italian, or simple homemade versions work beautifully. Honestly, if you have 2 minutes, you can make your own: whisk together ¾ cup olive oil, ¼ cup red wine vinegar, 2 tablespoons water, 2 minced garlic cloves, 2 teaspoons dried Italian seasoning, 1 teaspoon Dijon mustard, and salt and pepper to taste. Homemade dressing tastes notably fresher and gives you complete control over sodium and sugar content. This is something I do constantly when creating festive meals for my family—it takes less time than deciding which bottled brand to buy.
How Far in Advance Can I Prep Components If I’m Short on Time the Day Of?
This is exactly the kind of question I help clients solve constantly. You can prep everything up to 24 hours ahead: cook and cool the pasta, wash and pat dry your vegetables, and store them all in separate labeled containers in the refrigerator. The morning of your event or about 8-10 hours before serving, combine everything and dress it. This approach means you’re not stressed the day of and you’ve made maximum progress toward a finished dish. Personally, for large gatherings, I always do my pasta cooking and vegetable prep the day before, which means the actual assembly takes maybe 10 minutes.
Why Does My Pasta Salad Taste Better on the Second Day?
This is actually the best question because it tells me you’re paying attention to flavor development. After 24 hours in the refrigerator, the pasta has fully absorbed the dressing and the flavors have melded into something more cohesive and nuanced than they were fresh. The herbs (especially the oregano) have infused throughout, and all the individual ingredients have started tasting like part of a team rather than separate elements. This is why I always recommend making this salad at least the morning before serving—the salad is literally better on day two, which is perfect for meal planning. Make it, refrigerate overnight, and serve it already at peak flavor without doing anything additional.
Seasonal Variations
Spring Version: Add fresh asparagus tips (lightly steamed and cooled), fresh peas, and thinly sliced radishes. Increase the lemon juice to 3 tablespoons and use fresh basil instead of (or in addition to) the oregano. These additions brighten everything and make the salad feel like springtime in a bowl.
Summer Version: Substitute some of the mozzarella pearls with crumbled feta, add diced yellow or red bell peppers, and increase the cherry tomatoes to 1½ cups. Fresh zucchini (thinly sliced lengthwise, lightly grilled, and cut into strips) adds wonderful texture. This version celebrates peak summer produce and tastes incredible at outdoor gatherings.
Fall/Winter Version: Roast some diced butternut squash or add diced apple (red apples stay firmer than other varieties). Substitute some of the olives with roasted walnuts for nuttiness and crunch. Add fresh thyme instead of oregano. These additions create warmth and richness appropriate for cooler months.
More Recipes You’ll Love
- Chicken Noodle Stir Fry Recipe – another flexible noodle-based dish that’s perfect for quick weeknight meals or feeding a crowd
- this cozy soup – when you want warm, comforting noodles instead of chilled salad
- Banana Cream Pie with Nilla Wafers Recipe – the perfect light dessert to follow this Mediterranean salad at your gatherings
- Barbecue Potatoes Recipe – another excellent make-ahead side dish for holiday celebrations
You now have everything you need to create a pasta salad that actually tastes fresh, holds up beautifully, and becomes more delicious as it sits. This isn’t complicated cooking—it’s simply understanding the few key principles that make the difference between a tired dish and one that becomes the first thing to disappear from your holiday spread. The ice water, the careful dressing, the respect for each ingredient—these small decisions compound into something remarkable.
I genuinely believe that hosting a gathering shouldn’t require stress or complicated techniques. This recipe proves that with just a few smart choices and a little advance planning, you can create something that tastes like you spent hours in the kitchen when you actually spent 20 minutes in active time. Your family and friends will be impressed, your guests will ask for the recipe, and you’ll have given yourself permission to enjoy your own celebration instead of being stressed in the kitchen.
Happy Cooking!