Baked Cornish Hen Recipe

This post contains affiliate links. As an Amazon Associate I earn from qualifying purchases.
Picture this: candlelight flickers across the table as you place a beautifully bronzed, herb-roasted bird in front of each guest. The aroma of rosemary and smoked paprika fills the room, and everyone pauses—not because they’re hungry, but because what they’re about to eat looks and smells like pure celebration. That’s the magic of a perfectly baked Cornish hen. I discovered this magic years ago when I was searching for something elegant yet intimate for a Christmas dinner that felt both special and manageable. Unlike a massive turkey that demands hours of attention, these petite golden birds roast in under an hour and give each guest their own stunning centerpiece. It’s the recipe that transformed me from a stressed host into someone who actually enjoys the cooking process. Whether you’re planning an anniversary dinner, a sophisticated friendsgiving, or a holiday gathering that needs that wow factor, this lemon and herb preparation delivers restaurant-quality elegance without the restaurant-level stress.
Baked Cornish Hen Recipe That Will Steal the Show at Your Next Dinner Party
I’ll never forget the first time I served these individual roasted hens to my extended family during the holidays. My cousin—who’s a bit of a food critic—took one bite and asked if I’d secretly become a chef. I hadn’t. What I’d done was combine my decade of nutrition expertise with the simple understanding that the best meals are about more than just food; they’re about creating moments where people feel genuinely celebrated. That’s what a properly prepared Cornish hen does. Each guest receives their own beautifully roasted bird, complete with crispy skin, juicy meat, and aromatics they can see and taste. It transforms an ordinary dinner into something that feels personal, luxurious, and deeply thoughtful.

When to Make Baked Cornish Hen Recipe
This elegant protein is perfect for occasions that call for something more intimate than a traditional turkey but equally impressive. Let me share the moments when this dish truly shines:
- Holiday gatherings for smaller groups (4-8 people) – When you want that festive, special-occasion feeling without feeding an army, individual hens deliver elegance and manageability simultaneously
- Anniversary dinners and date-night celebrations – Serving one hen per couple or individual creates an instantly romantic presentation that says “you’re worth the effort”
- Friendsgiving and intimate holiday traditions – These hens are perfect when you’re hosting close friends who appreciate thoughtful cooking but don’t expect you to be stressed or exhausted
- Spring and early summer entertaining – Pair them with fresh herbs and lighter sides for a seasonal menu that feels fresh rather than heavy
- Special dietary gatherings – When guests have varying needs, individual portions make it easy to customize sides without compromising the stunning main event
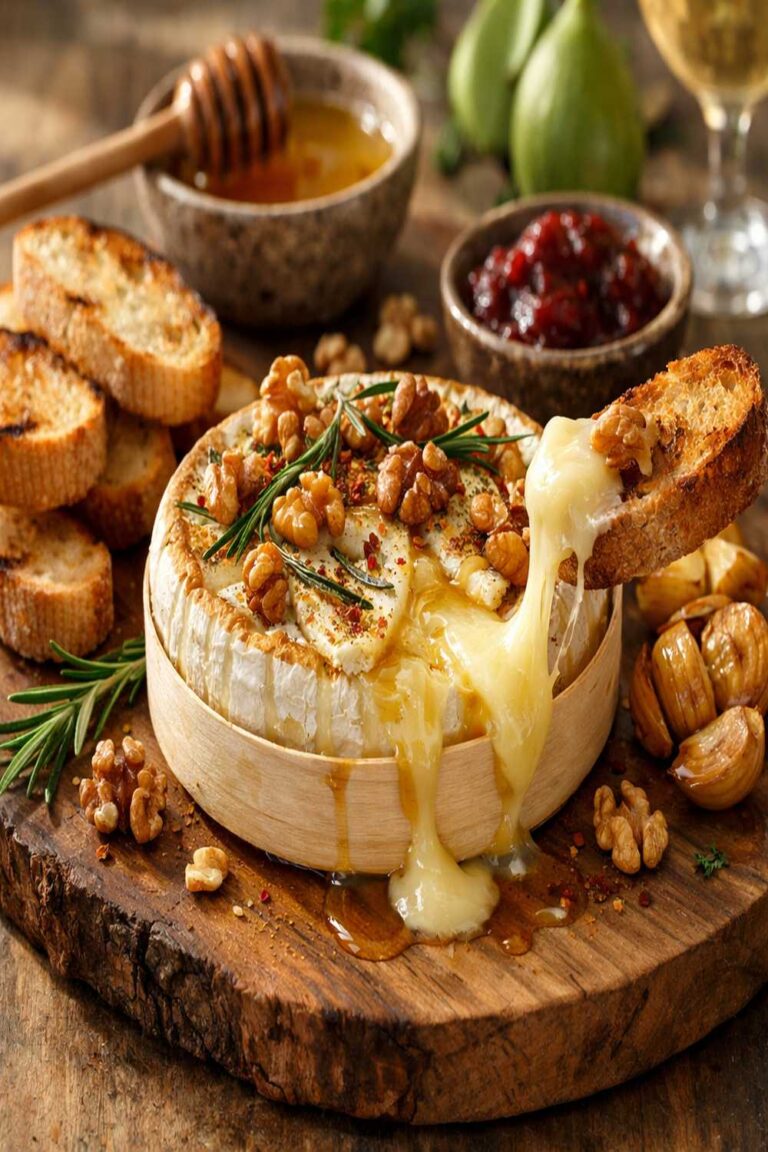
What Makes This Baked Cornish Hen Recipe Special
After a decade of helping Colorado families navigate holiday cooking, I’ve learned that the most successful gatherings aren’t about perfection—they’re about presence. This recipe works because it’s fundamentally forgiving while still delivering those showstopper moments that make people feel celebrated. The beauty of Cornish hens is that they cook evenly and quickly. There’s no rotating, no basting every fifteen minutes, no anxiety about uneven cooking. You season them generously, nestle them among aromatic vegetables and fresh herbs, and let the oven do the work.
What elevates this recipe above everyday cooking is the layering of flavor. The dry rub combines warm paprika with Italian herbs and garlic, creating a flavorful crust. The fresh herbs and citrus inside and around the bird infuse the meat with brightness. The onions and garlic in the pan become naturally sweet as they roast, creating a simple pan sauce you can drizzle over sides. It’s restaurant technique translated into accessible home cooking.
Scaling for Your Crowd
One of my favorite things about Cornish hens is their flexibility. Whether you’re cooking for two or twenty, the method stays exactly the same—you’re simply multiplying portions and adjusting oven space. Here’s how I scale this recipe based on guest count:
- Cooking for 2-4 people – Use 1-2 hens on a single sheet pan or in a medium roasting pan. Everything remains the same; roasting time stays 50-60 minutes. This is actually my go-to for anniversary dinners or intimate entertaining
- Cooking for 5-8 people – Use 2-4 hens. You may need two roasting pans side by side on your oven rack. Roasting time stays consistent since each bird is the same size. Rotate pans halfway if your oven has hot spots
- Cooking for 9-12 people – Use 6 hens. You’ll need two standard roasting pans or one very large roasting pan. Plan to stagger oven time if needed, or use two ovens if available. You might also consider cooking at 425°F for the first 30 minutes, then lowering to 375°F for the remaining 20-30 minutes to ensure even browning across multiple pans
The Ingredients
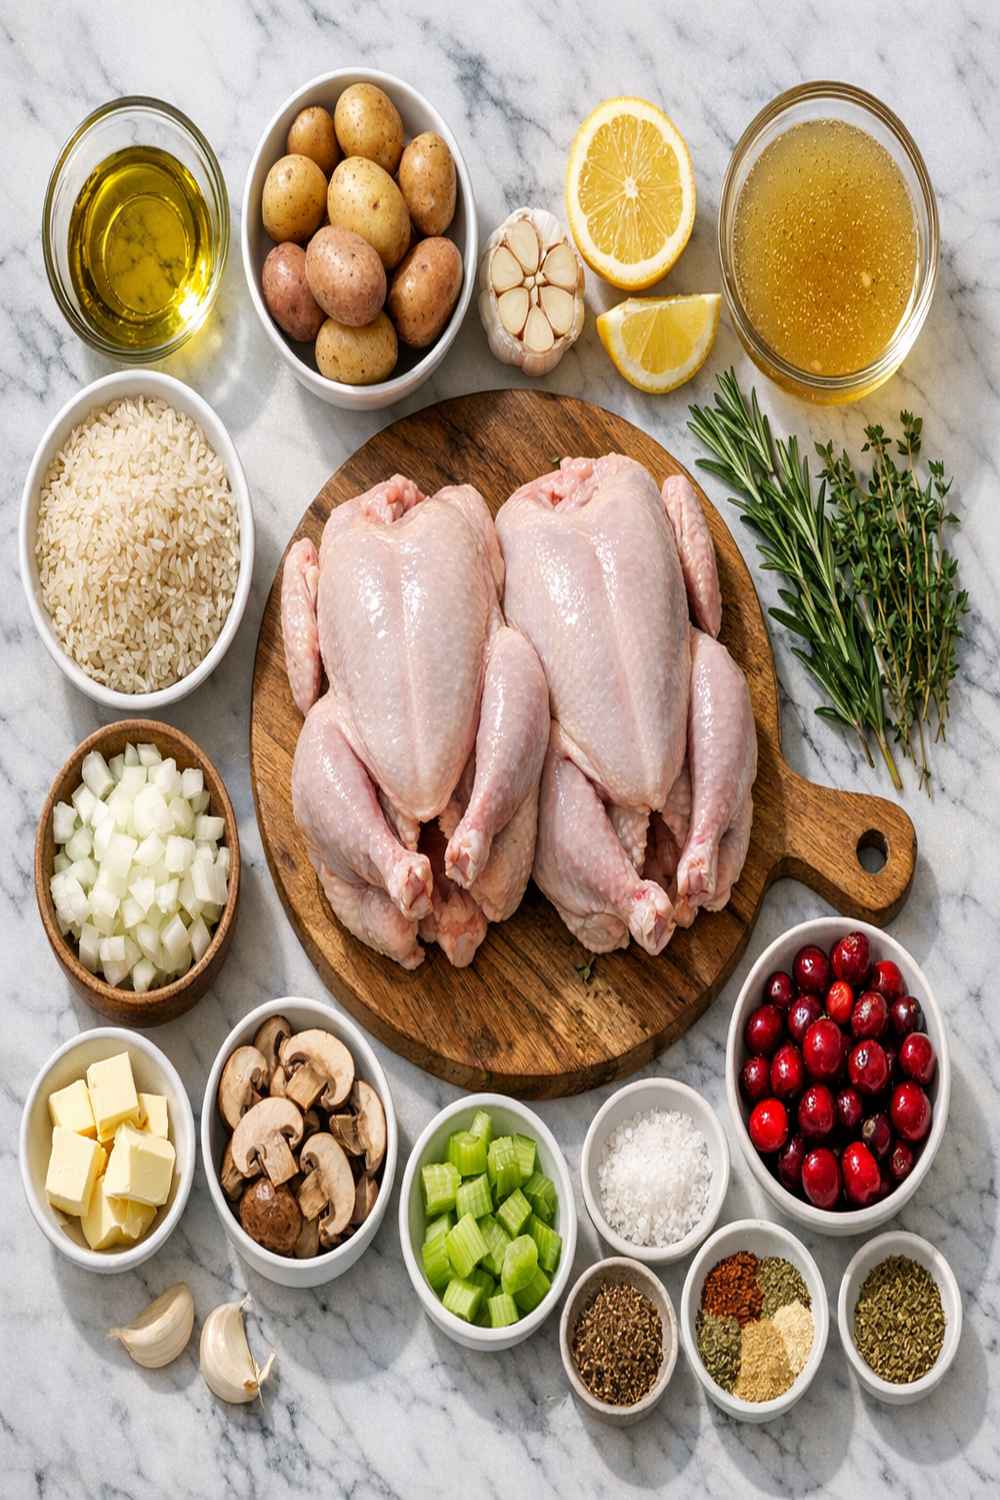
Here’s everything you need to create this elegant, herb-forward showstopper. I’ve chosen each ingredient for flavor and accessibility—nothing here requires a specialty store visit:
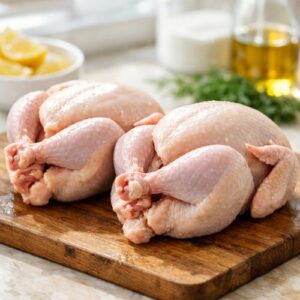
- 2 whole Cornish game hens (about 1½ pounds each, or 3 pounds total poultry)
- 1 teaspoon kosher salt (adjust based on your preference for seasoning intensity)
- ¼ teaspoon red pepper flakes (optional but adds wonderful subtle heat)
- 2 teaspoons smoked paprika (the smokiness is crucial to the flavor profile)
- 1 tablespoon Italian seasoning blend (or mix your own from dried oregano, basil, and thyme)
- 1 large yellow onion (cut into quarters—the natural sweetness develops beautifully during roasting)
- 3 sprigs fresh rosemary (or 1 teaspoon dried if fresh isn’t available)
- 4 sprigs fresh thyme (or 1 teaspoon dried thyme)
- 1 cup low-sodium chicken broth (for pan juices and a lighter sauce option)
- 1 fresh lemon (sliced into rounds, about 8-10 slices—Meyer lemons are sweeter if you find them)
- 2 tablespoons extra virgin olive oil (fruity quality matters for the finishing drizzle)
- 1 teaspoon garlic powder (freshly ground if possible for better flavor)
- 4 cloves fresh garlic (minced or crushed, about 2 tablespoons)
- 1 teaspoon freshly cracked black pepper (freshly ground tastes noticeably better than pre-ground)
How to Make Baked Cornish Hen Recipe for Your Occasion
This recipe is remarkably straightforward, and that’s by design. I believe elegant cooking shouldn’t require complicated techniques. What it requires is attention to a few critical moments—and I’m going to walk you through each one so you feel completely confident. The entire process, from prep to plate, takes about 90 minutes total, with only 10-15 minutes of hands-on work.
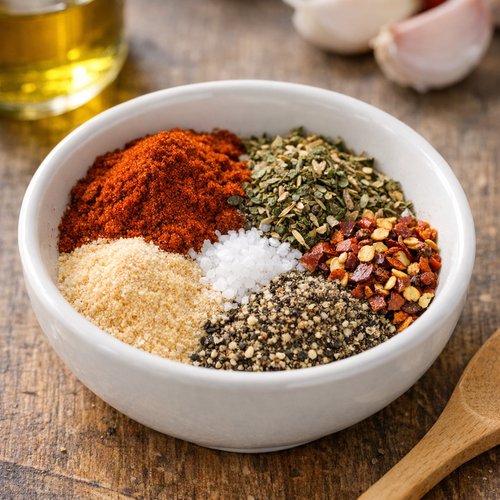
Step 1: Create Your Signature Dry Rub
In a small bowl, combine the smoked paprika, Italian seasoning, garlic powder, salt, pepper, and red pepper flakes. This is your flavor foundation, so take a moment to mix it thoroughly, breaking up any clumps. The beauty of making your own blend rather than buying pre-mixed seasonings is that you control the salt level and the freshness of the spices. I like to combine my dry ingredients the night before—it’s a five-minute task that removes stress from your cooking day. Store in a small container with a tight lid.
Step 2: Prepare Your Birds
Remove your Cornish hens from the refrigerator about 20 minutes before cooking. This allows them to come closer to room temperature, ensuring more even roasting. Pat them completely dry with paper towels—this is critical for crispy skin. Moisture is the enemy of browning. Don’t skip this step, even though it seems simple. Once they’re dry, generously apply your dry rub both inside and out. Get the seasoning under the wings, around the thighs, and inside the cavity. The hens should look almost encrusted with the seasoning blend. This generous application is what creates that stunning golden-brown exterior and ensures every bite is flavorful.

Step 3: Prepare Your Roasting Pan
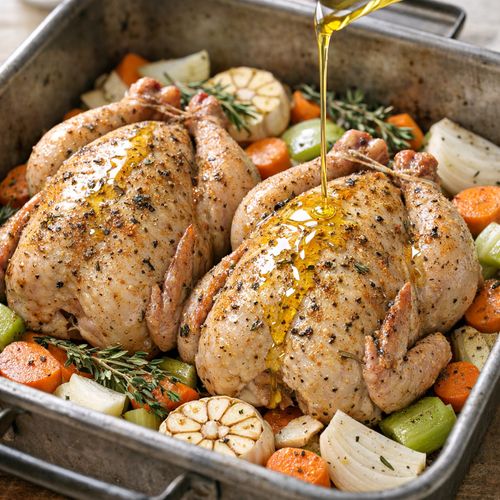
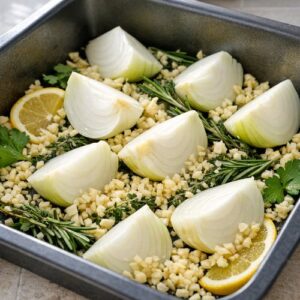
Preheat your oven to 425°F. While it heats, arrange your roasting pan with the aromatics. I like to create a bed using the quartered onion, minced garlic, and fresh rosemary and thyme sprigs. These aromatics serve two purposes: they flavor the hens from below and they elevate the birds slightly off the pan bottom, allowing air to circulate underneath for better browning. Don’t skip the aromatic base—it’s not just for flavor; it’s for technique. Arrange your lemon slices among the aromatics.

Step 4: Nestle Hens and Add Oil
Place your seasoned hens directly on top of the aromatic vegetables in the roasting pan. Position them breast-side up. Drizzle the olive oil evenly over both birds, allowing it to coat the skin. The oil ensures beautiful browning and keeps the meat juicy during roasting. If you’re cooking multiple birds, make sure they’re not touching—air circulation is essential for even cooking and browning.
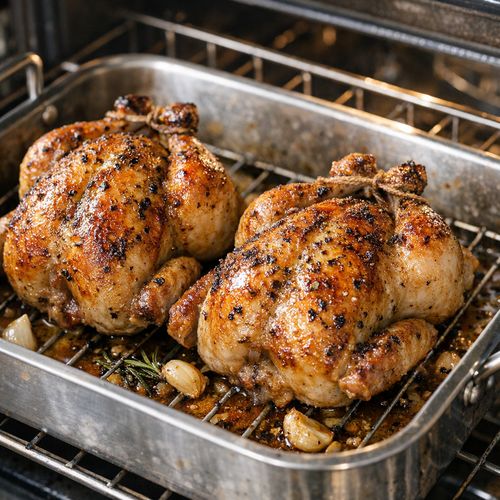
Step 5: Roast to Golden Perfection
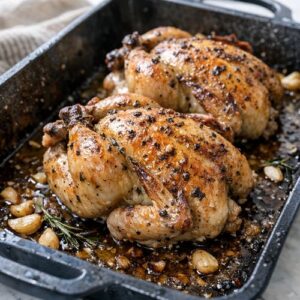
Transfer your roasting pan to the preheated 425°F oven. Set a timer for 50 minutes, and begin checking the hens at the 45-minute mark. They’re finished when an instant-read thermometer inserted into the thickest part of the thigh (not touching bone) registers 165°F. The skin should be deeply golden brown and crispy-looking. Don’t skip the temperature check—it’s the only way to ensure doneness without cutting into the bird and releasing precious juices.
If your oven runs hot or you notice the skin browning too quickly, you can tent the hens loosely with foil for the final 15 minutes. If they’re browning beautifully, leave them uncovered. Most ovens need the full 50-60 minutes, but check yours at the 45-minute mark.
Step 6: Rest and Finish
Remove the hens from the oven and let them rest on the pan for at least 20 minutes before serving. This resting period is non-negotiable if you want juicy meat. During this time, the residual heat continues gentle cooking while the muscle fibers relax and reabsorb the juices. Skipping this step is the primary reason home-cooked poultry comes out dry. Use this resting time to finish any sides or to make a quick pan sauce from the aromatic vegetables and chicken broth in the bottom of the pan.
For a pan sauce, simply pour the pan juices through a fine-mesh strainer into a saucepan, add ½ cup chicken broth, and simmer for 3-4 minutes while scraping up any browned bits from the pan. This creates an elegant, herby sauce that’s absolutely delicious drizzled over both the hen and your sides.

Make-Ahead Timeline
As someone who believes that good hosting means actually enjoying your guests, I’ve built this recipe to work with strategic advance preparation. Here’s my professional timeline for stress-free entertaining:
- 3 days before – Shop for ingredients. Choose the plumpest, freshest-looking hens available. If buying frozen, remove them now to thaw slowly in the refrigerator (they need 24 hours to thaw safely)
- 1 day before – Mix and store your dry rub seasonings in an airtight container. Prep all vegetables: wash and quarter your onion, mince or crush garlic, wash fresh herbs, and slice your lemon. Store everything in separate containers in the refrigerator. This removes morning-of stress
- Morning of the event – Remove hens from the refrigerator if they’re still cold. Assemble your roasting pan with aromatics and lemon slices about 2 hours before guests arrive. Pat the hens dry and apply seasoning 30 minutes before cooking. Preheat oven 10 minutes before placing birds in
- 45 minutes before serving – Hens go into the oven. This timing means they’ll finish roasting and resting right when you want to plate. If your guests arrive while birds are roasting, it actually smells incredible and builds anticipation
- During resting period – Finish last-minute side dishes, set the table, or mingle with guests. The hens are handled and you’re free
How to Present and Plate Baked Cornish Hen Recipe
The visual presentation of a Cornish hen is actually one of its greatest selling points. A whole roasted bird centered on a plate is instantly elegant and impressive. Here’s how I plate these beauties to maximize the wow factor:
- Use a warm plate – Place each hen on a pre-warmed dinner plate (hold your plates in a 200°F oven for 5-10 minutes before plating). The warmth keeps the hen from cooling down too quickly and makes the plate feel luxury-hotel-quality
- Create a herb-forward base – If you’ve made a pan sauce, drizzle it artfully around the base of the hen—not on top, which can make the skin less crispy. Fresh thyme sprigs and a lemon wedge placed beside the bird add color and elegance
- Lean into height and composition – Place your hen slightly off-center on the plate, angled so the breast faces toward 2 o’clock. Arrange sides (mashed potatoes, roasted vegetables, etc.) in a way that frames the hen rather than competing with it. The bird should be the clear star
- Finish with fresh elements – A small handful of fresh microgreens, a light scatter of fleur de sel, or a final rosemary sprig across the skin adds a professional touch that takes 10 seconds but makes a significant visual impact
Seasonal Variations
While this herb-forward preparation is perfect year-round, I love adapting it seasonally to highlight what’s freshest and brightest in Colorado during each season:
- Spring and early summer version – Replace half the Italian seasoning with fresh tarragon or dill, and use fresh lemon lavishly. Stuff the cavities with halved lemons, fresh thyme, and thin-sliced spring onions. The herbs stay bright rather than warming, and you can swap the smoked paprika for regular paprika for a lighter flavor profile. Serve alongside fresh spring vegetables like baby carrots and asparagus
- Fall and winter version – Amplify the smoked paprika to 3 teaspoons, add 1 teaspoon dried sage to the rub, and stuff the cavities with apple slices, fresh thyme, and cranberries alongside the lemon. The apple softens during roasting and creates a subtle sweetness that works beautifully with the warm spices. The cranberries add visual pop. Serve alongside roasted root vegetables or wild rice
What to Serve Alongside Baked Cornish Hen Recipe
A Cornish hen is elegant enough to stand alone, but the right accompaniments transform the entire meal into a complete, memorable experience. Based on my years of creating cohesive menus for Colorado gatherings, here are the sides and courses that shine alongside this bird:
- Creamy mashed potatoes or cauliflower mash – These provide the perfect neutral base to catch the herb pan sauce. For a lighter option, mashed cauliflower offers the same creamy texture with significantly fewer calories and a subtle sweetness
- Roasted seasonal vegetables – Brussels sprouts, root vegetables in winter, or fresh asparagus and spring peas in warmer months. Toss with the same Italian seasoning blend for flavor continuity
- A simple green salad – Bitter greens dressed with lemon vinaigrette provide essential brightness and cut through the richness of the roasted bird. This is especially important if you’re serving multiple courses
- Wild rice or farro pilaf – Nutty grains make a wonderful textural contrast and soak up the pan juices beautifully
- Your favorite bread or rolls – Crusty sourdough or herb-studded focaccia give guests something to use for sauce-soaking moments that always happen at my table
For a complete festive menu, consider starting with a light appetizer or soup, then moving to the hen with sides, and finishing with something elegant but not too heavy. A classic tiramisu or fruit-based dessert provides the perfect ending note to an herb-forward main course.
Can I Store Baked Cornish Hen Recipe?
Cornish hens do store well, which makes them perfect for meal planning or entertaining multiple groups across a few days. Here’s my professional guidance on storage:
Refrigerator storage: Leftover baked hens, properly cooled and stored in an airtight container, keep safely for 3-4 days. Remove the meat from the bones to maximize storage space and speed up reheating. The meat dries out less when boneless. Reheat gently in a 300°F oven, covered with foil, for 10-15 minutes until warmed through.
Freezer storage: Whole hens or hen meat can be frozen for up to 3 months. Wrap tightly in plastic wrap and then aluminum foil to prevent freezer burn. Thaw in the refrigerator overnight before reheating. Frozen-then-reheated hens work beautifully shredded for salads, tacos, or soup rather than served whole.
Leftover uses: Shredded hen meat is wonderful in grain bowls, over salads, in sandwiches, or mixed into rice bowls. Make stock from the bones by simmering with water, onion, and herbs for 2 hours—this creates a wonderful base for soups or risotto.
Nutrition Information
Based on USDA nutritional data, one whole Cornish hen (approximately 1½ pounds raw weight, 1 pound 4 ounces cooked without added seasonings) contains approximately 1,100 calories, 85 grams of protein, 84 grams of fat, and zero grams of carbohydrates. The skin accounts for much of the fat content; if you remove it, you reduce the fat to approximately 45 grams while maintaining most of the protein.
One serving (½ hen, if serving 2 people) provides roughly 550 calories and 42 grams of protein, making this an excellent protein-forward meal. The herbs and lemon add virtually no calories but significant flavor, and the aromatic vegetables roasted in the pan provide beneficial micronutrients including potassium, vitamin C, and B vitamins. The quality of fat in poultry is actually favorable for heart health compared to red meat, with a better omega-3 to omega-6 ratio.
Expert’s Nutritional Tip: As a registered dietitian, I want to highlight that the skin is where most of the fat lives, but it’s also where much of the flavor develops during roasting. Rather than always removing it, I suggest keeping the skin for the beautiful presentation and flavor, then simply eating more lean protein from the meat itself and less of the richer skin portions. This gives you the best of both worlds—restaurant-quality results with nutritional balance.
Common Mistakes to Avoid
After teaching dozens of friends and family members how to make this dish, I’ve identified four critical mistakes that derail otherwise perfect results. Avoid these and you’re guaranteed success:
- Skipping the pat-dry step – Wet poultry simply will not brown properly, no matter how hot your oven. The moisture creates steam rather than a crispy crust. Take the 30 seconds to pat thoroughly dry with paper towels
- Using an oven thermometer – Many home ovens run 25-50°F hotter or cooler than their dial indicates. For even roasting, invest in an inexpensive oven thermometer and verify your oven’s actual temperature before cooking. This changes everything
- Skipping the resting period – Cutting into a hen immediately after roasting releases all the juices onto the plate rather than keeping them in the meat. Those 20 minutes matter profoundly for texture and juiciness
- Overcrowding the pan – If hens are touching or positioned too close together, steam builds up and prevents browning. Use two pans if necessary. Your oven space is not the limiting factor; heat circulation is
Baked Cornish Hen Recipe
Ingredients
Method
- In a small bowl, combine the smoked paprika, Italian seasoning, garlic powder, salt, pepper, and red pepper flakes. This is your flavor foundation, so take a moment to mix it thoroughly, breaking up any clumps. The beauty of making your own blend rather than buying pre-mixed seasonings is that you control the salt level and the freshness of the spices. I like to combine my dry ingredients the night before—it's a five-minute task that removes stress from your cooking day. Store in a small container with a tight lid.
- Remove your Cornish hens from the refrigerator about 20 minutes before cooking. This allows them to come closer to room temperature, ensuring more even roasting. Pat them completely dry with paper towels—this is critical for crispy skin. Moisture is the enemy of browning. Don't skip this step, even though it seems simple. Once they're dry, generously apply your dry rub both inside and out. Get the seasoning under the wings, around the thighs, and inside the cavity. The hens should look almost encrusted with the seasoning blend. This generous application is what creates that stunning golden-brown exterior and ensures every bite is flavorful.
- Preheat your oven to 425°F. While it heats, arrange your roasting pan with the aromatics. I like to create a bed using the quartered onion, minced garlic, and fresh rosemary and thyme sprigs. These aromatics serve two purposes: they flavor the hens from below and they elevate the birds slightly off the pan bottom, allowing air to circulate underneath for better browning. Don't skip the aromatic base—it's not just for flavor; it's for technique. Arrange your lemon slices among the aromatics.
- Place your seasoned hens directly on top of the aromatic vegetables in the roasting pan. Position them breast-side up. Drizzle the olive oil evenly over both birds, allowing it to coat the skin. The oil ensures beautiful browning and keeps the meat juicy during roasting. If you're cooking multiple birds, make sure they're not touching—air circulation is essential for even cooking and browning.

- Transfer your roasting pan to the preheated 425°F oven. Set a timer for 50 minutes, and begin checking the hens at the 45-minute mark. They're finished when an instant-read thermometer inserted into the thickest part of the thigh (not touching bone) registers 165°F. The skin should be deeply golden brown and crispy-looking. Don't skip the temperature check—it's the only way to ensure doneness without cutting into the bird and releasing precious juices. If your oven runs hot or you notice the skin browning too quickly, you can tent the hens loosely with foil for the final 15 minutes. If they're browning beautifully, leave them uncovered. Most ovens need the full 50-60 minutes, but check yours at the 45-minute mark.

- Remove the hens from the oven and let them rest on the pan for at least 20 minutes before serving. This resting period is non-negotiable if you want juicy meat. During this time, the residual heat continues gentle cooking while the muscle fibers relax and reabsorb the juices. Skipping this step is the primary reason home-cooked poultry comes out dry. Use this resting time to finish any sides or to make a quick pan sauce from the aromatic vegetables and chicken broth in the bottom of the pan. For a pan sauce, simply pour the pan juices through a fine-mesh strainer into a saucepan, add ½ cup chicken broth, and simmer for 3-4 minutes while scraping up any browned bits from the pan. This creates an elegant, herby sauce that's absolutely delicious drizzled over both the hen and your sides.
Notes
FAQs
Can I buy frozen Cornish hens and cook them directly, or do they need to thaw?
Frozen hens absolutely need to thaw before cooking. A frozen bird won’t cook evenly—the exterior will overcook while the interior remains cold. Thaw overnight in the refrigerator (allow 24 hours for a 1½-pound bird) or use the cold-water thaw method (submerge in cold water for 2-3 hours, changing water every 30 minutes). Never thaw at room temperature, as this allows bacteria growth. Once thawed, proceed with the recipe exactly as written.
What if I can only find larger Cornish hens (around 2-2½ pounds each)?
Larger birds need slightly longer cooking time. Start checking for doneness at 60 minutes, and plan for 70-80 minutes total roasting time. The thicker thighs need more time to reach the safe internal temperature of 165°F. Remember that a bird roasting longer will brown more significantly, so if browning too quickly, tent with foil for the final 20 minutes. Larger birds also benefit from resting for 25-30 minutes rather than 20 minutes.
Can I prep these the morning of my event, or do I need to wait until closer to cooking time?
I recommend prepping vegetables and making your seasoning blend the day before, but seasoning the actual hens no more than 1-2 hours before roasting. You can arrange your roasting pan with aromatics and lemon in the morning if that helps reduce day-of stress. Pat the hens dry and apply seasoning about 30 minutes before they go in the oven—this gives the seasoning time to adhere while ensuring the skin stays dry for crisping.
What if I want to make this for a larger crowd—can I increase quantities significantly?
Absolutely, and this is where Cornish hens really shine for entertaining! Each bird cooks the same way regardless of how many you’re making. For 12 people, I’d prepare 6 hens using two large roasting pans side by side in your oven, or stagger them using both racks. Cooking time remains the same (50-60 minutes), assuming your oven temperature is calibrated correctly. Make your seasoning blend in the same proportions and apply generously to each bird. This is actually easier than one large turkey that demands rotation and basting.
Do I need to remove the giblets before roasting, and what do I do with them?
Yes, always remove the giblet package (usually tucked inside the cavity) before cooking. Run the bird under cold water and feel inside with your fingers to make sure you’ve removed the package completely. The giblets are wonderful for making stock: simmer them with water, onion, and herbs for 1-2 hours to create a flavorful base for gravy or soup. Don’t discard them—they’re liquid gold for another recipe.
More Recipes for Your Table
- Barbecue Potatoes Recipe – These smoky, tangy potatoes make a wonderful textural contrast alongside the herb-roasted hen and soak up the pan sauce beautifully
- Banana Pie Recipe With Pudding – A light, creamy dessert that provides the perfect sweet ending after an herb-forward main course without feeling too heavy
I can’t tell you how much joy I feel when I hear from readers who’ve made this recipe for their own gatherings. There’s something about taking the time to create an elegant, thoughtful meal that transforms how people experience coming together. A Cornish hen might seem simple—it’s just a roasted bird, after all—but it’s actually an expression of care. You’re saying to your guests, “You deserve something special. I chose to spend time in the kitchen creating this for you.”
That’s the real magic of cooking, and it’s what keeps me passionate about sharing recipes after all these years in nutrition and event hosting. Every time you make this dish, you’re not just feeding people; you’re creating memories around the table. You’re giving people something beautiful to gather around.
Happy Cooking!