Beef Queso Recipe

This post contains affiliate links. As an Amazon Associate I earn from qualifying purchases.
Getting kids to eat beef queso feels impossible—until you try this approach. I’ve watched countless families transform mealtime chaos into genuine connection around a bubbling skillet of cheesy goodness. My decade of nutrition work in Colorado has taught me that when children feel involved in creating food, they’re far more likely to actually eat it. This recipe isn’t just about melted cheese; it’s about building memories while sneaking in real nutrition that growing bodies actually need.
I still remember the first time I served this at my niece’s birthday gathering. My sister’s twins, notorious for rejecting anything “different,” asked for third helpings. That moment crystallized why I’m so passionate about festive gatherings—food brings people together, especially when everyone feels welcomed at the table. Whether you’re hosting a casual weeknight dinner, a backyard celebration, or planning ahead for holiday entertaining, this beef queso recipe delivers.
Beef Queso Recipe the Whole Family Will Actually Eat (Picky Eaters Included)
I’ll never forget when my neighbor brought this dish to a community potluck five years ago. Her teenage daughter, who typically avoided anything with texture, went back for seconds. Then thirds. Her mom whispered to me afterward that it was the first time her daughter had voluntarily eaten ground beef without complaint. That’s the power of understanding how picky eaters think—and building recipes around their preferences rather than fighting against them.
What makes this version different is the balance. There’s enough bold flavor that adventurous eaters feel satisfied, yet enough mild elements that cautious eaters find comfort. The customization factor means nobody feels left out of the fun.

Why Kids Love This Version
After working with families across the Front Range, I’ve identified the specific elements that make certain dishes “kid magnets.” This beef queso recipe hits multiple sensory and emotional notes that children respond to instinctively.
- Creamy, comforting texture – There’s something deeply satisfying about the smooth, warm consistency. Kids love that they can control how much they eat and when, which gives them a sense of agency that picky eaters crave.
- Mild, familiar flavors – The seasonings are balanced enough that spice-sensitive kids won’t feel overwhelmed, yet developed enough that older family members and adventurous eaters stay engaged.
- Dipping appeal – Children engage differently with food when it involves a physical action like dipping. It’s interactive, fun, and makes eating feel like play rather than obligation.
- Customization control – When kids can add their own toppings or adjust the heat level, they feel invested in the final product and become more willing to try it.
How to Get Kids Involved in Making This
One of my favorite discoveries during my nutrition career is that children who help prepare food are exponentially more likely to enjoy eating it. This recipe offers genuine, age-appropriate tasks for every skill level, making it perfect for multigenerational cooking sessions.
- Ages 3-5: Ingredient spotters and taste testers – Little ones can help you gather ingredients from the pantry, then safely taste each component before combining. They love being “official inspectors” and develop familiarity with flavors before they even hit the skillet.
- Ages 6-9: Measuring and stirring assistants – School-age children can measure dry ingredients, pour milk with supervision, and use a wooden spoon to stir the mixture on the stove (with you handling the heat and hot portions). Let them count spoonfuls of seasoning to make it math-related too.
- Ages 10+: Lead preparation and technique responsibility – Older kids can manage browning the ground beef under your supervision, adding seasoning, and even explaining steps to younger siblings. This builds real kitchen confidence and understanding of how flavors develop.
The Ingredients – Hidden Nutrition, Visible Deliciousness
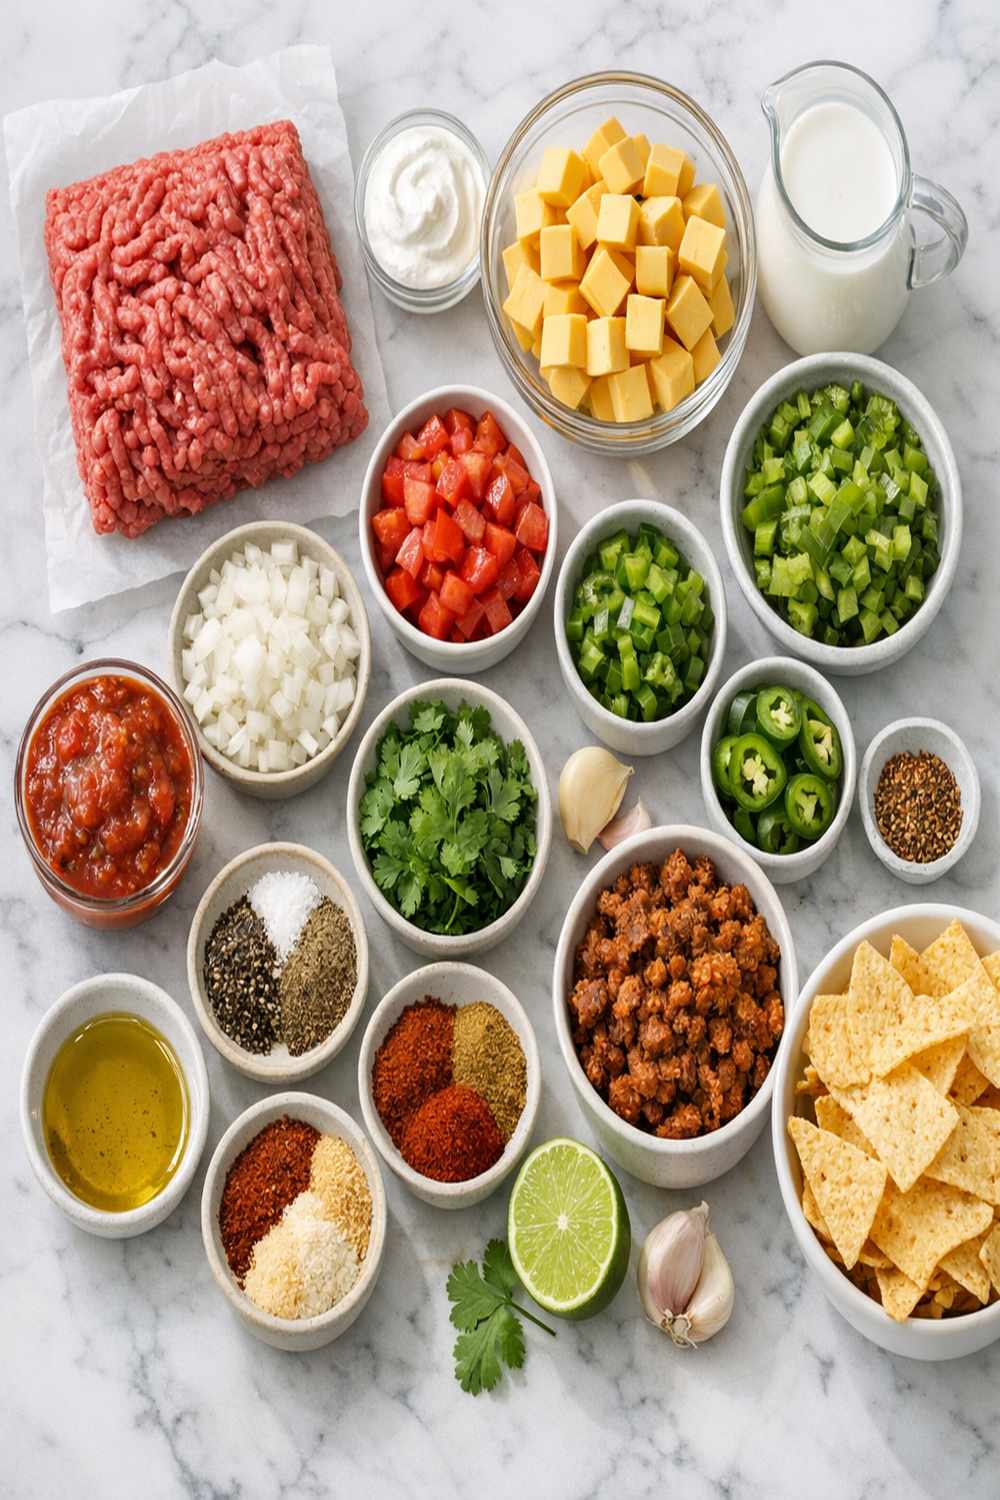
Here’s what many parents don’t realize: this recipe contains multiple nutritional powerhouses that kids don’t even taste. The tomatoes with green chiles provide lycopene for heart health and vitamin C for immune function—nutrients that developing bodies desperately need. The ground beef delivers iron and B12, crucial for energy and brain development. I’ve spent years helping families understand that traditional comfort foods can absolutely align with nutritional goals.
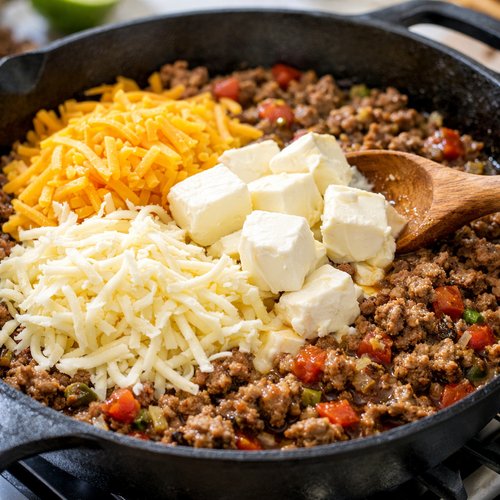
- 2 cups sharp cheddar cheese, freshly grated (freshly grated melts smoother than pre-shredded)
- 10 ounces canned diced tomatoes with roasted green chiles, drained (fire-roasted varieties add deeper flavor)
- 8 ounces processed cheese product (melts into incredibly smooth texture; non-negotiable for this recipe’s success)
- 1 pound ground beef, 93/7 lean (reduces saturated fat while maintaining rich flavor and texture)
- ½ teaspoon ground cumin (provides warmth and complexity without heat)
- ½ cup whole milk (full-fat creates silkier consistency than low-fat options)
- 1 teaspoon garlic powder (adds savory depth without noticeable “garlic” flavor kids might reject)
- 2 tablespoons seasoning blend for ground beef (contains cumin, paprika, garlic powder, and chili powder mixed together)
Makes approximately 4 cups of queso (serves 8-12 as an appetizer or 6-8 as a main dip component)
How to Make Beef Queso Recipe for the Whole Family
This recipe thrives on a slow, intentional approach. Rush it, and you’ll end up with grainy, broken cheese. Take your time, involve your family members at their comfort level, and you’ll create something genuinely special. Think of this as a family activity disguised as cooking—because that’s exactly what it is.
Step 1: Brown the Ground Beef with Care
Heat your large skillet over medium-high heat for about 90 seconds, then add the ground beef. Keep children at a safe distance during this step due to splattering fat. Break the beef into small, even pieces as it cooks—this isn’t about creating a uniform texture, but rather ensuring even cooking in about 5-7 minutes. You’ll know it’s ready when there are no visible pink portions remaining.
Once the beef is fully cooked, use a slotted spoon to transfer it to a paper towel-lined plate. This removes excess fat, which matters because we want a queso that coats your mouth beautifully, not one that leaves a greasy film. If you’re cooking with kids 8 and older, let them do the breaking-apart with a wooden spoon—it builds their understanding of protein cookery.

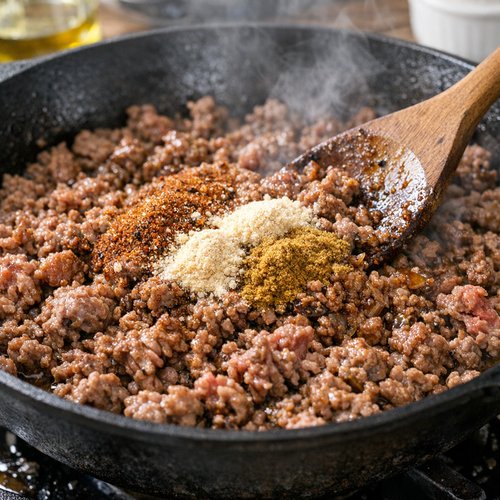
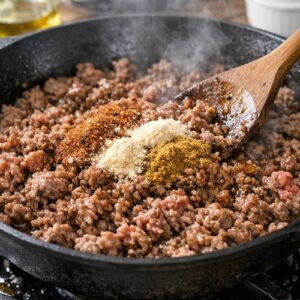
Step 2: Season the Beef with Intentional Layering
Return the beef to the skillet over medium heat. Sprinkle your seasoning blend evenly across the top, then add the garlic powder and cumin. Stir constantly for about 90 seconds—this is the crucial moment when spices bloom and transform from dusty powder into aromatic flavor compounds. Your kitchen will smell absolutely incredible, which is actually a sensory cue for your family that something delicious is coming.
This is an excellent step for kids to lead, as they can stir while you supervise the heat management. Involve them in smelling the transformation—engage all their senses in the cooking process.
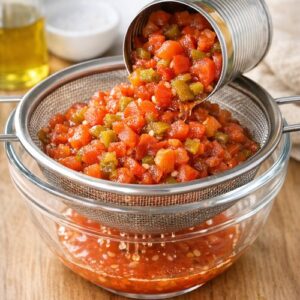
Step 3: Drain and Add the Tomatoes with Green Chiles
Open your can of diced tomatoes with roasted green chiles and pour the contents into a fine-mesh strainer positioned over a bowl. Let the liquid drain completely—this step prevents a watery queso that won’t coat chips or vegetables properly. Those drained juices? Save them for soups or sauces; nothing goes to waste in efficient meal prep.
Add the drained tomatoes to the seasoned beef, stirring to combine. Let this mixture cook together for about 2 minutes, allowing the flavors to marry. Kids love this step—they can help pour and stir, making them feel like true kitchen contributors.

Step 4: Add the Cheese and Begin the Gentle Melt
Reduce your heat to medium-low. This is absolutely critical. High heat causes cheese to separate, become grainy, and develop an unpleasant texture. We’re aiming for silky, pourable queso, not broken curds.
Add the processed cheese product first, stirring constantly. It melts quickly and creates the base for creamy texture. Then add your freshly grated sharp cheddar in handfuls, stirring after each addition until fully melted before adding more. This patience pays dividends in texture.
Keep children away from the direct heat source during cheese addition. Older kids (10+) can add small portions of grated cheese while you stir and manage temperature.
Step 5: Achieve Silky Perfection with Milk
Once all cheese has melted and combined, slowly pour in the milk while stirring continuously. Add it gradually—not all at once. This allows the milk to integrate smoothly rather than creating clumpy texture. You’re looking for a consistency that flows slightly off a spoon but isn’t completely liquid. Think: pourable but not soupy.
Keep stirring for about 2-3 minutes after milk addition, ensuring complete temperature and texture uniformity throughout.

Step 6: Taste, Adjust, and Celebrate
Remove your skillet from heat and perform a family taste test. Does it need more salt? A pinch of cumin? A dash of fresh lime juice? This collaborative tasting moment is where children learn that cooking involves assessment and adjustment, not just following directions blindly. Invite their opinions genuinely—and actually implement their suggestions sometimes. It builds confidence and investment.

Expert’s Nutritional Tip
After a decade of nutrition work, I’ve discovered that the combination of protein (from beef), fat (from cheese), and complex carbohydrates (when served with whole grain chips or vegetables) creates a perfectly balanced snack that stabilizes blood sugar and prevents the energy crashes kids experience mid-afternoon. The lycopene from tomatoes becomes more bioavailable when combined with the fat from cheese—meaning your body actually absorbs more of this powerful antioxidant. This isn’t just delicious; it’s strategically nutritious.
Customization Station: Let Everyone Build Their Own
This is where the magic happens for picky eaters. Instead of serving one “finished” queso that some kids will reject outright, create a customization station where everyone can build their perfect version. Suddenly, the child who won’t eat tomatoes finds themselves adding their own cheese portion. The kid who loves heat piles on jalapeños. Control shifts from parent-enforced to child-chosen, and resistance melts away.
- Heat level options – Offer fresh diced jalapeños on the side, allowing heat-sensitive eaters to enjoy the queso plain while adventurous eaters customize upward. Some families even offer hot sauce for those seeking more punch.
- Protein add-ins – Offer crumbled cooked chorizo, seasoned ground turkey, or even pulled rotisserie chicken on the side. This lets older kids and adults enhance their portions while younger eaters enjoy the original version.
- Fresh vegetable toppers – Diced red onion, fresh cilantro, sliced jalapeños, and diced tomatoes arranged in small bowls. Kids will add vegetables they’ve chosen themselves, dramatically increasing vegetable consumption.
- Dipping vehicle options – Arrange tortilla chips, whole grain tortilla chips, bell pepper strips, cucumber slices, and celery alongside. Different family members will gravitate toward different options based on preference and dietary needs.
Make-Ahead Guide: Strategic Meal Prep
As someone who helps busy families navigate festive gatherings, I’ve developed a detailed make-ahead strategy that removes stress and maximizes flexibility.
Up to 24 hours before serving: Brown the ground beef, season it completely, cool it to room temperature, and store it in an airtight container in your refrigerator. Grate your cheddar cheese and store in a separate container. Measure all remaining ingredients into prep bowls. This forward work means you’ll spend less than 15 minutes actually cooking when guests arrive.
2-3 hours before serving: Arrange your customization station with all vegetables chopped, arranged in bowls, and covered with damp paper towels to prevent browning. Set out dipping options on a separate board or platter.
30 minutes before serving: Begin the actual queso assembly. The entire process takes about 12-15 minutes. Your dish will arrive at the table hot and fresh, which matters far more than serving something that’s been sitting for hours.
Make-ahead storage: Fully prepared queso holds beautifully in a slow cooker on the warm setting for up to 4 hours. If you’ve made it more than 30 minutes ahead, transfer it to a slow cooker to maintain temperature and texture without continued direct heat.
Common Mistakes to Avoid
I’ve made these mistakes so you don’t have to. Learning from them has shaped how I approach every batch.
- Using high heat at any point – This is the number one culprit for grainy, broken queso. Medium and medium-low are non-negotiable. Patience transforms this dish; rushing ruins it.
- Pre-shredded cheese instead of freshly grated – The anti-caking agents in pre-shredded varieties create a grainy texture that’s genuinely unpleasant. Yes, grating takes five extra minutes. The texture improvement justifies it completely.
- Not draining the tomato liquid – This creates a queso that’s too thin and watery. Proper draining is essential. Don’t skip it.
- Forgetting the processed cheese product – Real cheese alone won’t create the silky, smooth texture this dish requires. The processed cheese product (like Velveeta) contains emulsifiers that regular cheese lacks. Don’t eliminate it thinking you’ll improve nutrition—you’ll actually create a worse product and worse experience.
Scaling for Different Family Sizes
This recipe beautifully scales for any gathering size. Here’s exactly how to adjust:
For 2-4 people (intimate gathering): Use ½ pound ground beef, 1 tablespoon seasoning blend, 1 cup cheddar, 4 ounces processed cheese, 5 ounces drained tomatoes, and ¼ cup milk. Everything scales proportionally. Makes about 2 cups.
For 6-8 people (standard family dinner): Follow the original recipe exactly as written. Makes about 4 cups, which serves 6-8 as an appetizer or dip component.
For 12-16 people (festive gathering or party): Double everything. Use 2 pounds ground beef, 4 tablespoons seasoning, 4 cups cheddar, 16 ounces processed cheese, 20 ounces drained tomatoes, and ½ cup milk. Prepare in two separate batches rather than one enormous batch—it’s easier to maintain proper temperature and texture. Makes about 8 cups total.
For 20+ people: Triple the recipe and use two slow cookers for serving. This volume works better split between two cooking vessels to prevent the bottom from overcooking while tops stay cool.
Can I Store Beef Queso Recipe?
Yes, though it’s honestly best enjoyed fresh. Here’s the practical breakdown for real family situations:
Refrigerator storage: Place fully cooled queso in an airtight container and refrigerate for up to 4 days. The texture will thicken as it cools, becoming almost spreadable.
Reheating method: Warm gently over low heat in a saucepan, stirring occasionally and adding splashes of milk as needed to return to dipping consistency. Microwave works in a pinch but creates grainier texture. Slow cooker is ideal—warm on low setting for 30-45 minutes, stirring halfway through.
Freezer storage: While you *can* freeze queso for up to 2 months, the texture changes noticeably upon thawing. The emulsification separates slightly. It’s still delicious but not quite the same silky experience. I recommend freezing only if you genuinely won’t eat it within 4 days.
School lunch prep: Cool the queso completely, portion into small containers, and pack with whole grain crackers for school lunches. Kids love the novelty, and it provides legitimate protein and nutrition. Include a small spoon for easy eating at lunch tables.
Nutrition Information
Per ½ cup serving: Approximately 280 calories, 18g protein, 20g fat, 8g carbohydrates, 2g fiber, and 520mg sodium. This data aligns with USDA nutritional guidelines for a balanced snack or appetizer component.
From a child development perspective, this matters. The protein supports muscle growth and tissue development. The iron (approximately 2mg per serving) is crucial for oxygen transport and cognitive development in growing bodies. The calcium from cheese—about 240mg per serving—builds strong bones during critical growth years. Vitamin B12 from beef supports neurological development and energy metabolism. The lycopene from tomatoes provides antioxidants that protect developing cells.
For families managing picky eaters, understanding what nutrition *is* in the foods they’ll actually eat helps ease the anxiety many parents experience. This isn’t just comfort food; it’s nutrient-dense comfort food.
What to Serve Alongside for a Complete Family Meal
This queso works beautifully as part of a larger spread or paired with complementary dishes. Here are family-tested combinations that work beautifully together:
- Whole grain tortilla chips – Provides complex carbohydrates and fiber that round out the protein-and-fat heavy queso, creating more balanced nutrition and extended satiety for growing kids.
- Rainbow vegetable plate (bell peppers, carrots, cucumbers, cherry tomatoes) – Creates visual appeal that draws kids toward vegetables, and the cool crunch provides textural contrast to warm, creamy queso.
- Mexican rice or cilantro-lime rice – If you’re serving this as a meal component rather than purely an appetizer, rice creates a complete balanced plate. Check out our Arroz Con Pollo Best Recipe for inspiration on rice-based dishes.
- Black bean dip alongside – Creates a protein duo that appeals to kids seeking more substance. Beans provide fiber that queso alone doesn’t offer.
- Fresh lime wedges and cilantro sprinkle – Adds brightness that prevents the heaviness that can come with cheese-forward dishes, and appeals to older kids and adults developing sophisticated palates.
For festive gatherings where you’re building an entire spread, consider pairing this with Alambres Recipe or Barbecue Potatoes Recipe to create a cohesive menu that celebrates bold flavors families genuinely enjoy.
Seasonal Variations
This recipe adapts beautifully throughout the year, which is one reason it’s become a year-round staple in my entertaining repertoire.
Spring variation: Add fresh corn kernels (raw or lightly cooked) for sweetness and texture. Include diced red onion and fresh jalapeños for brightness. The combination becomes lighter and more vegetable-forward.
Summer version: Incorporate roasted red peppers, fresh cilantro, and lime juice. Add crumbled cotija cheese for a tangy element. Serve with grilled vegetable sticks alongside chips. The fresh elements cut through the richness beautifully on warm evenings.
Fall adaptation: Stir in roasted diced poblano peppers for depth. Add smoked paprika to the seasoning blend. Include crispy chorizo for smokiness. Serve with charred tortilla chips for a heartier autumn feel.
Winter holiday version: Add roasted garlic, crispy bacon pieces, and fresh thyme. Include a splash of apple cider vinegar for subtle sweetness. Serve with whole grain crackers and apple slices for a autumn-meets-winter transition.
Beef Queso Recipe
Ingredients
Method
- Heat your large skillet over medium-high heat for about 90 seconds, then add the ground beef. Keep children at a safe distance during this step due to splattering fat. Break the beef into small, even pieces as it cooks—this isn't about creating a uniform texture, but rather ensuring even cooking in about 5-7 minutes. You'll know it's ready when there are no visible pink portions remaining. Once the beef is fully cooked, use a slotted spoon to transfer it to a paper towel-lined plate. This removes excess fat, which matters because we want a queso that coats your mouth beautifully, not one that leaves a greasy film. If you're cooking with kids 8 and older, let them do the breaking-apart with a wooden spoon—it builds their understanding of protein cookery.

- Return the beef to the skillet over medium heat. Sprinkle your seasoning blend evenly across the top, then add the garlic powder and cumin. Stir constantly for about 90 seconds—this is the crucial moment when spices bloom and transform from dusty powder into aromatic flavor compounds. Your kitchen will smell absolutely incredible, which is actually a sensory cue for your family that something delicious is coming. This is an excellent step for kids to lead, as they can stir while you supervise the heat management. Involve them in smelling the transformation—engage all their senses in the cooking process.
- Open your can of diced tomatoes with roasted green chiles and pour the contents into a fine-mesh strainer positioned over a bowl. Let the liquid drain completely—this step prevents a watery queso that won't coat chips or vegetables properly. Those drained juices? Save them for soups or sauces; nothing goes to waste in efficient meal prep. Add the drained tomatoes to the seasoned beef, stirring to combine. Let this mixture cook together for about 2 minutes, allowing the flavors to marry. Kids love this step—they can help pour and stir, making them feel like true kitchen contributors.
- Reduce your heat to medium-low. This is absolutely critical. High heat causes cheese to separate, become grainy, and develop an unpleasant texture. We're aiming for silky, pourable queso, not broken curds. Add the processed cheese product first, stirring constantly. It melts quickly and creates the base for creamy texture. Then add your freshly grated sharp cheddar in handfuls, stirring after each addition until fully melted before adding more. This patience pays dividends in texture. Keep children away from the direct heat source during cheese addition. Older kids (10+) can add small portions of grated cheese while you stir and manage temperature.

- Once all cheese has melted and combined, slowly pour in the milk while stirring continuously. Add it gradually—not all at once. This allows the milk to integrate smoothly rather than creating clumpy texture. You're looking for a consistency that flows slightly off a spoon but isn't completely liquid. Think: pourable but not soupy. Keep stirring for about 2-3 minutes after milk addition, ensuring complete temperature and texture uniformity throughout.

- Remove your skillet from heat and perform a family taste test. Does it need more salt? A pinch of cumin? A dash of fresh lime juice? This collaborative tasting moment is where children learn that cooking involves assessment and adjustment, not just following directions blindly. Invite their opinions genuinely—and actually implement their suggestions sometimes. It builds confidence and investment.

Notes
FAQs
What’s the difference between this queso and actual Mexican queso fresco?
This is an Americanized version designed for family-friendly entertaining and picky eaters. Traditional Mexican queso dips are often simpler and use fresh cheeses. This version uses processed cheese product and cheddar because they create the silky, pourable texture most American kids expect and enjoy. Neither version is “wrong”—they’re just different approaches to different dining contexts. My version prioritizes accessibility and appeal to varied palates.
Can I make this without the processed cheese product?
Technically yes, but I wouldn’t recommend it for this specific application. Without the emulsifiers in processed cheese, you’ll end up with grainy, separated texture that breaks apart rather than flows. If you’re committed to all-natural cheese, use a 50/50 blend of sharp cheddar and fontina (which has natural emulsifiers), add a tablespoon of cornstarch mixed with the milk, and accept that texture will differ slightly. For families with specific dietary restrictions, that’s a worthwhile trade-off. For general family cooking, the processed cheese product is actually the better choice here.
My kids are refusing the green chiles—how do I adapt this?
Replace the diced tomatoes with green chiles with plain diced tomatoes, and add ½ teaspoon cumin and ¼ teaspoon smoked paprika to compensate for lost depth. You’ll lose the mild heat and slight char flavor, but the queso will still be delicious. Alternatively, prepare two batches—one traditional and one mild—then mix them together so nobody feels singled out. As kids mature, their palates evolve, and keeping the traditional version available allows them to expand their preferences naturally.
Is this gluten-free?
Yes, absolutely. All ingredients in this recipe are naturally gluten-free. If you’re serving to guests with gluten sensitivities, pair it with verified gluten-free tortilla chips and fresh vegetables. Double-check seasoning blend labels if using store-bought, as some contain anti-caking agents that may have gluten. Most don’t, but reading labels matters for serious allergies.
Can I make this ahead completely and reheat it?
Yes, with caveats. Cool prepared queso to room temperature, transfer to an airtight container, and refrigerate up to 4 days. Reheat gently on low heat, stirring occasionally and adding milk as needed. The texture will be slightly different—often a bit thicker—but completely acceptable. For party settings where you need queso hot for several hours, transfer to a slow cooker on warm setting rather than reheating repeatedly. This maintains better texture than multiple reheating cycles.
More Family-Friendly Recipes
- Lemon Baked Cod Recipe – A lighter protein option that appeals to kids seeking alternatives to ground beef, featuring bright citrus flavors that develop adventurous palates
- Alambre Mexican Food Recipe – A colorful grilled dish that builds on the Mexican flavors families already love from queso, with built-in vegetable variety
- Creamy Crab Croquette – A sophisticated yet kid-approachable appetizer that introduces seafood in a familiar creamy format families enjoy
- this no-bake Italian dessert – A make-ahead dessert that balances richness with lightness, perfect for concluding festive meals alongside savory appetizers like this queso
Final Thoughts
After a decade of helping Colorado families navigate the intersection of nutrition, tradition, and genuine joy around shared meals, I’ve learned that the best recipes aren’t necessarily the most complex. They’re the ones that bring people together—the ones where grandparents feel comfortable helping, where picky eaters find something to actually enjoy, and where everyone feels welcomed.
This beef queso recipe embodies everything I believe about festive gathering: it’s accessible, it’s inclusive, it’s budget-friendly, and it creates moments where families genuinely connect. Whether you’re hosting a small weeknight gathering or planning something larger and more formal, this dish delivers.
The real magic isn’t in the ingredients—though they matter. The real magic is in watching your niece taste something new and like it. Seeing your son proudly stir a pot knowing he contributed to dinner. Observing your picky eater request seconds because *they* built their own customized version.
I can’t wait to share many more delicious and festive recipes with you! Happy Cooking!