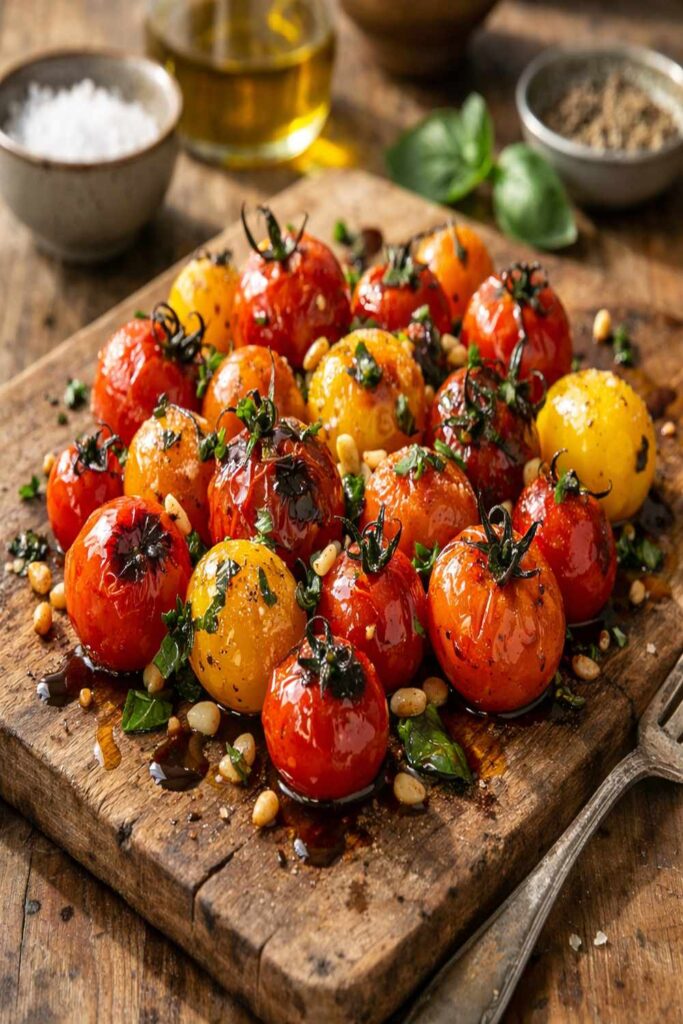
Blistered Tomato Recipe
This post contains affiliate links. As an Amazon Associate I earn from qualifying purchases.

Five ingredients. That’s all it takes to create an unforgettable side dish that tastes like you’ve been cooking all day. I discovered the power of blistered tomatoes during my first Colorado summer, when I was struggling to feed a crowd at our family’s Fourth of July gathering with a tight budget and a smaller-than-expected pantry. What started as a constraint became my secret weapon—and now, more than a decade later as a registered dietitian, I understand exactly why this minimal approach works so brilliantly. These charred, bursting tomatoes are proof that sometimes the simplest recipes tell the most delicious stories. No long shopping lists, no complicated techniques, no pantry raid required—just fresh, whole ingredients working together in perfect harmony.
5-Ingredient Blistered Tomato Recipe That Proves Simple Is Best
I’ll never forget that Fourth of July moment. The cooler was half-empty, my budget was stretched, and I had committed to bringing a side dish for thirty people. I stood in my kitchen staring at one thing that was plentiful: beautiful, ripe cherry tomatoes from the farmer’s market. In that moment of kitchen constraint, I learned something that shaped my entire approach to nutrition and festive gatherings: sometimes limitations spark creativity in ways that abundance never could.
When you strip away everything except the essentials, each ingredient becomes non-negotiable. There’s nowhere to hide—no heavy cream to mask inferior tomatoes, no elaborate seasoning blend to distract from quality produce. This blistered tomato recipe lives or dies by the integrity of what you choose to bring to the pan. That’s not a limitation. That’s freedom.
Over the years, I’ve used this same philosophy to help countless families plan stress-free holiday gatherings and weeknight meals that don’t require a culinary degree. The magic isn’t in complexity—it’s in understanding how a few exceptional ingredients can create something that tastes far more impressive than the effort required. Whether you’re hosting Friendsgiving or a casual Tuesday dinner, this approach to minimal cooking will change how you think about feeding people you love.
Why 5 Ingredients Is Actually an Advantage
- Each ingredient gets to shine – When you’re working with just five components, there’s no crowding on the plate or competition for flavor. Your tomatoes taste like tomatoes, your garlic sings without being buried, and your herbs add brightness instead of chaos. This is the essence of Mediterranean cooking philosophy—respect your ingredients enough to let them speak.
- Easier to master and repeat perfectly every single time – Simplicity breeds confidence. When you make this recipe three times, you’ll understand it completely. You’ll know exactly how your stovetop behaves, when the tomatoes reach peak blister, and how to adjust for your preferences. That’s professional cooking, and it’s now within your reach.
- Faster shopping and dramatically less waste – I’ve spent a decade watching families stress about grocery shopping for gatherings. With a five-ingredient recipe, you’re buying exactly what you need, nothing more. No half-used jars lingering in your pantry, no wilting herbs forgotten in the vegetable drawer. Your budget stays intact, and your kitchen stays organized.
Choosing Your 5 Ingredients Wisely
As a registered dietitian, I’ve learned that the most nutritious meals aren’t about quantity—they’re about quality and intentionality. When I was designing this recipe, I asked myself one question: What are the absolute non-negotiable elements that create the magic of blistered tomatoes?
The answer surprised me in its simplicity. You need tomatoes that are ripe enough to burst but structured enough to hold their shape through the cooking process. You need fat—specifically olive oil—to conduct heat evenly and create those beloved charred edges. You need garlic for aromatic depth that transforms from sharp to mellow as it cooks. You need salt and pepper to amplify the natural flavors already present. And you need fresh herbs to add a final note of brightness that makes everything sing.
I considered adding more: would balsamic vinegar improve it? Could a splash of white wine deepen the complexity? Should I include red pepper flakes for heat? Each addition tested positive, but each one also asked a question: Does this help or does it complicate? In the context of a five-ingredient recipe for a holiday gathering, complexity becomes a liability. You’re not trying to impress food critics—you’re trying to nourish people, celebrate together, and do it without stress.
This is the maximum flavor strategy: every single ingredient must earn its place by contributing something irreplaceable to the final dish.
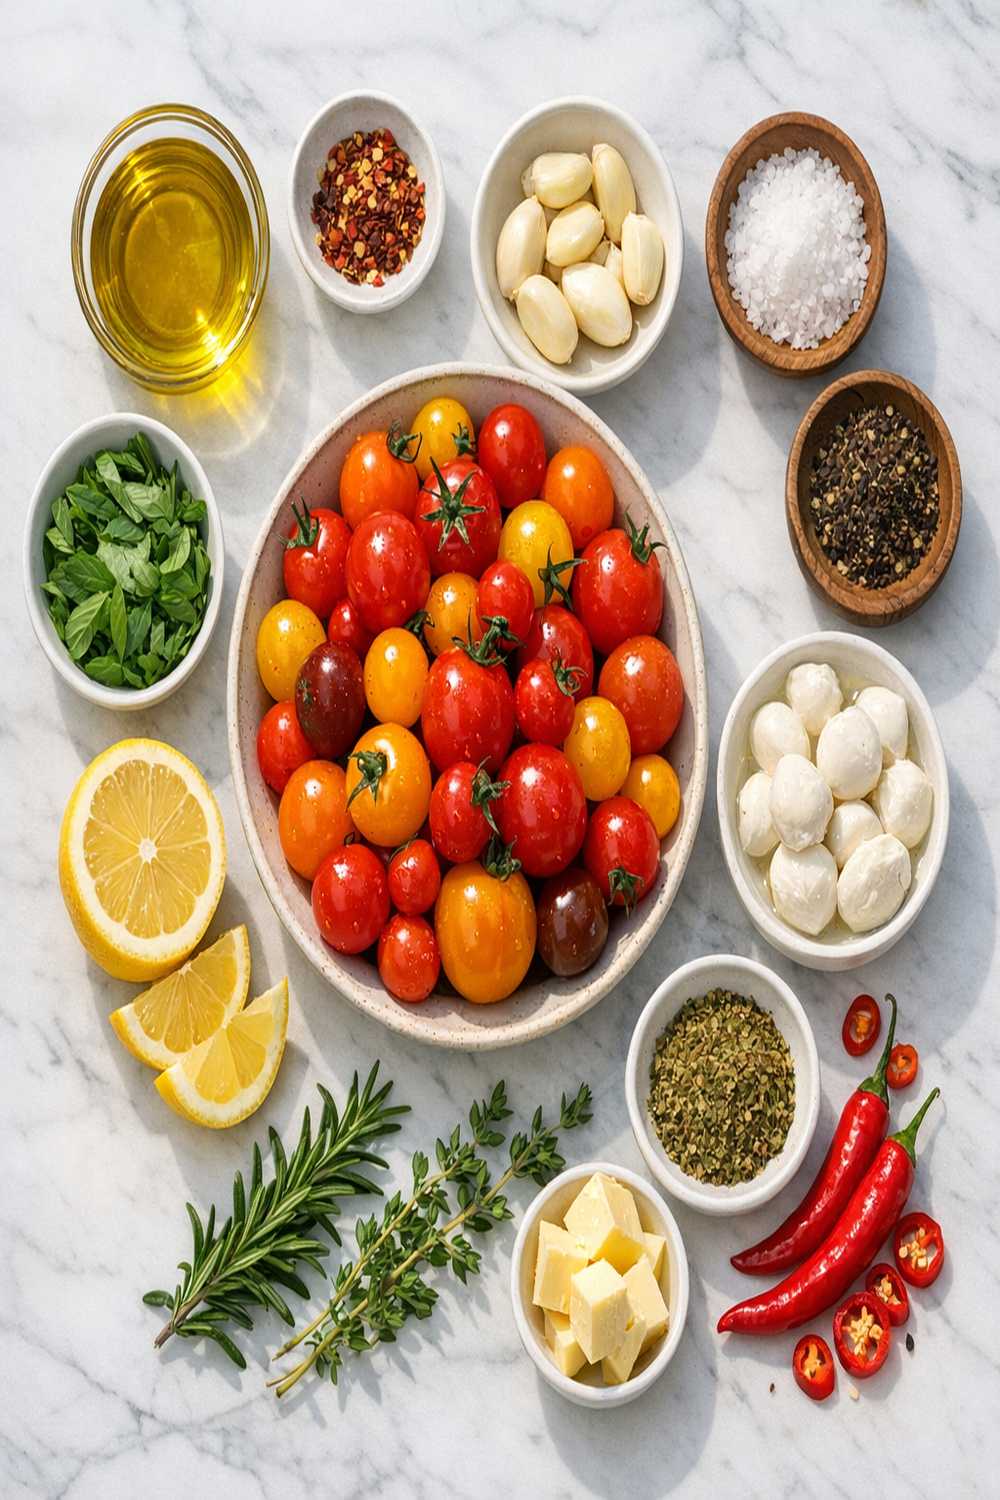
The 5 Ingredients
Let me walk you through each ingredient and why it made the cut. As someone who’s guided families through countless holiday planning sessions, I can tell you that understanding why each component matters is just as important as knowing how much to use. This knowledge transforms you from someone following instructions into someone who truly understands their cooking.
- 3 garlic cloves (minced very finely so they distribute evenly and cook at the same rate as the tomatoes)
- 3 cups cherry tomatoes (look for deep red color and slight give when gently squeezed—these are at peak ripeness and will burst beautifully when heat-shocked)
- 1½ tablespoons fresh basil leaves (chopped just before serving to preserve volatile oils that fade quickly after cutting)
- 3 tablespoons extra-virgin olive oil (this is where you splurge; quality oil creates silky mouthfeel and authentic Mediterranean flavor that cheaper alternatives simply cannot deliver)
- Sea salt and freshly ground black pepper to taste (kosher salt works beautifully too if that’s what you have on hand)
How to Make Blistered Tomato Recipe With Just 5 Ingredients
The elegance of simplicity reveals itself in the technique. With only five ingredients, every step becomes critical because there’s nothing extra to compensate for mistakes. But here’s what I’ve learned from a decade in nutrition practice: constraints actually make cooking easier, not harder. You’re not juggling multiple components—you’re simply mastering one beautiful transformation.
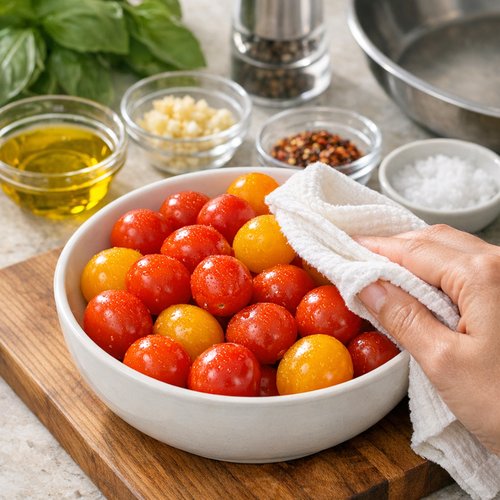
Step 1: Prepare Your Tomatoes and Mise en Place
Before you touch your stovetop, have everything ready and waiting. Rinse your cherry tomatoes and pat them completely dry—any water clinging to their surface will create steam instead of char. Mince your garlic very finely (this matters more than you’d think; chunks will brown unevenly while fine pieces will cook to creamy golden perfection). Tear or chop your basil and set it aside on a small cutting board. Measure your olive oil and have it standing by.
I learned this lesson the hard way during my first professional kitchen experience: mise en place isn’t French fanciness, it’s injury prevention and stress elimination. When everything is prepared and positioned, you can focus entirely on what’s happening in your pan instead of panicking about what you haven’t done yet.
Step 2: Heat Your Oil to the Right Temperature
Place a medium skillet (10-12 inches is ideal) over medium-high heat. Pour in your olive oil and let it warm for about 60-90 seconds. You’ll know it’s ready when it shimmers and moves freely across the pan. The oil should smell fragrant but never smoky—if you see smoke, your heat is too high and you’ll risk bitter, burnt flavoring instead of the sweet caramelized notes you’re building toward.
This temperature matters more than you’d expect. Too cold and your tomatoes will release water instead of caramelize. Too hot and you’ll char the exterior before the interior softens. Medium-high is the Goldilocks zone where the magic happens.
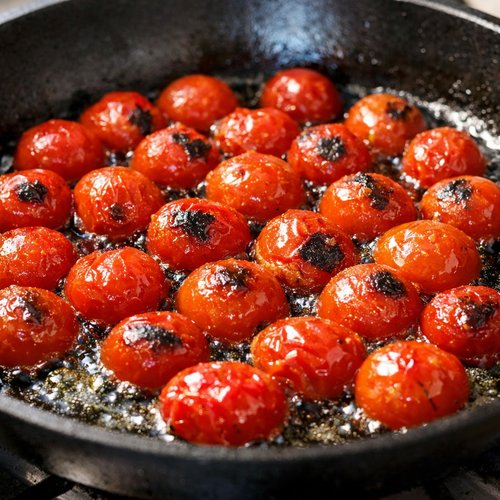
Step 3: Create the First Blister
Add all your dried cherry tomatoes to the hot oil in a single layer. This is critical: don’t stir them. Let them sit completely undisturbed for exactly 2 minutes. During this time, the direct heat is creating a gorgeous caramelized crust on the bottom of each tomato. You might hear a gentle crackling sound—that’s the sound of browning, and it’s beautiful.
I know the urge to stir is strong. We’re conditioned to think that moving food around prevents sticking. But with this technique, the stillness is the entire point. Trust the heat, trust the oil, trust the process.
Step 4: Add Your Garlic and Begin the Second Blister
After those 2 minutes, scatter your minced garlic across the tomatoes. Add a generous pinch of sea salt and freshly ground black pepper. Now you can gently stir, using a wooden spoon or silicone spatula to fold the garlic into the oil and distribute it among the tomatoes. You’re looking for even coating—the oil should be visibly clinging to everything in the pan.
Let this mixture cook for another 2-3 minutes, stirring occasionally (every 30-45 seconds is perfect). Watch as the tomatoes continue to blister and split. Some will burst completely, releasing their seeds and juice into the oil, creating a light sauce. Others will hold their shape with deep char marks. This variation is exactly what you want—it creates textural contrast that makes the dish more interesting.
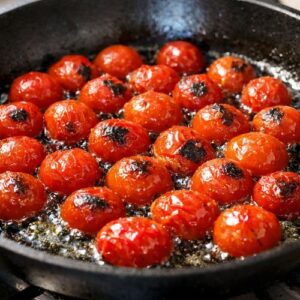
Step 5: Finish and Serve Immediately
The moment you notice the tomatoes are deeply blistered and beginning to collapse (usually around 4-5 minutes total cooking time), remove the pan from heat. Taste one tomato—it should be soft, sweet, with just a hint of savory depth from the garlic. If it tastes thin or watery, you can return the pan to heat for another 30 seconds to reduce the liquid further.
Pour the entire contents—tomatoes, garlic, all the precious oil—into a serving bowl. Scatter your fresh basil across the top and give it one gentle fold to combine. Serve immediately while everything is still warm and the basil aroma is at its peak. The warmth helps the basil release its essential oils, creating aroma and flavor that will make people ask for your recipe before they even taste it.
The Optional 6th Ingredient (If You Want to Elevate)
Here’s what I’ve learned from hosting countless holiday gatherings: sometimes you want to take a simple dish to the next level without abandoning the philosophy that made it special in the first place. If you’re serving this at a more formal gathering or want to add richness, consider one optional single addition—not multiple extras, just one meaningful choice.
My recommendation: add ¼ cup of fresh burrata cheese, torn into chunks and stirred in after you remove the pan from heat. The warm blistered tomatoes will soften the cheese slightly while keeping it creamy and luxurious. It transforms the dish from a simple side into something that feels restaurant-quality, yet still honors the minimal philosophy that makes this recipe special. Alternatively, if dairy isn’t your preference, try finishing with a teaspoon of aged balsamic vinegar (the thick, syrupy kind, not the thin cooking vinegar) drizzled over just before serving.
5-Ingredient Variations
- Mediterranean Herbs Variation – Swap the fresh basil for an equal amount of fresh oregano and add a small pinch of dried red pepper flakes to the garlic as it cooks. This creates a more savory, slightly spicy profile that pairs beautifully with grilled chicken or fish. The oregano is more herbaceous and less delicate than basil, so it stands up better to longer storage if you’re making this ahead.
- Spanish Smoked Variation – Replace the fresh basil with smoked paprika (½ teaspoon) mixed into the oil before you add the tomatoes. This creates a deep, complex flavor that’s completely different from the fresh Mediterranean version. It’s stunning served with the Barbecue Potatoes Recipe as part of a Spanish-inspired feast.
- Asian-Inspired Variation – Swap the basil for fresh cilantro and replace the garlic with minced fresh ginger (use slightly less—about 1 tablespoon—as ginger is more assertive than garlic). Add a tiny drizzle of sesame oil at the very end. This creates a completely different flavor profile that’s bright, warming, and aromatic. Serve alongside your favorite grain dishes for an unexpectedly delicious pairing.
Can I Store Blistered Tomato Recipe?
Yes, absolutely—though I recommend enjoying these tomatoes fresh and warm whenever possible, as that’s when they shine brightest. If you have leftovers, here’s how to handle them:
Refrigerator Storage: Transfer the blistered tomatoes (including all the oil) to an airtight glass container. They’ll keep for up to 3 days in your refrigerator. The flavors will mellow slightly, and the texture will soften further, but they remain delicious. Gently reheat in a small saucepan over low heat, or enjoy them cold as a topping for salads, grain bowls, or crackers.
Make-Ahead Strategy: You can prepare this recipe up to 6 hours in advance, but I suggest a different approach: prepare through Step 2 (heat your oil), then complete the cooking just 15-20 minutes before serving. This way, the tomatoes stay warm and the basil retains its bright color and fresh aroma. If you’re hosting a larger gathering and need true advance preparation, roast your tomatoes at 400°F for 15-20 minutes instead (toss with oil, garlic, salt, and pepper), then add fresh basil just before serving. The flavor is slightly different but equally delicious.
Freezing: I don’t recommend freezing blistered tomatoes, as the texture becomes mushy and the fresh basil loses all its character. If you have excess, consider making them into a quick pasta sauce instead.
Nutrition Information
As a registered dietitian, I’m particularly passionate about helping people understand what they’re eating—especially when it comes to festive gatherings, where nutrition can feel like an afterthought. These blistered tomatoes are nutritional superstars, and understanding why makes you feel confident serving them to anyone at your table.
Per serving (assuming 4 servings total): approximately 120 calories, 11 grams fat (primarily heart-healthy monounsaturated fat from olive oil), 5 grams carbohydrates, 1 gram protein, and less than 1 gram fiber. The beauty here is that almost all the fat comes from high-quality olive oil, which according to USDA nutrition databases contains polyphenols and other compounds associated with cardiovascular health. The tomatoes themselves provide lycopene, a carotenoid compound that gives tomatoes their red color and has been extensively studied for its antioxidant properties. When tomatoes are cooked (as in this recipe), the lycopene becomes more bioavailable, meaning your body can actually absorb and use it more effectively than from raw tomatoes.
The salt content is minimal and entirely under your control—there’s no hidden sodium from processed ingredients or sauces. This makes this recipe naturally appropriate for people managing sodium intake, provided you taste and season conservatively.
Expert’s Nutritional Tip: The combination of cooked tomatoes with fat (the olive oil) creates an ideal situation for nutrient absorption. Lycopene is fat-soluble, meaning your body needs dietary fat present in the same meal to absorb it properly. This is why Mediterranean diets, which pair vegetables with olive oil, show such strong health outcomes in nutritional research. You’re not just enjoying a delicious side dish—you’re creating nutritional synergy with every bite.
What to Serve With Blistered Tomato Recipe?
One of my favorite aspects of working with families on festive gathering menus is understanding how individual dishes work together to create a complete, balanced meal. These blistered tomatoes are wonderfully versatile because their simplicity means they complement almost anything without competing for attention.
The warm, caramelized tomatoes are absolutely stunning served alongside grilled proteins—chicken, fish, shrimp, or even plant-based options like seasoned tofu or tempeh. They work beautifully with grain dishes like couscous, farro, or rice. They’re magnificent on crostini as an appetizer. And they add brightness and sophistication to any charcuterie board or appetizer spread.
For a complete Friendsgiving-style gathering, I love pairing these with the Arroz Con Pollo Best Recipe, which shares that same Mediterranean spirit. The warm spices in the rice dish complement the bright, caramelized tomatoes perfectly, and together they tell a cohesive flavor story.
- Grilled Chicken Breast – keeps the meal light and protein-forward while letting the tomatoes shine
- Fresh Burrata or Mozzarella – creates an elegant appetizer or light lunch pairing
- Crusty Bread for Crostini – lets you capture all the precious oil in the pan
- Simple Green Salad with Lemon Dressing – adds freshness and textural contrast
- Grain Bowls with Quinoa or Farro – creates a more substantial, satisfying meal
Blistered Tomato Recipe
Method
- Before you touch your stovetop, have everything ready and waiting. Rinse your cherry tomatoes and pat them completely dry—any water clinging to their surface will create steam instead of char. Mince your garlic very finely (this matters more than you'd think; chunks will brown unevenly while fine pieces will cook to creamy golden perfection). Tear or chop your basil and set it aside on a small cutting board. Measure your olive oil and have it standing by. I learned this lesson the hard way during my first professional kitchen experience: mise en place isn't French fanciness, it's injury prevention and stress elimination. When everything is prepared and positioned, you can focus entirely on what's happening in your pan instead of panicking about what you haven't done yet.
- Place a medium skillet (10-12 inches is ideal) over medium-high heat. Pour in your olive oil and let it warm for about 60-90 seconds. You'll know it's ready when it shimmers and moves freely across the pan. The oil should smell fragrant but never smoky—if you see smoke, your heat is too high and you'll risk bitter, burnt flavoring instead of the sweet caramelized notes you're building toward. This temperature matters more than you'd expect. Too cold and your tomatoes will release water instead of caramelize. Too hot and you'll char the exterior before the interior softens. Medium-high is the Goldilocks zone where the magic happens.

- Add all your dried cherry tomatoes to the hot oil in a single layer. This is critical: don't stir them. Let them sit completely undisturbed for exactly 2 minutes. During this time, the direct heat is creating a gorgeous caramelized crust on the bottom of each tomato. You might hear a gentle crackling sound—that's the sound of browning, and it's beautiful. I know the urge to stir is strong. We're conditioned to think that moving food around prevents sticking. But with this technique, the stillness is the entire point. Trust the heat, trust the oil, trust the process.
- After those 2 minutes, scatter your minced garlic across the tomatoes. Add a generous pinch of sea salt and freshly ground black pepper. Now you can gently stir, using a wooden spoon or silicone spatula to fold the garlic into the oil and distribute it among the tomatoes. You're looking for even coating—the oil should be visibly clinging to everything in the pan. Let this mixture cook for another 2-3 minutes, stirring occasionally (every 30-45 seconds is perfect). Watch as the tomatoes continue to blister and split. Some will burst completely, releasing their seeds and juice into the oil, creating a light sauce. Others will hold their shape with deep char marks. This variation is exactly what you want—it creates textural contrast that makes the dish more interesting.
- The moment you notice the tomatoes are deeply blistered and beginning to collapse (usually around 4-5 minutes total cooking time), remove the pan from heat. Taste one tomato—it should be soft, sweet, with just a hint of savory depth from the garlic. If it tastes thin or watery, you can return the pan to heat for another 30 seconds to reduce the liquid further. Pour the entire contents—tomatoes, garlic, all the precious oil—into a serving bowl. Scatter your fresh basil across the top and give it one gentle fold to combine. Serve immediately while everything is still warm and the basil aroma is at its peak. The warmth helps the basil release its essential oils, creating aroma and flavor that will make people ask for your recipe before they even taste it.
FAQs
Can I use regular tomatoes instead of cherry tomatoes?
You absolutely can, though the result will be slightly different. If using medium beefsteak or heirloom tomatoes, cut them into quarters or eighths so they cook in roughly the same time as cherry tomatoes. The larger surface area means more potential for charring, which some people prefer. The cooking time remains about the same, but watch carefully as the pieces soften. I still prefer cherry tomatoes for their natural sweetness and because they create those gorgeous burst-and-blister effects that make the dish visually stunning, but fresh, ripe tomatoes of any kind will work here.
What if I don’t have fresh basil?
Fresh basil is ideal, but it’s not the only option. You can substitute with equal amounts of fresh parsley (slightly milder flavor), fresh oregano (more savory), or fresh mint (completely different but surprisingly delicious). If you’re truly out of fresh herbs, even a very light sprinkle of dried basil or oregano added to the pan at the very end works—but use about one-third the amount since dried herbs are more concentrated. The dish will still be delicious; the fresh herb is primarily for brightness and aroma, and several options can deliver that.
Can I make this recipe on the stovetop versus other methods?
The stovetop method I’ve described is ideal because it gives you maximum control over temperature and the ability to create those beautiful char marks. However, you can also broil these tomatoes: toss them with oil, garlic, salt, and pepper in a baking dish, then broil for 8-10 minutes until blistered. The result is slightly different (more even browning, less concentrated flavor), but still delicious. Roasting at 400°F for 15-20 minutes is another option and works wonderfully if you’re preparing ahead for a gathering.
How do I know when the tomatoes are done?
The tomatoes are finished cooking when the skins have visibly blistered and burst (some should split open entirely), the tomatoes have softened considerably but still hold their basic shape, and the oil has taken on a light orange or peachy hue from the tomato juices. The whole process typically takes 4-5 minutes total (2 minutes undisturbed, then 2-3 minutes stirred). If you’re uncertain, simply taste one—it should be sweet, soft, and concentrated in flavor rather than fresh and crisp.
Can I prepare this recipe without garlic?
Yes, though garlic is truly one of the star players here. If you’re avoiding garlic (allergies, digestive sensitivity, or simply preference), the tomatoes are still delicious with just oil, salt, pepper, and fresh herbs. You might consider adding a tiny squeeze of fresh lemon juice (about 1 teaspoon) to replace some of the savory depth that the garlic provides. The result will be brighter and more purely tomato-forward, which some people actually prefer.
Make-Ahead Guide: Prep Strategy for Holiday Hosting
One of the greatest gifts I can give you as someone who’s guided families through holiday gatherings for a decade is a solid prep strategy. Here’s exactly how to build this into your gathering timeline so you’re not stressed the night before or day-of:
Three Days Before: Shop for your tomatoes, garlic, and herbs. Store tomatoes at room temperature (cold temperatures damage flavor and texture). Keep basil in a glass of water on your counter, loosely covered, so it stays bright and fresh.
The Day Before: Mince your garlic and store it in a small glass container in the refrigerator. Yes, it will develop a slightly stronger smell, but it’s perfectly fine. Chop your basil, place it in a damp paper towel, seal it in a container, and refrigerate. This preserves its color and flavor better than you’d expect.
One Hour Before Serving: This is your sweet spot. Bring everything to room temperature (remove garlic and basil from the fridge about 15 minutes before cooking). Just before your guests arrive or sit down, execute Steps 1-5 as written. The entire process takes less than 10 minutes, and your guests will be amazed by how you “just threw this together.”
If you’re genuinely constrained for time during the meal service, you can roast the tomatoes earlier in the day (follow the broiler or oven method), then simply reheat gently in a saucepan and add fresh basil just before serving. It won’t have that exact stovetop magic, but it will still be delicious and impressive.
Common Mistakes to Avoid
In my decade working with families, I’ve seen certain patterns emerge around this simple recipe. Here are the pitfalls that can transform something stunning into something disappointing:
Mistake 1: Using Wet Tomatoes – If you skip drying your tomatoes after rinsing, that moisture becomes steam, and steam prevents charring. You’ll end up with soft tomatoes in oil rather than blistered, caramelized tomatoes with deep brown edges. Always pat them completely dry with a clean kitchen towel or paper towel.
Mistake 2: Underestimating Your Heat – Medium-high heat is critical. If you cook on medium, you’re essentially simmering rather than searing, and you’ll get soft tomatoes without the beautiful char. If you jump straight to high, you risk burnt garlic and bitter flavors. Stick with medium-high and trust the process.
Mistake 3: Stirring During the First Blister – I know I’ve mentioned this, but it’s crucial enough to repeat. Those first undisturbed 2 minutes are what create the gorgeous caramelized crust. Every time I see someone fidget and stir too early, they’re disrupting that magic. Set a timer, step away, let the heat do its job.
Mistake 4: Adding the Basil Too Early – Fresh basil added during cooking loses its brightness and can become slightly bitter from the heat. Add it at the very end, right before serving. This preserves the aroma and color that make it special.
Seasonal Variations: How to Adapt Throughout the Year
One of the beautiful things about understanding a recipe deeply is realizing how it can shift and evolve with seasons and available ingredients. Here’s how I adapt this dish year-round:
Summer (Peak Tomato Season): This is the season for the classic recipe exactly as written. Cherry tomatoes are at their sweetest, and fresh basil is abundant and inexpensive. This is when you make it, serve it proudly, and understand why it’s become a staple in my kitchen.
Fall: As tomato quality declines in autumn, I sometimes add a tiny pinch of balsamic vinegar (just ½ teaspoon, drizzled at the very end) to deepen the flavor and add complexity. I also swap basil for fresh oregano, which is still available and more robust. This version pairs beautifully with this no-bake Italian dessert as part of an Italian-inspired fall gathering.
Winter: Fresh tomatoes are genuinely sad in winter (unless you’re in a warm climate), so I pivot to roasted cherry tomatoes prepared earlier in the day, focusing on the warmth and coziness of the olive oil and garlic rather than expecting peak tomato flavor. Or I use good-quality canned San Marzano tomatoes (drained well, treated the same way), which actually shine in winter cooking.
Spring: As fresh tomatoes begin appearing again, I add a whisper of fresh lemon juice and thin slivers of lemon zest to brighten the emerging season. The acidity complements the slowly-improving tomato quality as we transition toward summer.
More 5-Ingredient Recipes
- Avocado Tomatillo Salsa Recipe – Fresh, bright, and perfect as a dip or topping that celebrates minimal ingredients and maximum flavor
- Alambres Recipe – Another celebration of simplicity that lets quality ingredients speak for themselves
- 5 Star Guacamole Recipe – Proves that you don’t need a long ingredient list to create something restaurant-quality
After more than a decade of helping families navigate holiday gatherings and everyday cooking, I’ve become a genuine believer in the power of restraint. The blistered tomato recipe isn’t special because it’s complicated—it’s special because it trusts you. It trusts that you can select quality ingredients, respect them enough to let them shine, and execute a simple technique with intention.
Every time I make this dish, whether it’s for a casual weeknight dinner or an elaborate holiday gathering, I’m reminded of that Fourth of July moment when constraints sparked creativity. That’s the real magic here—not the tomatoes or the oil or the garlic, though those matter enormously. The magic is in understanding that sometimes simplicity isn’t a limitation. Sometimes it’s the greatest freedom of all.
I can’t wait to hear how this recipe transforms your table and brings people together. Happy Cooking!