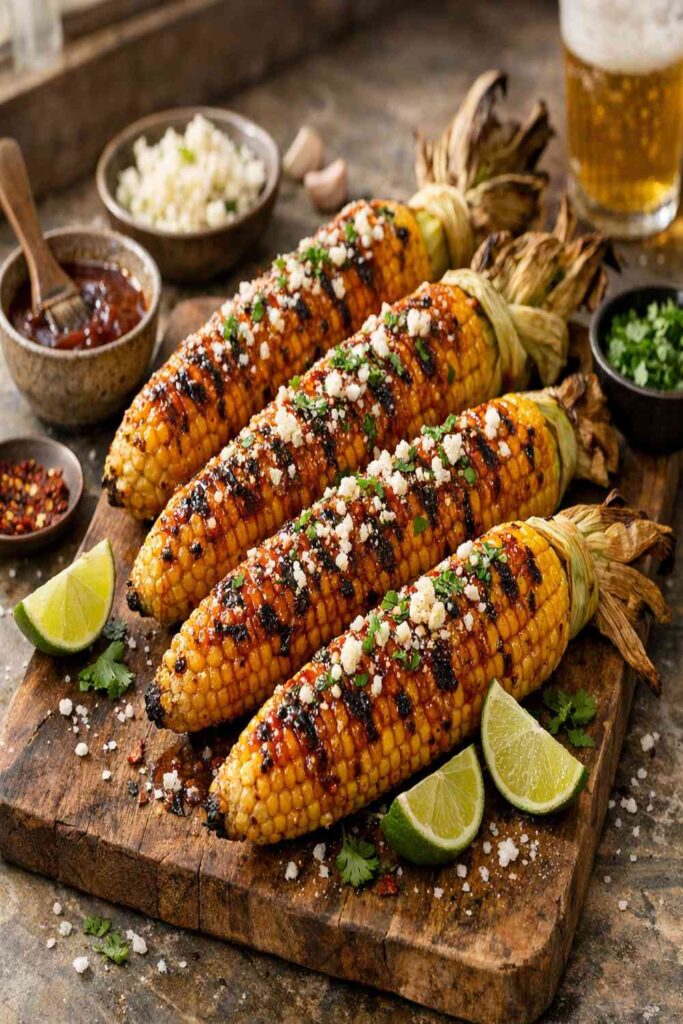
BBQ Corn Recipe
This post contains affiliate links. As an Amazon Associate I earn from qualifying purchases.
There’s nothing quite like biting into fresh corn with those beautiful charred kernels, butter running down your chin, surrounded by friends and family. This dish looks and tastes like it should cost $40 at a high-end restaurant—yet the entire batch costs under $8. I’ve been serving this at Colorado summer gatherings for over a decade, and it never fails to impress.
As a registered dietitian who’s spent years simplifying festive gatherings, I’ve learned that the most memorable meals aren’t about complexity or expense. They’re about quality ingredients treated with intention. This BBQ corn recipe proves that point beautifully. Pair it with Barbecue Potatoes Recipe for a complete summer spread that feeds a crowd without stress.
Restaurant-Quality Grilled Corn for Under $8 (And You’ll Know Exactly Why It’s Better)
I remember the summer my family first discovered how to grill corn properly. My grandmother had always boiled hers—and I loved her dearly, but those pale, mushy kernels weren’t doing anyone favors. Then one Fourth of July, my uncle brought his beat-up old grill to the picnic, and everything changed. I watched him work the corn with such care: watching for those gorgeous charred spots, brushing it with butter only at the very end, serving it with softened butter and fresh herbs.
That moment taught me something I’ve carried into my nutrition practice: sometimes the simplest preparations showcase ingredients best. There’s no cream sauce hiding anything here, no complicated techniques. Just four whole ears, heat, butter, and perfect timing. When I started hosting my own gatherings as an adult, this became my signature side dish—the one people ask about before dessert.
What makes this special isn’t a secret ingredient. It’s understanding the science of caramelization and knowing that slightly charred exterior with a juicy, tender interior is achievable every single time if you pay attention.

The Real Cost Breakdown
Let me show you exactly where your money goes with this recipe, because I believe in transparency about budgeting for quality ingredients. Here’s the per-serving cost for four ears of corn:
- Fresh corn on the cob (4 ears) – $3.60 to $4.00 total (roughly $0.90-$1.00 per ear at farmers markets or during peak season at grocery stores)
- Salted butter (3 tablespoons total) – $1.20 (using store-brand butter at approximately $4.50 per pound)
- Fresh parsley (for garnish) – $1.50 (one bunch, though you’ll have leftovers for other dishes)
- Sea salt and cracked pepper – $0.50 (minimal usage from pantry staples)
Total cost for four servings: approximately $7.80
Compare that to a summer barbecue restaurant charging $6-$8 per corn ear. You’re spending less than the price of a single restaurant serving to feed four people. The value here is extraordinary.
Smart Shopping Tips for This Recipe
- Buy corn during peak season (June through August) – At farmers markets in Colorado, I find the best prices mid-summer when local growers have abundant supply. Expect $3-$5 per dozen ears versus $1-$1.50 per ear in off-season. Buy extra ears and freeze the kernels for winter cooking.
- Choose store-brand salted butter over name brands – The quality difference is minimal for a recipe where butter is the star. Store brands cost 20-30% less. Avoid whipped butter, which contains added water and won’t provide the same richness.
- Splurge on fresh parsley; save on everything else – Dried parsley loses 90% of its flavor during drying. Fresh parsley costs pennies and transforms the final dish. This is where I never compromise. Skip the “gourmet” sea salt varieties—regular salt does the job perfectly.
The Ingredients
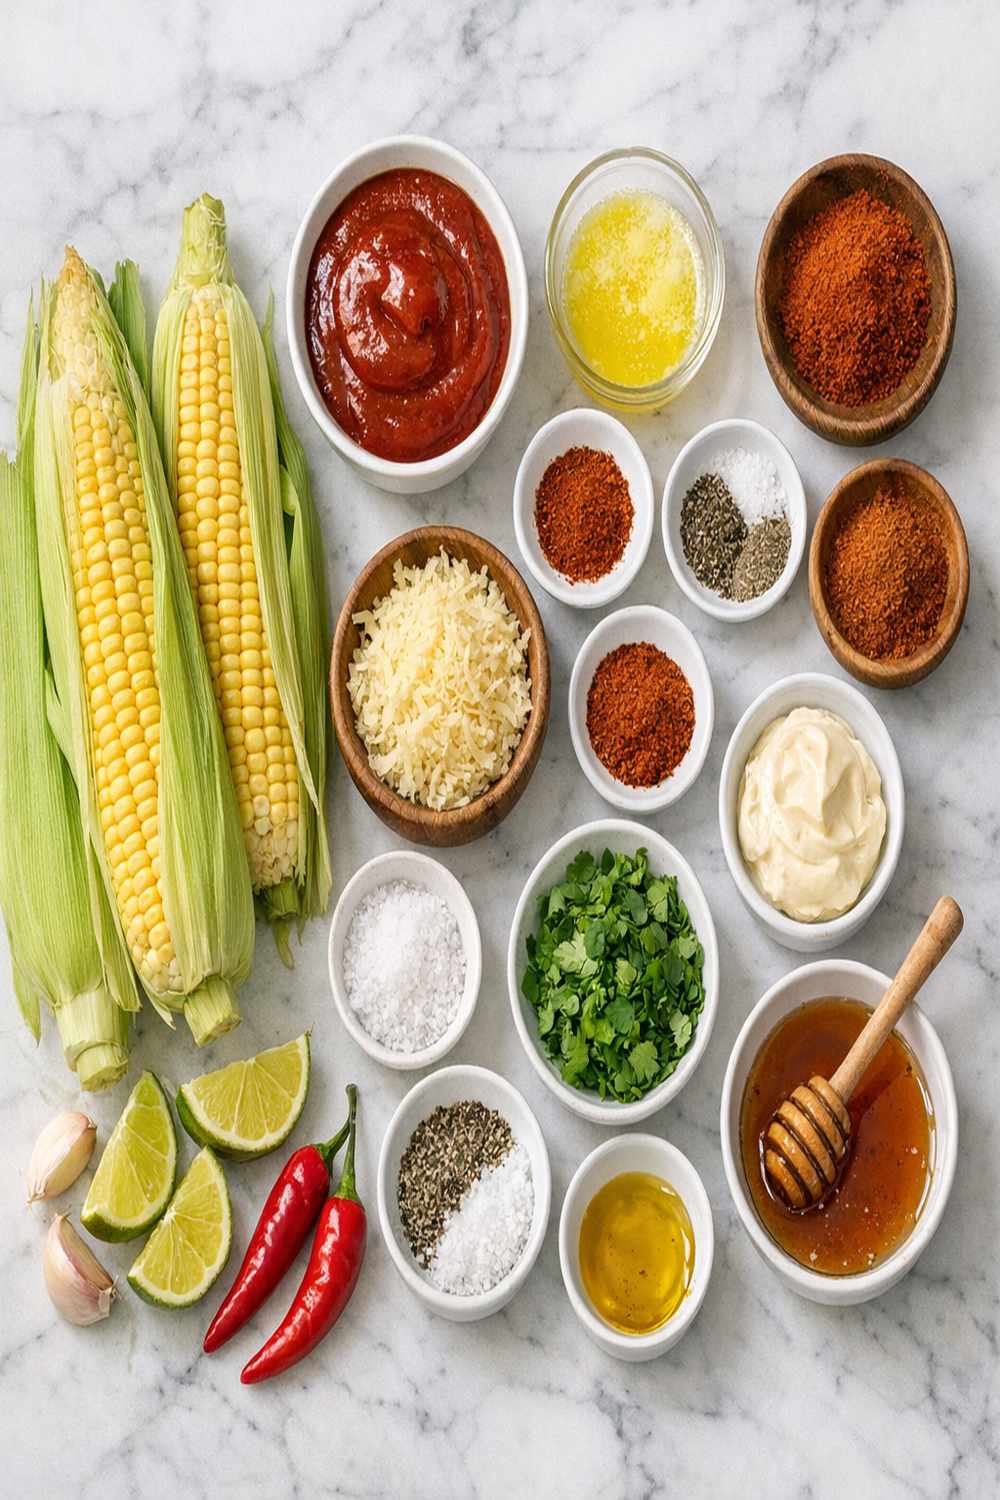
Every ingredient in this recipe earns its place and its cost. There are no fillers, no unnecessary additions. This is intentional cooking at its finest, which is exactly what my nutrition practice teaches about sustainable, budget-friendly eating.
- ¼ teaspoon freshly cracked black pepper (freshly ground tastes infinitely better than pre-ground)
- 2 tablespoons salted butter (softened to room temperature for serving, ensuring it spreads easily)
- 3 tablespoons salted butter (melted and kept warm, not hot—this prevents scorching when applied)
- 4 whole ears of fresh corn (with husks still attached, choosing ears with bright green husks and moist silk)
- 2 tablespoons fresh flat-leaf parsley (finely chopped just before serving to preserve color and flavor)
- ½ teaspoon sea salt (for finishing, divided among ears)
Make-Ahead Guide: Prep Like a Professional
One of the reasons I love serving this at gatherings is how flexible it is for meal prep. As someone who’s hosted hundreds of festive meals, I’ve learned that strategic make-ahead work transforms stress into joy.
Two days before: Purchase your corn and store it in a produce bag in the crisper drawer. Don’t remove husks yet—they protect the kernels and maintain moisture. Store your butter at room temperature for easy spreading.
One day before: Chop your parsley and store it in a damp paper towel inside a sealed container. This keeps it vibrant and fresh. You can prep your grill station: arrange your heat source, have tongs ready, and measure your melted butter into a small heat-safe bowl.
30 minutes before serving: Remove husks from corn and lightly rinse under cool water to remove any silk. Pat completely dry—any moisture will steam rather than char. Set your grill to high heat and let it preheat for at least 10 minutes.
How to Make Perfectly Charred BBQ Corn Without Stress
What separates this dish from mediocre grilled corn is understanding that you’re not just heating it—you’re creating flavor through the Maillard reaction, that beautiful browning that develops when proteins and sugars hit high heat. This requires active attention, but only for 10-12 minutes. Think of it as meditation time at the grill.
Step 1: Prepare Your Grill and Corn
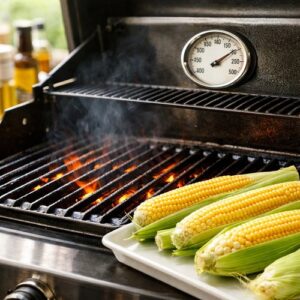
Heat your grill to high heat (around 450-500°F if you have a thermometer). This is crucial—a lukewarm grill won’t create those gorgeous charred bits that make this dish special. While your grill heats, remove the husks completely from all four ears and rinse under cool water, rubbing gently with your hands to remove any remaining silk strands stuck between kernels. Pat everything thoroughly dry with a clean kitchen towel. Moisture is the enemy of charring—it causes steaming instead of browning.

Step 2: Place Corn Directly on the Grill
Once your grill is screaming hot, carefully place the corn directly on the grate. No oil needed—the natural sugars in corn will caramelize on their own. Arrange them perpendicular to the grill bars so they don’t roll into any gaps. Space them about two inches apart for even heat circulation. You should hear an immediate sizzle—that’s the sound of the Maillard reaction beginning.
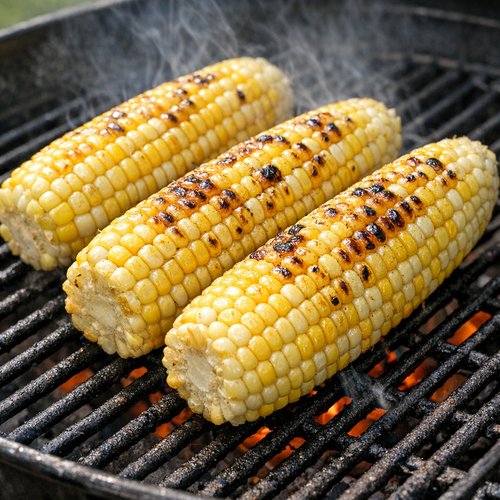
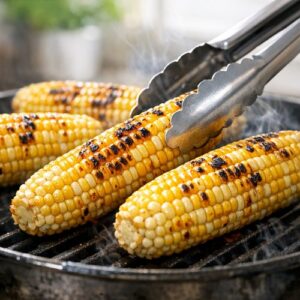
Step 3: Rotate and Monitor for Perfect Charring (10-12 Minutes Total)
This is where patience and attention matter. Set a timer for 2-3 minutes, then rotate each ear a quarter turn using tongs. You’re looking for light charring on the first side—not blackening, but those appetizing brown spots that indicate caramelization. Repeat this rotation every 2-3 minutes for a total cooking time of 10-12 minutes. The corn is done when the kernels are tender (test by piercing with a knife—it should slide through with slight resistance) but still juicy. This is the critical mistake: overcooking causes shriveled, dry corn that no amount of butter can salvage. Under-cooked is better than over-cooked—you can always return it for 30 seconds, but you can’t undo dryness.

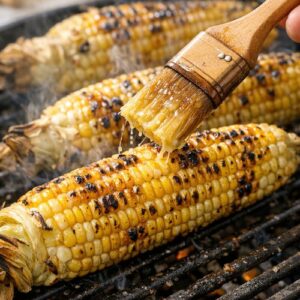
Step 4: Apply Butter and Final Charring
In the final minute of cooking, use a pastry brush to lightly coat each ear with your melted butter. Immediately roll each ear across the grill grate, rotating it to coat all sides and create additional caramelization. The butter adds richness and helps develop those final gorgeous brown spots. Remove from heat immediately—the residual heat will continue cooking for another 30 seconds even after you remove the corn.

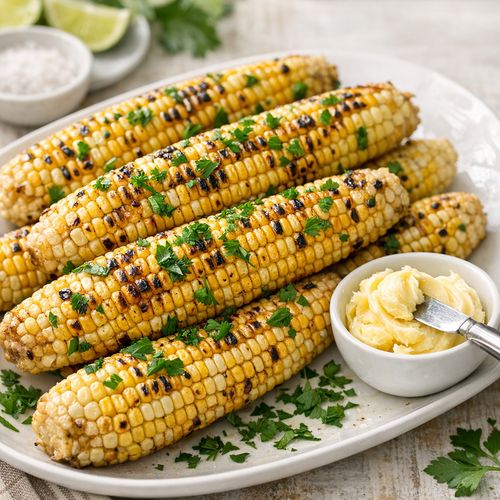
Step 5: Serve While Hot with Fresh Toppings
Transfer your corn to a serving platter and immediately serve with softened room-temperature butter on the side, fresh parsley sprinkled over the top, and a light finishing of sea salt and cracked pepper. The contrast of hot corn, cool softened butter, and fresh herbs creates the restaurant-quality experience. Your guests can apply as much or as little butter as they prefer.
Common Mistakes to Avoid
My nutrition practice isn’t just about what to eat—it’s about removing obstacles to successful, enjoyable meals. Here are the mistakes I see most often with grilled corn:
- Not drying the corn thoroughly before grilling. Even small amounts of water create steam, which prevents charring. I pat mine dry twice—once with a paper towel and once with a kitchen towel—to ensure every kernel is ready for high heat.
- Using oil on the grill or on the corn. Corn contains enough natural sugars and fat that oil is unnecessary. Oil also has a lower smoke point and can create unpleasant burnt flavors. Trust the corn itself.
- Applying butter too early. I see people brush butter on at the beginning, and it burns before the corn finishes cooking, creating acrid flavors that overshadow the sweet corn. Save the butter brush for the final minute.
- Cooking at inconsistent temperatures or not rotating frequently enough. Every grill is different, but frequent rotation (every 2-3 minutes) ensures even cooking and prevents charring that’s too dark or hot spots that cook faster than others.
Expert’s Nutritional Insight: Why Fresh Corn Is Worth the Cost
As someone who’s spent a decade in nutrition practice, I want to highlight something important: fresh corn is nutritionally superior to frozen or canned, and here’s why. One medium ear of corn contains 17 grams of carbohydrate with 2 grams of fiber, 3.5 grams of plant-based protein, and zero added sodium. The kernels are also rich in lutein and zeaxanthin—carotenoids that support eye health—plus B vitamins that support energy metabolism.
More importantly, when you grill corn, you’re not adding empty calories. The butter is a real food with vitamin A and fat-soluble vitamins that help nutrient absorption. Fresh parsley adds vitamin K and antioxidants. At under $2 per serving, you’re getting nutrient-dense food that satisfies completely. That’s the definition of eating well without breaking the budget.
How to Stretch This Recipe Further
- Transform leftover corn into salads and grain bowls. Grill extra ears and slice the kernels off the cob the next morning. Toss with lime juice, black beans, diced red bell pepper, and cilantro for a quick salad. Or add to any grain bowl—the charred flavor elevates even simple rice or quinoa. A single extra ear provides two servings of this salad.
- Freeze corn kernels for winter use. When corn is in peak season and cheapest, grill extra ears specifically for freezing. Let them cool completely, then slice kernels into a freezer-safe container. Use in winter soups, stews, and side dishes. This extends your summer’s bounty and reduces per-serving cost when buying multiple dozen ears at farmers markets.
- Create corn butter for future meals. Blend leftover corn kernels with softened butter and fresh herbs, then freeze in small portions. Use this flavored butter to finish soups, vegetables, or grains. This transforms excess corn into a premium ingredient that adds impact without additional cost.
Budget Substitutions That Don’t Sacrifice Quality
- Frozen corn kernels (from the grocery store) → Fresh corn on the cob (when in season): Frozen corn costs half as much during off-season, and modern freezing techniques preserve nutrients well. However, frozen won’t achieve the charred, caramelized exterior that makes this recipe special. The texture also becomes mushy when grilled. Reserve frozen corn for soups and side dishes; fresh corn is essential for this specific preparation.
- Unsalted butter → Salted butter: I strongly recommend salted butter for this recipe because it contains natural salt that enhances corn’s sweetness. Unsalted butter requires you to add additional salt, and the flavor profile is slightly different. Salted butter is often cheaper anyway—manufacturers don’t charge premium prices for it.
- Dried parsley → Fresh parsley: This is the one substitution I discourage. Dried parsley loses 90% of its flavor and color. Fresh parsley costs $1-2 per bunch and lasts weeks in the refrigerator. It elevates the entire dish and justifies the small cost. If fresh is unavailable, use fresh cilantro instead—it provides similar brightness.
Seasonal Variations: Adapt This Recipe Year-Round
While corn is a summer crop, understanding seasonal variations helps you make this dish when corn is available and affordable in your region.
- Early summer (June): Corn is just arriving at farmers markets. Prices are higher but quality is exceptional. Select ears carefully, choosing those with bright green husks. The kernels will be smaller and sweeter than mid-summer corn.
- Peak season (July-August): Buy in bulk—this is when corn is cheapest and most abundant. Stock up for freezing. The kernels are larger and sweeter, requiring slightly less cooking time (9-10 minutes instead of 12). This is peak grilling season in Colorado.
- Late summer/early fall (September): Corn is still available but supplies dwindle. Prices begin rising. Select the firmest ears with no soft spots. Some corn varieties at this time are starchier than sweet, so taste before committing to bulk purchases.
- Off-season substitution: Frozen corn can be thawed and grilled, though it won’t achieve the same caramelization. Consider this a different recipe entirely—it makes excellent corn salads but not restaurant-quality charred corn.
Can I Store BBQ Corn?
Storage strategy directly impacts your budget because it determines whether you’ll enjoy your meal or waste it. Here’s my professional guidance:
Freshly cooked corn (best served immediately): Ideally, serve within 10 minutes of cooking. The texture and juiciness peak at this point. If you must hold it, keep it covered loosely with foil at room temperature for up to 30 minutes.
Cooked corn (within 3-4 hours): Store in a sealed container in the refrigerator. The kernels will firm up slightly as they cool, but they remain edible. Reheat gently by wrapping in damp paper towels and microwaving for 30-45 seconds, or place on a cool section of your grill and warm through (about 2 minutes).
Leftover kernels (up to 5 days): Slice kernels off the cob and store in an airtight container. Use in salads, grain bowls, soups, or as a side vegetable. The charred flavor actually intensifies after 24 hours in the refrigerator.
Freezing whole ears or kernels (up to 3 months): Cool completely, then wrap tightly in plastic wrap or transfer kernels to freezer containers. Frozen corn works well for soups and cooked applications, though the fresh charred quality diminishes. Don’t refreeze thawed corn—use it immediately after thawing.
Nutrition Information
Here’s the nutritional breakdown per ear of corn (based on USDA data for medium-sized ears, approximately 102 grams raw):
- Calories: 77
- Carbohydrate: 17 grams
- Dietary fiber: 2 grams
- Protein: 3.5 grams
- Fat: 1 gram
- Sodium: 15 mg (before adding salt)
With the added butter and toppings (approximately 1 tablespoon per ear), add 100 calories and 11 grams of fat per serving. Total per ear with butter: approximately 177 calories, with excellent nutrient density at roughly 8-9 cents per 100 calories.
This is nutrient-dense food—the carbohydrates come with fiber and B vitamins, the protein supports satiety, and the fat helps absorb fat-soluble vitamins in the parsley. From a registered dietitian’s perspective, this is exactly the kind of whole-food preparation I recommend for sustainable, enjoyable eating that supports health.
What Can I Serve With BBQ Corn?
I always design festive gatherings around complementary dishes that work together financially and nutritionally. Here are the dishes I pair with this corn to create memorable meals:
- Barbecue Potatoes Recipe – Roasted potatoes create textural contrast with the tender corn kernels. The earthy potato flavor balances the corn’s sweetness. Cost: approximately $3 for four servings.
- Simple green salad with my favorite salad – The bright, nutty dressing cuts through the richness of buttered corn. Prepare ahead and save time at the gathering. Cost: $4 for salad and dressing.
- Grilled chicken or lean beef – Corn and grilled protein naturally pair. A simple seasoned chicken breast or lean burger completes the plate. Keep protein costs down by buying in bulk during sales and freezing.
- Avocado Tomatillo Salsa Recipe – The bright, acidic salsa provides a fresh counterpoint to sweet grilled corn. Spoon directly over warm corn for added dimension. Cost: approximately $3-4.
- Fresh coleslaw with lime vinaigrette – Crisp, cool slaw provides textural contrast to warm corn. The acidity refreshes the palate between bites. Make 2-3 hours ahead for best flavor.
BBQ Corn Recipe
Ingredients
Method
- Heat your grill to high heat (around 450-500°F if you have a thermometer). This is crucial—a lukewarm grill won't create those gorgeous charred bits that make this dish special. While your grill heats, remove the husks completely from all four ears and rinse under cool water, rubbing gently with your hands to remove any remaining silk strands stuck between kernels. Pat everything thoroughly dry with a clean kitchen towel. Moisture is the enemy of charring—it causes steaming instead of browning.
- Once your grill is screaming hot, carefully place the corn directly on the grate. No oil needed—the natural sugars in corn will caramelize on their own. Arrange them perpendicular to the grill bars so they don't roll into any gaps. Space them about two inches apart for even heat circulation. You should hear an immediate sizzle—that's the sound of the Maillard reaction beginning.

- This is where patience and attention matter. Set a timer for 2-3 minutes, then rotate each ear a quarter turn using tongs. You're looking for light charring on the first side—not blackening, but those appetizing brown spots that indicate caramelization. Repeat this rotation every 2-3 minutes for a total cooking time of 10-12 minutes. The corn is done when the kernels are tender (test by piercing with a knife—it should slide through with slight resistance) but still juicy. This is the critical mistake: overcooking causes shriveled, dry corn that no amount of butter can salvage. Under-cooked is better than over-cooked—you can always return it for 30 seconds, but you can't undo dryness.
- In the final minute of cooking, use a pastry brush to lightly coat each ear with your melted butter. Immediately roll each ear across the grill grate, rotating it to coat all sides and create additional caramelization. The butter adds richness and helps develop those final gorgeous brown spots. Remove from heat immediately—the residual heat will continue cooking for another 30 seconds even after you remove the corn.
- Transfer your corn to a serving platter and immediately serve with softened room-temperature butter on the side, fresh parsley sprinkled over the top, and a light finishing of sea salt and cracked pepper. The contrast of hot corn, cool softened butter, and fresh herbs creates the restaurant-quality experience. Your guests can apply as much or as little butter as they prefer.

Notes
FAQs
Can I grill corn with the husks still on?
Yes, and many people do. Leaving husks on prevents direct charring but creates a different (more steamed) result. I prefer removing husks because you lose the beautiful caramelized exterior that makes this dish special. However, if you want a gentler cooking method that prevents any charring, soak husked corn in water for 30 minutes, then grill with husks on for 15-20 minutes, rotating every 3-4 minutes. The result is tender but lacks the restaurant-quality charred appearance.
My corn turned out dry. What went wrong?
The most common cause is cooking too long at high heat. Corn continues cooking even after removal from the grill. If your corn was dry, you likely cooked it 2-3 minutes longer than needed. Start checking for doneness at 8-9 minutes next time. Another possibility: you applied butter too early, which accelerated moisture loss. Save the butter brush for the final minute only. Finally, always buy the freshest corn possible—older ears with less moisture inside dry faster when grilled.
Is there a way to make this without a grill?
You can absolutely use your oven’s broiler as a substitute, though you won’t achieve identical charring. Husk your corn, place on a foil-lined baking sheet, and broil on the top rack for 8-10 minutes, rotating every 2 minutes. You’ll get some browning but not the deep caramelization of a grill. A cast-iron skillet over high heat on your stovetop also works—coat with a tiny amount of oil and turn every 2 minutes for about 10 minutes total. The results are somewhere between boiling and grilling.
How much butter is too much butter for this recipe?
I recommend 1 tablespoon of softened butter per ear at serving, which is about what people naturally apply when it’s available. Some guests prefer less, others want more—that’s why I always serve butter on the side. The initial melted butter for the grill (about ¾ tablespoon per ear) is the right amount to add browning and richness without overwhelming the corn itself. More than this and you’ll mask the sweet corn flavor.
Can I prepare this corn for a crowd in advance?
Grill the corn no more than 1-2 hours before serving if you want to maintain the best texture and juiciness. If you must prepare earlier, store husked corn in the refrigerator on damp paper towels (which prevents drying), then quickly reheat on the grill for 1-2 minutes per side just before serving. Alternatively, grill everything ahead and serve at room temperature with room-temperature softened butter—this actually works beautifully for casual outdoor gatherings and takes pressure off your grilling schedule.
More Budget-Friendly Recipes
- One Pot Creamy Mushroom Chicken Thigh Recipe – A complete, restaurant-quality meal in one pot for under $12
- this simple cake – Transform leftover rice into an impressive side dish
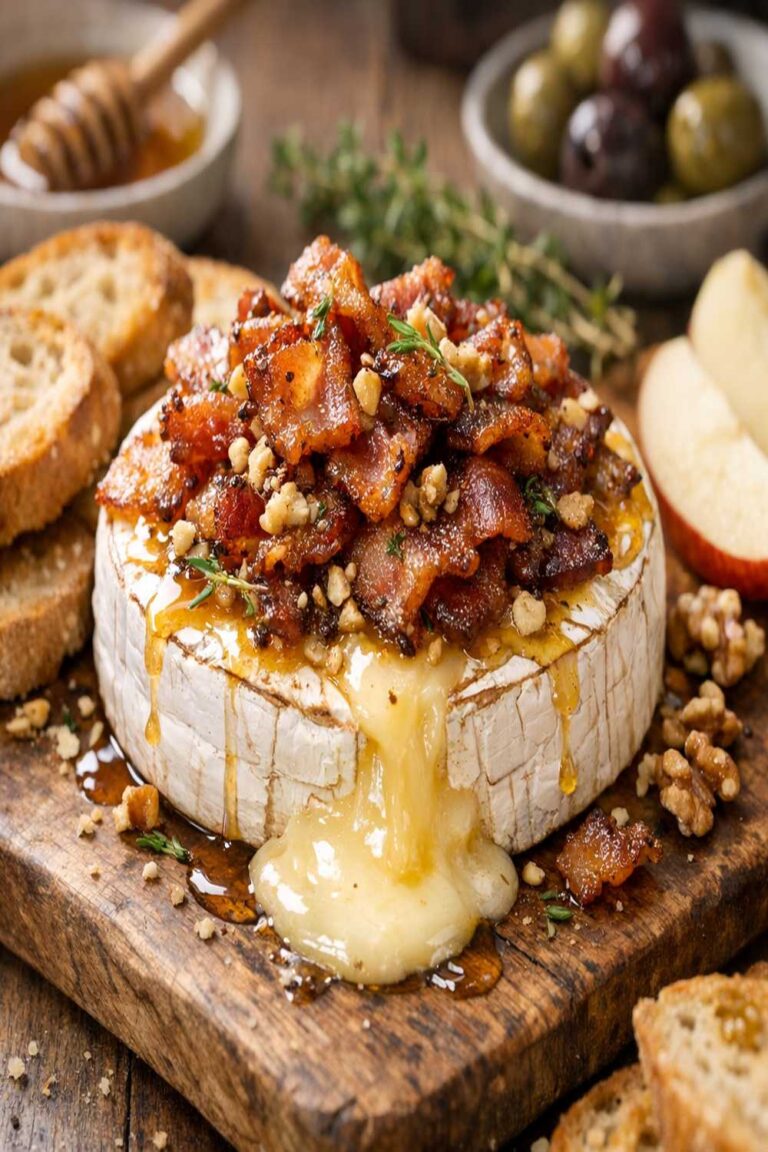
- Bacon And Brie Recipe – An elegant appetizer that costs far less than you’d expect
I hope you’ll make this corn recipe at your next gathering and experience the joy of creating restaurant-quality food without the restaurant price tag. This is what budget-friendly cooking really means to me: not shortcuts or compromises, but thoughtful preparation that honors quality ingredients and celebrates togetherness.
There’s real magic in standing at the grill with friends nearby, tending to something with intention, and knowing you’re spending maybe $8 to create an experience worth far more. That’s the philosophy I bring to every recipe I share.
I can’t wait to share many more delicious and festive recipes with you! Happy Cooking!