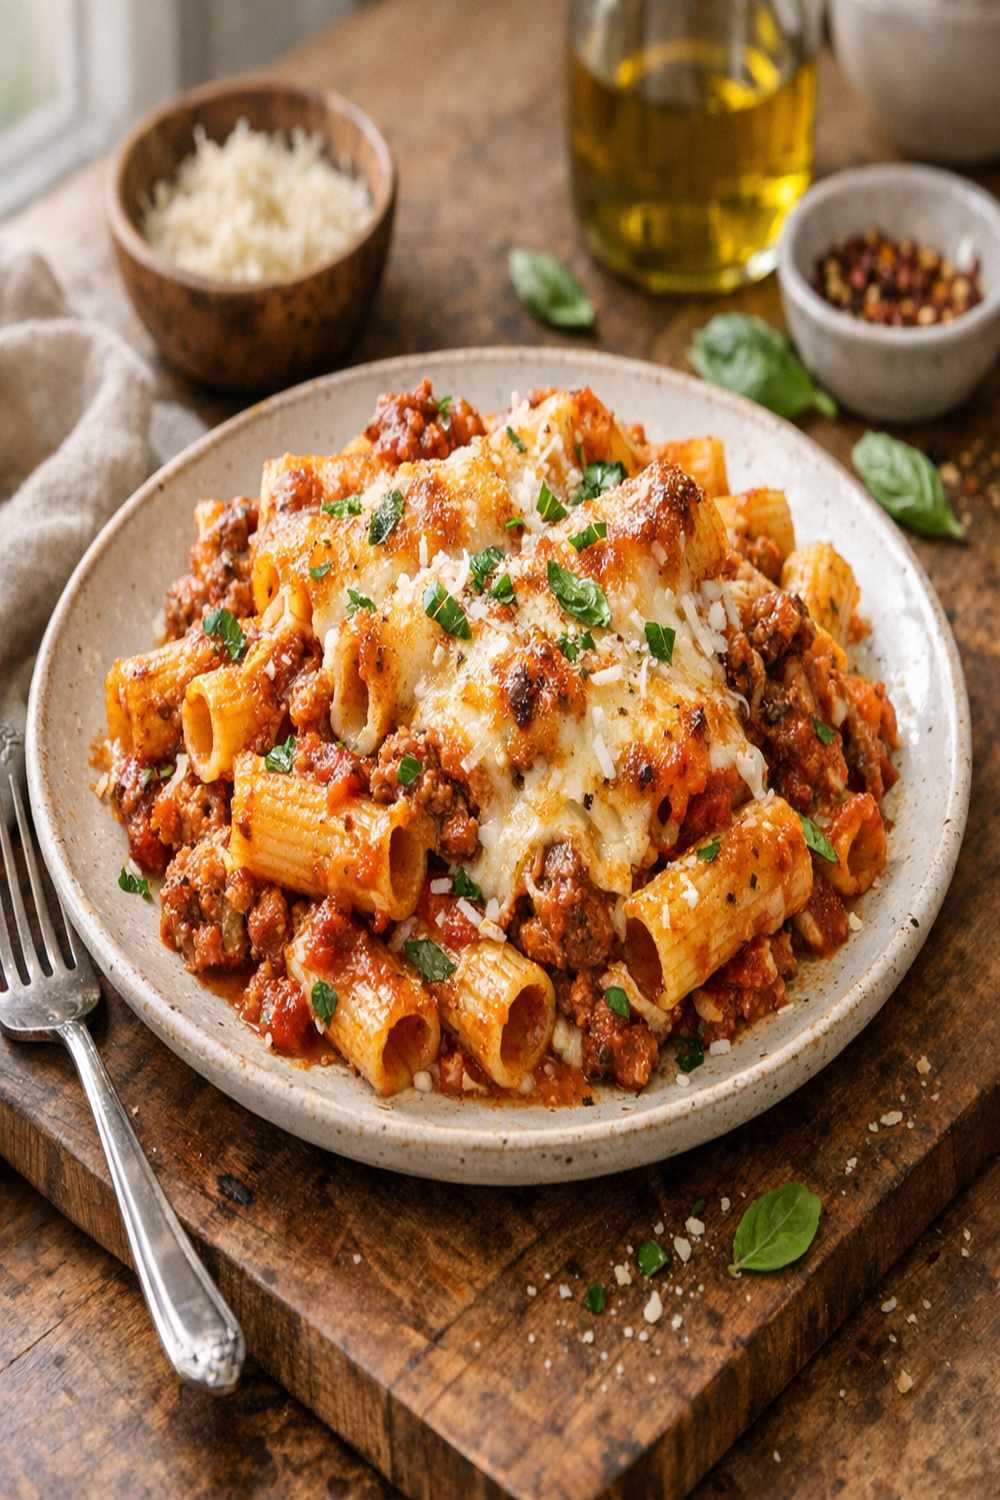
Baked Rigatoni Recipe

This post contains affiliate links. As an Amazon Associate I earn from qualifying purchases.
You’ve probably tried the stovetop-only version where everything sits in a pot, the slow cooker method that leaves your pasta mushy, and maybe even the ultra-simple one-pan approach that somehow never cooks evenly. Here’s why this baked version wins: it delivers perfectly tender pasta with a crispy, golden cheese top, feeds a crowd with minimal stress, and tastes even better the next day. I’ve been serving variations of this recipe at my Colorado holiday gatherings for over a decade, and I can tell you with absolute confidence—this is the method that keeps guests coming back for seconds and asking for the recipe.
Baked Rigatoni Recipe: Which Method Actually Works Best?
As a registered dietitian who’s hosted countless festive gatherings, I’ve tested every possible way to make this dish. I’ve burned it on the stovetop, dealt with watery results from the slow cooker, and struggled with uneven cooking when I tried shortcuts. What I discovered is that the three-stage cooking method—browning the meat, simmering the sauce, and then finishing in the oven with cheese—creates something that’s impossible to replicate any other way.
The magic happens in the final baking stage. The oven’s consistent, dry heat transforms everything: the pasta absorbs the remaining sauce evenly, the cheese creates a protective golden layer that keeps moisture inside, and the bottom edges get just slightly crispy. You can’t achieve this texture rushing things on the stovetop, and the slow cooker tends to make everything soft and uniform rather than layered and interesting.
The Methods Compared: An Honest Breakdown
Let me walk you through the three most popular approaches I’ve tested with my own gatherings, so you can understand why I recommend the baked method for any festive occasion where you’re feeding more than four people.
- Stovetop-Only Method – You brown the meat, add sauce and pasta directly to the same pan, and simmer until combined. Pros: Quick (25 minutes total), one-pot cleanup. Cons: Pasta continues absorbing liquid and gets increasingly mushy, uneven texture throughout the dish, bottom layer burns if you’re not stirring constantly, reheats poorly. Best for: Solo meals or when you’re cooking for two people maximum.
- Slow Cooker Method – Everything goes in a slow cooker on low for 4-6 hours. Pros: Zero active cooking time, hands-off, great for potlucks. Cons: Results are uniformly soft (no textural interest), pasta gets overcooked despite the long time, cheese never develops that golden crust, requires pre-cooking meat separately anyway. Best for: When you absolutely need hands-free cooking and don’t mind sacrificing texture.
- Three-Stage Baked Method (This Recipe) – Brown meat and vegetables, simmer sauce separately, combine with pasta, then finish in the oven with cheese on top. Pros: Perfect, consistent results every single time, freezes beautifully, reheats without drying out, impresses guests with restaurant-quality presentation, makes enough for 6-8 people, can be prepped 24 hours ahead. Cons: Requires a bit more active cooking time upfront (about 35 minutes), uses an oven which might be crowded during holiday cooking. Best for: Holiday gatherings, dinner parties, meal prep, anyone who values quality over convenience.
Why This Version Beats the Rest
The three-stage baked method works because it respects the nature of each ingredient. The ground meat gets a proper sear, which develops deep, savory flavors that stovetop rushing can’t achieve. The sauce simmers separately, allowing the aromatics to fully infuse the tomato base while you’re managing the meat. Most importantly, the pasta is cooked to just-al dente before combining—this is the critical difference from every other method.
When the assembled dish goes into the oven, those slightly firm pasta tubes have room to absorb the remaining sauce moisture without turning to mush. The top gets crispy while the interior stays creamy. The cheese browns in a way that creates actual flavor complexity—toasted, slightly caramelized notes—rather than just melting into a plain layer. And here’s the professional secret: the 20-minute covered bake followed by a 10-minute uncovered finish creates a moisture gradient. The interior stays saucy while the top develops character.
I learned this technique from managing community holiday potlucks where dishes sit out and reheat multiple times. This method survives that chaos. A stovetop version would separate, dry out, and look sad. This one actually improves as it cools and reheats.
The Ingredients
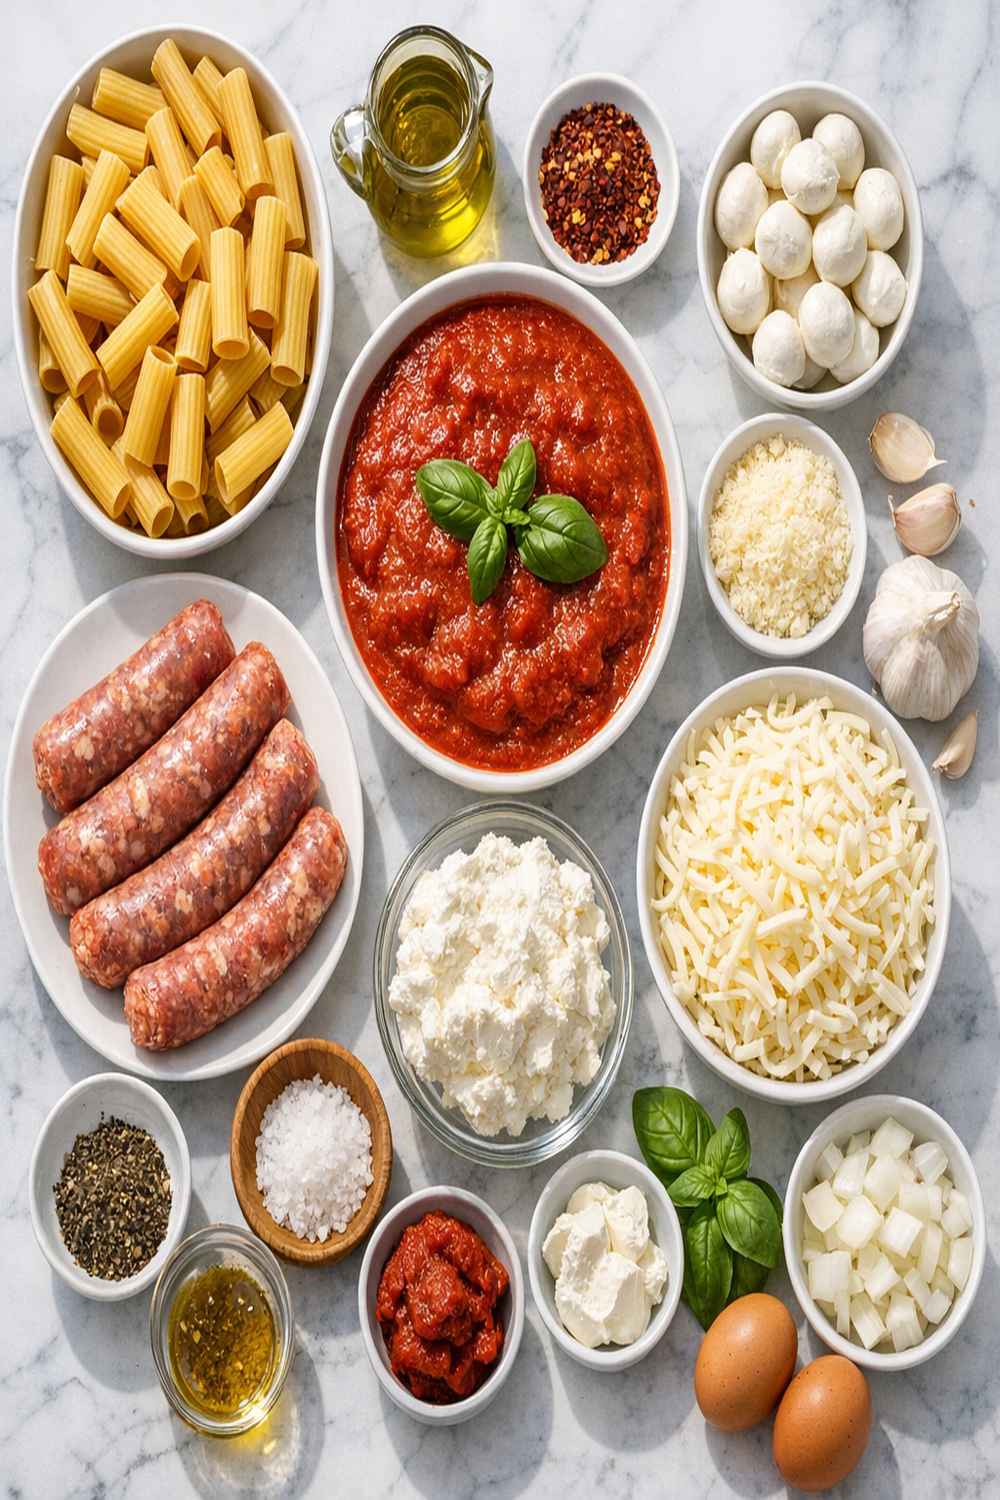
The ingredient choices here are intentionally different from standard casserole recipes I’ve encountered. I’m using slightly less cheese than typical (which keeps this from becoming heavy), quality marinara sauce as the foundation rather than cream-based alternatives, and fresh basil at the end for brightness that cuts through the richness. This is how I’ve learned to build festive meals that feel special but don’t leave guests feeling overstuffed—essential when you’re serving multiple courses at a gathering.
- ¼ cup fresh basil, roughly chopped (adds herbaceous brightness as a finishing touch)
- 2 cups whole milk mozzarella cheese, shredded (use freshly shredded, not pre-packaged, for better melting)
- 1 tablespoon extra-virgin olive oil (for sautéing, quality matters here for flavor)
- Kosher salt and freshly ground black pepper to taste (always season in stages, never at the end)
- 2 cloves fresh garlic, minced (adds depth and prevents the dish from tasting one-note)
- 1 pound ground beef (85/15 blend gives the best texture and richness without excess grease)
- ½ teaspoon red pepper flakes (optional but recommended for subtle heat that enhances flavor complexity)
- 1 pound dried rigatoni pasta (the tube shape holds sauce better than penne, and al dente cooking prevents mushiness)
- 1 large yellow onion, diced (provides sweetness and body to the meat sauce)
- 40 ounces marinara sauce (about 5 cups, preferably with recognizable ingredients and minimal added sugar)
How to Make the Best Version of Baked Rigatoni Recipe
I’m going to walk you through this like you’re in my kitchen in Colorado during the holidays. Each step exists for a specific reason, and I’ll explain the why behind every technique. This is how I’ve learned to make it reliable and foolproof, even when I’m managing multiple dishes simultaneously.
Step 1: Start Your Oven and Cook the Pasta
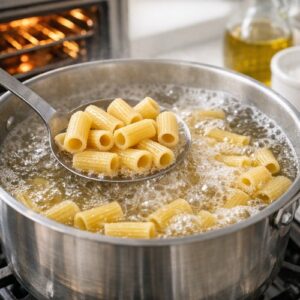
Preheat your oven to 350°F (176°C). This is slightly lower than some recipes call for, and here’s why: it allows the cheese top to brown gently without the edges browning too quickly. While your oven preheats, bring a large pot of salted water to a rolling boil—the water should taste like the sea, which means you’re properly seasoning the pasta itself.
Add your rigatoni and cook according to the package directions, but stop one minute before the recommended time. The pasta should still have a slight firm bite when you taste it—this is crucial. Many people cook pasta all the way to tender because they’re used to finished dishes, but here, the pasta will continue cooking in the oven. If you cook it fully now, you’ll end up with overcooked mush. Drain well and set aside in a large bowl.

Prep-ahead tip: You can cook your pasta up to 24 hours in advance. Toss it lightly with a tiny drizzle of olive oil, cover, and refrigerate. This actually makes assembly faster on the day of your gathering.
Step 2: Build Your Meat Sauce Foundation
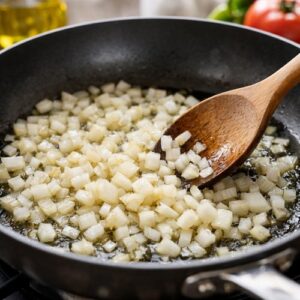
While the pasta cooks, heat your olive oil in a large skillet over medium-high heat. Add your diced onion and cook, stirring occasionally, for about 4-5 minutes until the edges begin to soften and the pieces become translucent at the edges. Don’t skip this step by adding everything at once. The onion needs time to break down and release its natural sugars, which creates the deep, savory base of your sauce.
Once the onion is softened, add your minced garlic and stir constantly for about 30 seconds—just until you can smell it, which means the raw bite is gone. If you cook garlic too long, it becomes bitter. If you don’t cook it at all, it tastes harsh in the finished dish.
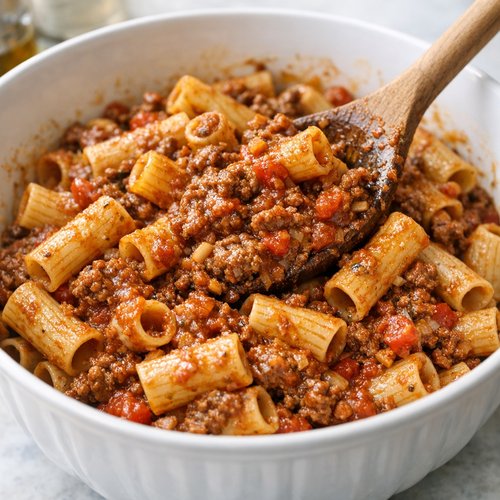
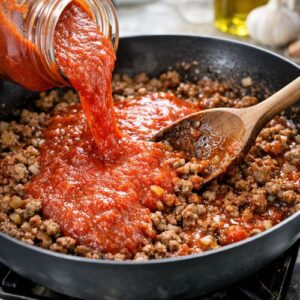
Now add your ground beef directly to the pan. Here’s the technique I use: let it sit undisturbed for about 2 minutes so it makes direct contact with the heat and begins browning on one side. Then break it up with a wooden spoon, stirring as it cooks. Don’t break it into tiny pieces—aim for chunks about the size of peas. Smaller pieces dry out and disappear into the sauce. Keep cooking, stirring occasionally, until there’s no pink remaining and the meat has developed a deep brown color (about 5-7 minutes total).

This browning step is why this method works better than others. You’re creating what’s called the Maillard reaction—a chemical transformation that develops complex, savory flavors that stovetop rushing simply can’t achieve. It takes 2 extra minutes, but it’s the difference between “pretty good” and “why does this taste so restaurant-quality?”
Step 3: Combine with Sauce and Season
Pour your entire jar or can of marinara sauce into the pan with the cooked meat. Stir well, making sure to scrape the browned bits from the bottom of the pan—that’s where all the flavor is. Let the sauce come to a gentle simmer and cook for 2-3 minutes while stirring occasionally. This allows the flavors to meld and the sauce to heat through completely.
Now comes the most important seasoning step: taste the sauce and season with salt and pepper. Start with ½ teaspoon of salt and ¼ teaspoon of pepper, stir well, and taste again. The sauce should taste flavorful but not salty on its own—remember, you’ll be combining it with pasta and cheese, which will also contribute to the overall seasoning. This staged seasoning approach prevents the final dish from being oversalted, which is a common mistake.
If you like a little heat, this is where you’d stir in that optional red pepper flakes. Add them to the meat mixture rather than waiting until the end, so they infuse into the sauce.

Step 4: Combine Everything in Your Baking Dish
Pour your cooked meat sauce over the drained pasta in your large bowl and stir until every piece of rigatoni is coated. This takes a bit of elbow grease—be thorough. You want the sauce distributed evenly so every bite has that savory-tomato-meat component.
Transfer the entire mixture to a 13×9 inch baking dish. Spread it in an even layer. If you’re making this ahead for a holiday gathering, this is the perfect stopping point. Cover with plastic wrap and refrigerate for up to 24 hours. You can bake it straight from the fridge—just add about 5 minutes to the covered baking time.
Make-ahead expert tip: Preparing this the night before your gathering is my secret to stress-free hosting. You can focus on other dishes, set the table, and attend to guests instead of cooking frantically in the kitchen while everyone’s arriving.
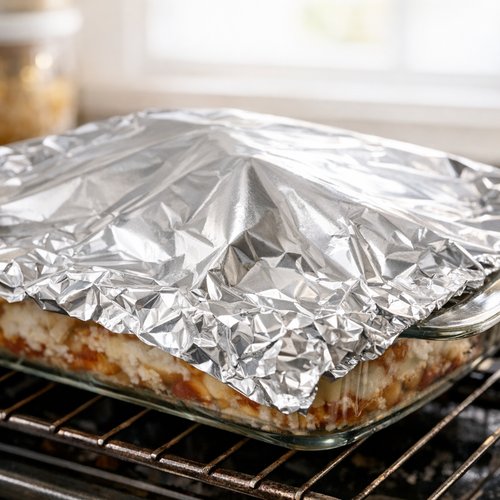
Step 5: The First Bake—Covered
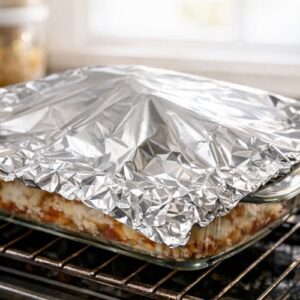
Cover your baking dish loosely with aluminum foil. I say “loosely” because you want to tent it—the foil shouldn’t be pulled tight against the top. A loose tent allows steam to circulate gently while trapping enough moisture so the pasta doesn’t dry out.
Bake at 350°F for 20 minutes. You’re not looking for any browning yet; you’re just heating everything through and allowing the pasta to absorb the remaining sauce moisture. If you’re baking straight from the refrigerator, add 25 minutes total (5 extra for the cold temperature).
Step 6: The Final Bake—Uncovered with Cheese
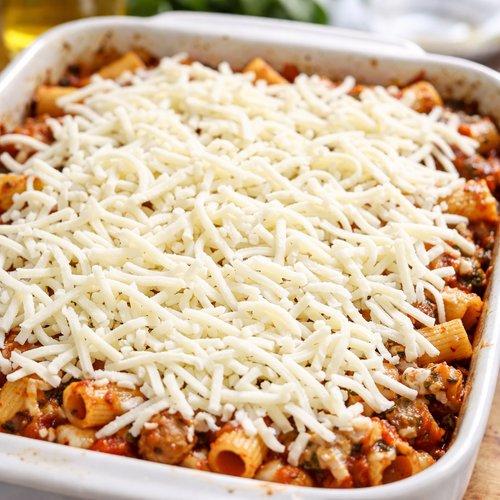
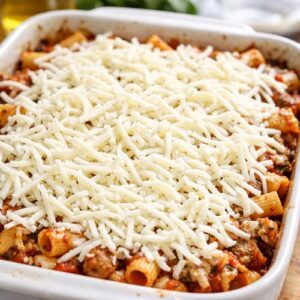
Carefully remove the baking dish from the oven and remove the foil. Evenly distribute your shredded mozzarella cheese over the top of the pasta mixture. I use about 2 cups for this amount, which is enough to create a cohesive, golden layer without making the dish overly heavy or rich. Don’t pack the cheese down; let it sit loosely on top so it can brown evenly.
Return to the oven, uncovered, for 10 more minutes until the cheese is completely melted and the edges are turning golden brown. You’ll see some slightly darker spots on the top—that’s exactly what you want. That’s flavor development. The cheese should bubble slightly at the edges.
Watch it carefully during this final stage. Every oven is slightly different—if your oven runs hot, it might brown faster. You’re looking for golden, not dark brown.
Step 7: Rest and Finish with Fresh Basil
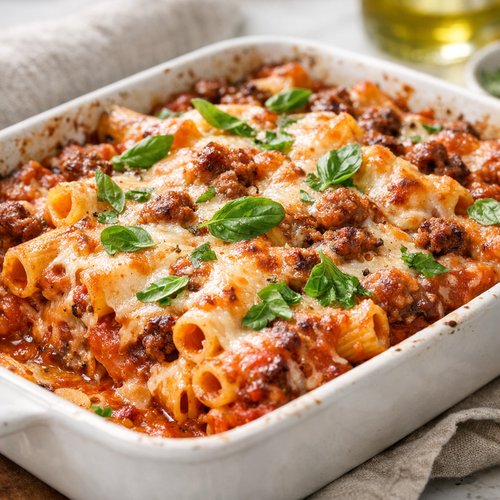
Remove from the oven and let the baked rigatoni rest for 3-5 minutes before serving. This resting period allows the interior to set slightly so it holds together when you scoop it onto plates. During the first 2 minutes of resting, the residual heat finishes cooking the pasta and allows the cheese to firm up just slightly.
Just before serving, scatter your fresh basil over the top. The heat will gently warm the basil and release its essential oils, adding a bright, herbaceous note that balances the richness. Fresh basil is non-negotiable here—it completely changes the flavor profile from heavy to elegant.
Side-by-Side Results: What to Expect
When you pull this baked rigatoni from the oven, you should see a bubbling, golden-brown cheese top with slightly darker edges and patches where the cheese has started to caramelize. The aroma should be complex—tomato sauce, browned meat, toasted cheese—not one-dimensional.
When you scoop a portion onto a plate, the pasta should hold together in a cohesive clump, not separate into individual tubes or fall apart. The sauce should be thick enough to coat each tube but still flow slightly on the plate—not soupy like stovetop versions and not dry like overcooked casseroles.
When you take a bite, the top layer of pasta should have texture—slightly crispy from the cheese, slightly firm from being al dente originally. The interior should be creamy and sauce-coated. The cheese adds richness and salt, the basil adds brightness, and the meat adds savory depth. Each element distinct but unified.
Compare this to stovetop versions, which tend to be uniformly soft with sauce that’s either too thick (because you overcooked it) or too thin (because you undercooked it). The slow cooker version will be noticeably softer throughout with no textural interest and no golden top. This baked method creates something genuinely different and noticeably better.
When to Use Each Method
- Holiday Dinner Parties – This baked method wins decisively. It can be made 24 hours ahead, reheats beautifully, looks restaurant-quality when served, and impresses guests. You’re not standing at the stove during your gathering.
- Casual Weeknight Dinners – The stovetop method is actually better here. It’s quicker (25 minutes vs. 45), uses fewer dishes, and for a family meal, the texture difference matters less than convenience.
- Potluck Situations Where You Need Absolutely Zero Attention – The slow cooker method wins, despite inferior texture. If you’re bringing this to an event where you can’t heat it in an oven and texture isn’t critical, slow cooker is your solution.
- Make-Ahead Meal Prep – This baked version is your only option. It freezes beautifully, reheats without drying, and you can portion it into individual containers. The other methods don’t survive freezing well.
- Feeding Large Groups (8+ people) – Only this method scales well. Stovetop becomes difficult in large quantities, and slow cookers have space limitations. This recipe doubles easily in two baking dishes.
Can I Store Baked Rigatoni Recipe?
Refrigerator Storage: Let the baked rigatoni cool to room temperature (about 15 minutes), then cover with plastic wrap or transfer to an airtight container. It will keep for 3-4 days in the refrigerator. Reheat covered in a 350°F oven for 15-20 minutes until warmed through, or in the microwave in 2-minute intervals, stirring between each.
Freezer Storage: You can freeze this dish in multiple ways. Freeze it in the assembled baking dish (before baking) wrapped tightly in plastic wrap and foil for up to 3 months. Bake from frozen, adding about 15 minutes to both baking stages. Alternatively, freeze portions in individual airtight containers for grab-and-go meals that reheat in about 5 minutes in the microwave.
Important note: If you’ve already baked it, cool completely before freezing to prevent condensation. Frozen baked portions keep for 2-3 months and reheat beautifully—often better than fresh because the flavors have melded.
Pro tip for holiday gatherings: I often assemble three versions of this dish and freeze two, keeping one to bake fresh. This gives you flexibility if your guest list changes or if you want to extend the festive eating across several days.
Nutrition Information
Based on USDA nutritional database calculations, one serving (approximately 1.5 cups) of this baked rigatoni contains approximately 520 calories, 28 grams of protein, 42 grams of carbohydrates, and 22 grams of fat. A full recipe makes about 6 generous servings or 8 moderate servings.
The protein comes from the beef and mozzarella (essential for satiety and post-meal satisfaction), the carbohydrates are primarily from the pasta (complex carbs that provide sustained energy), and the fat is from the beef, cheese, and olive oil (essential for nutrient absorption and flavor).
Expert’s Nutritional Tip: As a registered dietitian, I always recommend serving this dish with a large green salad on the side. The fiber and micronutrients from vegetables balance the richness of the pasta and cheese, creating a more complete meal that leaves guests feeling satisfied without being overstuffed. This is especially important at holiday gatherings where people often eat multiple courses. The fresh vegetables also provide a flavor contrast that makes the entire meal more interesting.
If you want to boost the nutrition profile, try stirring in a package of frozen spinach (thawed and squeezed dry) when you combine the sauce with the pasta. You’ll add vitamins and minerals without changing the flavor profile. I also sometimes use a mixture of 85/15 ground beef and 93/7 ground turkey (half and half) to reduce saturated fat while maintaining the hearty flavor.
What Can I Serve With Baked Rigatoni Recipe?
When I’m hosting festive gatherings, I build the meal around this baked rigatoni as the anchor, which means I choose sides that complement rather than compete. Here’s what works beautifully with this dish.
- Large Leafy Green Salad with Bright Vinaigrette – The acidity cuts through the richness of the cheese and meat. I use arugula or mixed greens with a simple lemon vinaigrette. This is my most-served pairing because it balances the meal perfectly.
- Barbecue Potatoes – If you want a heartier side, these roasted potatoes with smoky barbecue flavors complement the Italian-style pasta beautifully. The different flavor profile makes the menu more interesting.
- Crusty Garlic Bread – For more casual gatherings, garlic bread is expected. Make it fresh or use quality store-bought. It’s perfect for soaking up extra sauce from plates.
- Roasted Vegetables – Broccoli, zucchini, or bell peppers roasted with olive oil and garlic at 400°F until tender and slightly caramelized. The char adds depth that balances the pasta.
- Caprese Salad – Tomato, fresh mozzarella, and basil with olive oil and salt. It’s light, refreshing, and echoes the Italian flavors in the main dish without being repetitive.
- Banana Pie With Pudding – For dessert after a festive pasta dinner, this creamy, cool option provides textural contrast and a satisfying sweet finish that’s not too heavy.
Common Mistakes to Avoid
Mistake 1: Cooking the Pasta All the Way to Tender Before Baking – This is the most common error I see. People are used to finished pasta dishes being fully cooked, so they cook the rigatoni to package-recommended time. Then it continues cooking in the oven and becomes mushy. Cook one minute before the package says, taste it to confirm there’s still a firm bite, and trust the process.
Mistake 2: Using Pre-Shredded Cheese – I know it’s convenient, but pre-shredded cheese contains anti-caking agents that prevent it from melting smoothly. It becomes grainy and separated. Shred fresh mozzarella (or buy fresh balls and shred them) just before using. Yes, it takes 2 minutes longer. The difference is noticeable and worth it.
Mistake 3: Skipping the Resting Period After Baking – People pull the dish out of the oven and immediately start scooping. The interior is still too soft and falls apart on the plate. Three to five minutes of resting allows everything to set slightly, creating a dish that holds together beautifully when served. This is the professional plating secret many home cooks miss.
Mistake 4: Overseasoning or Underseasoning – This happens when people either salt everything to death while cooking the meat, then add more with the sauce (resulting in an overly salty dish), or they don’t taste and adjust. Season in stages: taste the meat sauce before adding to pasta, adjust there. This prevents final-product disappointments.
Seasonal Variations
Spring Version: Add sautéed fresh asparagus and peas to the meat sauce before combining with pasta. Use fresh basil (more than the recipe calls for) and finish with a squeeze of fresh lemon juice. The spring vegetables lighten the dish while keeping the savory satisfaction.
Summer Version: Stir in fresh corn kernels (about ¾ cup) and add roasted red bell peppers to the meat sauce. Summer tomatoes in your marinara sauce (if available) make an even bigger flavor difference. Serve with a very cold white wine.
Fall Version: This is when I sometimes add a teaspoon of balsamic vinegar to the meat sauce (adds depth and slight sweetness) and finish with crispy sage leaves instead of basil. You can also add a pinch of nutmeg to the sauce—just ¼ teaspoon—which adds autumnal warmth without being obvious.
Winter Holiday Version: This is the version I’m sharing with you exactly as is. At the holidays, I sometimes add crispy pancetta to the meat mixture (about 4 ounces, cooked and chopped) for extra depth, and I use fresh Italian parsley along with the basil at the end. If you want festive presentation, you can garnish with thin strips of roasted red pepper before serving.
Expert’s Make-Ahead Guide
As someone who hosts multiple holiday gatherings annually, I’ve perfected the make-ahead timing for this dish. Here’s my detailed guide so you can stress-free through your gathering.
Two Days Before: Make your marinara sauce from scratch if you’re so inclined (this is optional but creates superior flavor). Let it cool, transfer to airtight containers, and refrigerate. If using store-bought sauce, simply purchase it and keep it in the pantry.
One Day Before: Dice your onion, mince your garlic, and store in airtight containers in the refrigerator. Shred your mozzarella cheese fresh (don’t pre-shred) and store in a container lined with paper towels to absorb excess moisture. This prevents clumping.
The Day Before (Afternoon): Cook your pasta one minute under package time, drain, toss with a tiny bit of olive oil, cover, and refrigerate. Brown your meat with onions and garlic, add the sauce, season, and cool completely. Then combine everything in your baking dish, cover with plastic wrap and foil, and refrigerate.
Gathering Day (30 Minutes Before): Remove your assembled baking dish from the refrigerator. Don’t wait for it to come to room temperature—you can bake it straight from the fridge. Just add 5 minutes to the covered baking time. Start your oven preheating.
Gathering Day (30 Minutes Before Serving): Put the covered rigatoni in the oven. It will bake covered for 25 minutes (remember the extra 5 for cold temperature), then you’ll remove foil, add cheese, and bake uncovered for 10 more minutes. Total time from cold dish to table: 35 minutes. Set your timer and focus on your guests.
Just Before Serving: Remove from oven, let rest 3-5 minutes, scatter fresh basil over top, and serve. You’ve created a restaurant-quality dish while barely spending time in the kitchen during your gathering.
Baked Rigatoni Recipe
Ingredients
Method
- Preheat your oven to 350°F (176°C). This is slightly lower than some recipes call for, and here's why: it allows the cheese top to brown gently without the edges browning too quickly. While your oven preheats, bring a large pot of salted water to a rolling boil—the water should taste like the sea, which means you're properly seasoning the pasta itself. Add your rigatoni and cook according to the package directions, but stop one minute before the recommended time. The pasta should still have a slight firm bite when you taste it—this is crucial. Many people cook pasta all the way to tender because they're used to finished dishes, but here, the pasta will continue cooking in the oven. If you cook it fully now, you'll end up with overcooked mush. Drain well and set aside in a large bowl. Prep-ahead tip: You can cook your pasta up to 24 hours in advance. Toss it lightly with a tiny drizzle of olive oil, cover, and refrigerate. This actually makes assembly faster on the day of your gathering.
- While the pasta cooks, heat your olive oil in a large skillet over medium-high heat. Add your diced onion and cook, stirring occasionally, for about 4-5 minutes until the edges begin to soften and the pieces become translucent at the edges. Don't skip this step by adding everything at once. The onion needs time to break down and release its natural sugars, which creates the deep, savory base of your sauce. Once the onion is softened, add your minced garlic and stir constantly for about 30 seconds—just until you can smell it, which means the raw bite is gone. If you cook garlic too long, it becomes bitter. If you don't cook it at all, it tastes harsh in the finished dish. Now add your ground beef directly to the pan. Here's the technique I use: let it sit undisturbed for about 2 minutes so it makes direct contact with the heat and begins browning on one side. Then break it up with a wooden spoon, stirring as it cooks. Don't break it into tiny pieces—aim for chunks about the size of peas. Smaller pieces dry out and disappear into the sauce. Keep cooking, stirring occasionally, until there's no pink remaining and the meat has developed a deep brown color (about 5-7 minutes total). This browning step is why this method works better than others. You're creating what's called the Maillard reaction—a chemical transformation that develops complex, savory flavors that stovetop rushing simply can't achieve. It takes 2 extra minutes, but it's the difference between "pretty good" and "why does this taste so restaurant-quality?"
- Pour your entire jar or can of marinara sauce into the pan with the cooked meat. Stir well, making sure to scrape the browned bits from the bottom of the pan—that's where all the flavor is. Let the sauce come to a gentle simmer and cook for 2-3 minutes while stirring occasionally. This allows the flavors to meld and the sauce to heat through completely. Now comes the most important seasoning step: taste the sauce and season with salt and pepper. Start with ½ teaspoon of salt and ¼ teaspoon of pepper, stir well, and taste again. The sauce should taste flavorful but not salty on its own—remember, you'll be combining it with pasta and cheese, which will also contribute to the overall seasoning. This staged seasoning approach prevents the final dish from being oversalted, which is a common mistake. If you like a little heat, this is where you'd stir in that optional red pepper flakes. Add them to the meat mixture rather than waiting until the end, so they infuse into the sauce.
- Pour your cooked meat sauce over the drained pasta in your large bowl and stir until every piece of rigatoni is coated. This takes a bit of elbow grease—be thorough. You want the sauce distributed evenly so every bite has that savory-tomato-meat component. Transfer the entire mixture to a 13x9 inch baking dish. Spread it in an even layer. If you're making this ahead for a holiday gathering, this is the perfect stopping point. Cover with plastic wrap and refrigerate for up to 24 hours. You can bake it straight from the fridge—just add about 5 minutes to the covered baking time. Make-ahead expert tip: Preparing this the night before your gathering is my secret to stress-free hosting. You can focus on other dishes, set the table, and attend to guests instead of cooking frantically in the kitchen while everyone's arriving.

- Cover your baking dish loosely with aluminum foil. I say "loosely" because you want to tent it—the foil shouldn't be pulled tight against the top. A loose tent allows steam to circulate gently while trapping enough moisture so the pasta doesn't dry out. Bake at 350°F for 20 minutes. You're not looking for any browning yet; you're just heating everything through and allowing the pasta to absorb the remaining sauce moisture. If you're baking straight from the refrigerator, add 25 minutes total (5 extra for the cold temperature).
- Carefully remove the baking dish from the oven and remove the foil. Evenly distribute your shredded mozzarella cheese over the top of the pasta mixture. I use about 2 cups for this amount, which is enough to create a cohesive, golden layer without making the dish overly heavy or rich. Don't pack the cheese down; let it sit loosely on top so it can brown evenly. Return to the oven, uncovered, for 10 more minutes until the cheese is completely melted and the edges are turning golden brown. You'll see some slightly darker spots on the top—that's exactly what you want. That's flavor development. The cheese should bubble slightly at the edges. Watch it carefully during this final stage. Every oven is slightly different—if your oven runs hot, it might brown faster. You're looking for golden, not dark brown.
- Remove from the oven and let the baked rigatoni rest for 3-5 minutes before serving. This resting period allows the interior to set slightly so it holds together when you scoop it onto plates. During the first 2 minutes of resting, the residual heat finishes cooking the pasta and allows the cheese to firm up just slightly. Just before serving, scatter your fresh basil over the top. The heat will gently warm the basil and release its essential oils, adding a bright, herbaceous note that balances the richness. Fresh basil is non-negotiable here—it completely changes the flavor profile from heavy to elegant.

FAQs
Is This Recipe Better Than the Stovetop Method I Usually Make?
Absolutely, but with a caveat: it depends on your goals. If you’re hosting a gathering, celebrating an occasion, or want restaurant-quality results, yes—this baked method is decisively better. You get a golden cheese top, better texture, consistent results, and it’s easier to reheat. If you’re making a quick weeknight dinner for your family and texture isn’t your priority, the stovetop method is fine and faster.
I recommend trying this method at least once, ideally when you have time to appreciate the difference. You’ll taste the quality gap immediately—the way the pasta has texture, the cheese browns properly, and the overall dish feels intentional rather than rushed. Many home cooks switch to this method after one try.
Can I Make This Ahead and Freeze Before Baking?
Yes, this is one of the reasons I love this recipe. Assemble everything in your baking dish, cool completely, then wrap tightly in plastic wrap and heavy-duty foil. Freeze for up to 3 months. To bake from frozen, cover with foil and bake at 350°F for approximately 35-40 minutes until heated through (check that the center is steaming hot), then add cheese and bake uncovered for 10 minutes. This is my secret for stress-free holiday hosting—I freeze half the recipe and have options.
What If I Don’t Have Fresh Basil?
Fresh basil truly makes a difference in the final presentation and flavor, but if you don’t have it, dried basil (1 tablespoon stirred into the meat sauce) or fresh parsley (¼ cup scattered on top) works. I don’t recommend omitting it entirely because that bright herbaceous note balances the richness. In winter when fresh basil is hard to find, I buy it from the produce section at the grocery store even though it costs more, because it completely changes the dish.
How Do I Know When the Cheese Is Done Browning in the Final Bake?
Watch for the cheese to be completely melted with patches of golden-brown color. You should see slight browning at the edges and scattered golden spots across the top. The edges might bubble slightly. This takes about 10 minutes in a standard 350°F oven. If your oven runs hot, it might be 8-9 minutes. If it runs cool, 11-12 minutes. You’re looking for golden, not dark brown. Err on the side of slightly under-browned rather than over-browned—you can always return it to the oven for another minute, but you can’t undo over-browning.
Can I Use a Different Type of Pasta?
Rigatoni is ideal because the tube shape holds sauce beautifully and the pasta has enough structure to not turn mushy. Penne works similarly well. Spaghetti, linguine, and angel hair don’t work—they’re too delicate and break apart easily when you’re stirring and baking. Short pasta shapes like shells, bow ties, or wheels also work fine. Stay with chunky shapes, cook them one minute under package time, and you’ll be successful.
More Recipes You’ll Love
- Lemon Baked Cod Recipe – A light, elegant seafood option for when you want something completely different but equally impressive for festive gatherings
- this no-bake Italian dessert – The perfect Italian-inspired dessert to serve after this baked rigatoni, with coffee and cocoa notes that complement the savory meal beautifully
Final Thoughts: Why This Is the Definitive Method
I’ve been hosting holiday gatherings in Colorado for over a decade, and I’ve learned that the best dishes are the ones that let you actually enjoy your guests instead of stressing in the kitchen. This baked rigatoni is that dish. It’s make-ahead friendly, impressive without being fussy, scalable for any group size, and it tastes noticeably better than shortcuts.
The three-stage cooking method—browning meat, simmering sauce, then finishing in the oven—respects each ingredient and creates something genuinely better than any other method. You’re not rushing on the stovetop, you’re not dealing with mushy slow cooker results, and you’re not compromising on presentation or texture.
Start with this exact recipe, make it at least once to understand how it works, then feel free to experiment with seasonal variations. Whether you’re hosting Thanksgiving friends, celebrating a milestone birthday, or simply gathering family around your table, this baked rigatoni will make you look like you spent hours in the kitchen when you actually had plenty of