Chicken Parmesan Meatball Recipe
This post contains affiliate links. As an Amazon Associate I earn from qualifying purchases.
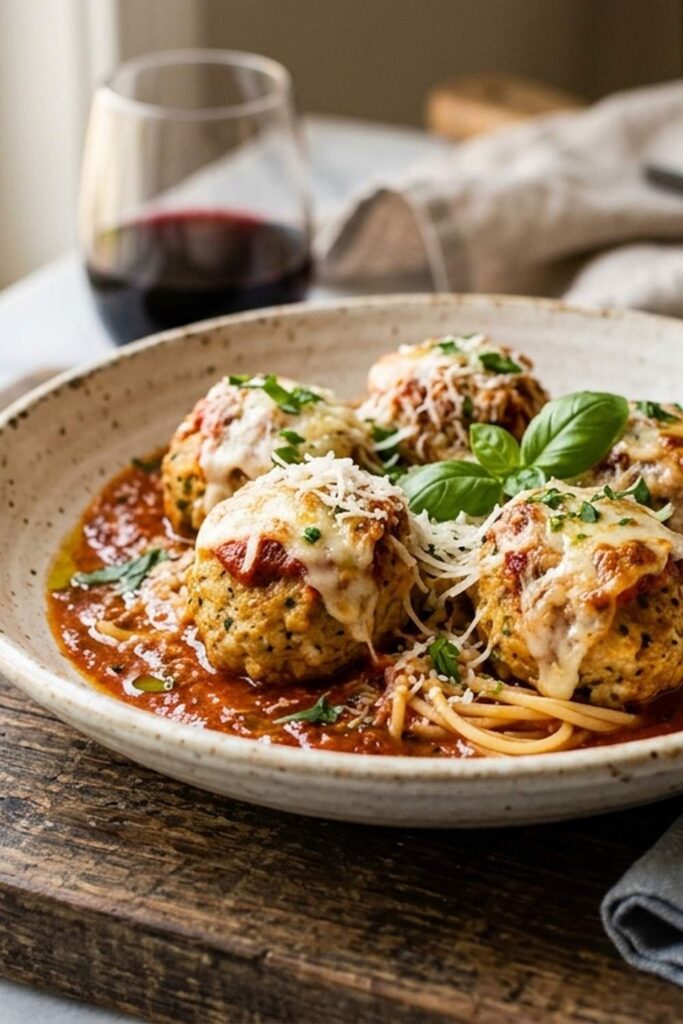
These chicken parmesan meatballs don’t just taste incredible—they stop people in their tracks. The moment guests bite through that golden-brown exterior and discover the warm, melted mozzarella center surrounded by herbs and cheese, you’ve already won the table. I’ve been making these for Colorado holiday gatherings for over a decade, and they’ve become the dish people ask about before dessert even arrives. Whether you’re hosting Friendsgiving or a winter celebration, this recipe transforms a simple appetizer into an edible centerpiece that looks restaurant-quality yet comes together in your home kitchen. These meatballs also pair beautifully with other make-ahead dishes like Avocado Tomatillo Salsa Recipe, which offers fresh contrast to the rich, savory flavors here.
The Most Beautiful Chicken Parmesan Meatballs You’ll Ever Make (And It’s Easier Than It Looks)
I’ll never forget the year I first introduced these meatballs to my sister’s holiday party in Boulder. I’d been experimenting with the cheese-center concept for weeks, worried the mozzarella would leak out or the meatballs would fall apart. When I pulled the baking dish from the oven and the basil hit the warm marinara, the aroma alone drew everyone into the kitchen. But what really got them was the presentation—golden spheres nestled in vibrant red sauce, fresh green basil scattered across the top, creamy white cheese just visible at the edges where someone had already bitten in. Suddenly, this wasn’t just an appetizer. It was theater.

The Visual Elements That Make This Dish Stunning
Creating a visually spectacular appetizer isn’t about complicated plating techniques—it’s about understanding how color, texture, and composition work together on the plate. These meatballs have natural built-in beauty that requires minimal effort to highlight.
- Golden-brown exterior – The panko breadcrumb coating creates a crispy, appetizing crust with warm caramel tones that signal proper searing. This happens when you use medium-high heat and avoid crowding the skillet, allowing each meatball to develop an even, burnished surface.
- Creamy white cheese contrast – The mozzarella centers create visual intrigue. When a meatball is cut or broken open, that melted white interior against the herbs and meat creates a stunning cross-section that makes people want to photograph and taste simultaneously.
- Vibrant red marinara base – Quality marinara sauce provides a rich, saturated color that frames the meatballs beautifully. The depth of red signals freshness and quality ingredients, which builds anticipation before the first bite.
- Fresh basil garnish – Torn basil leaves add bright green color, delicate texture, and aromatic appeal. The soft, irregular shapes contrast beautifully with the spherical meatballs and smooth sauce.
Choosing Ingredients for Maximum Visual Impact
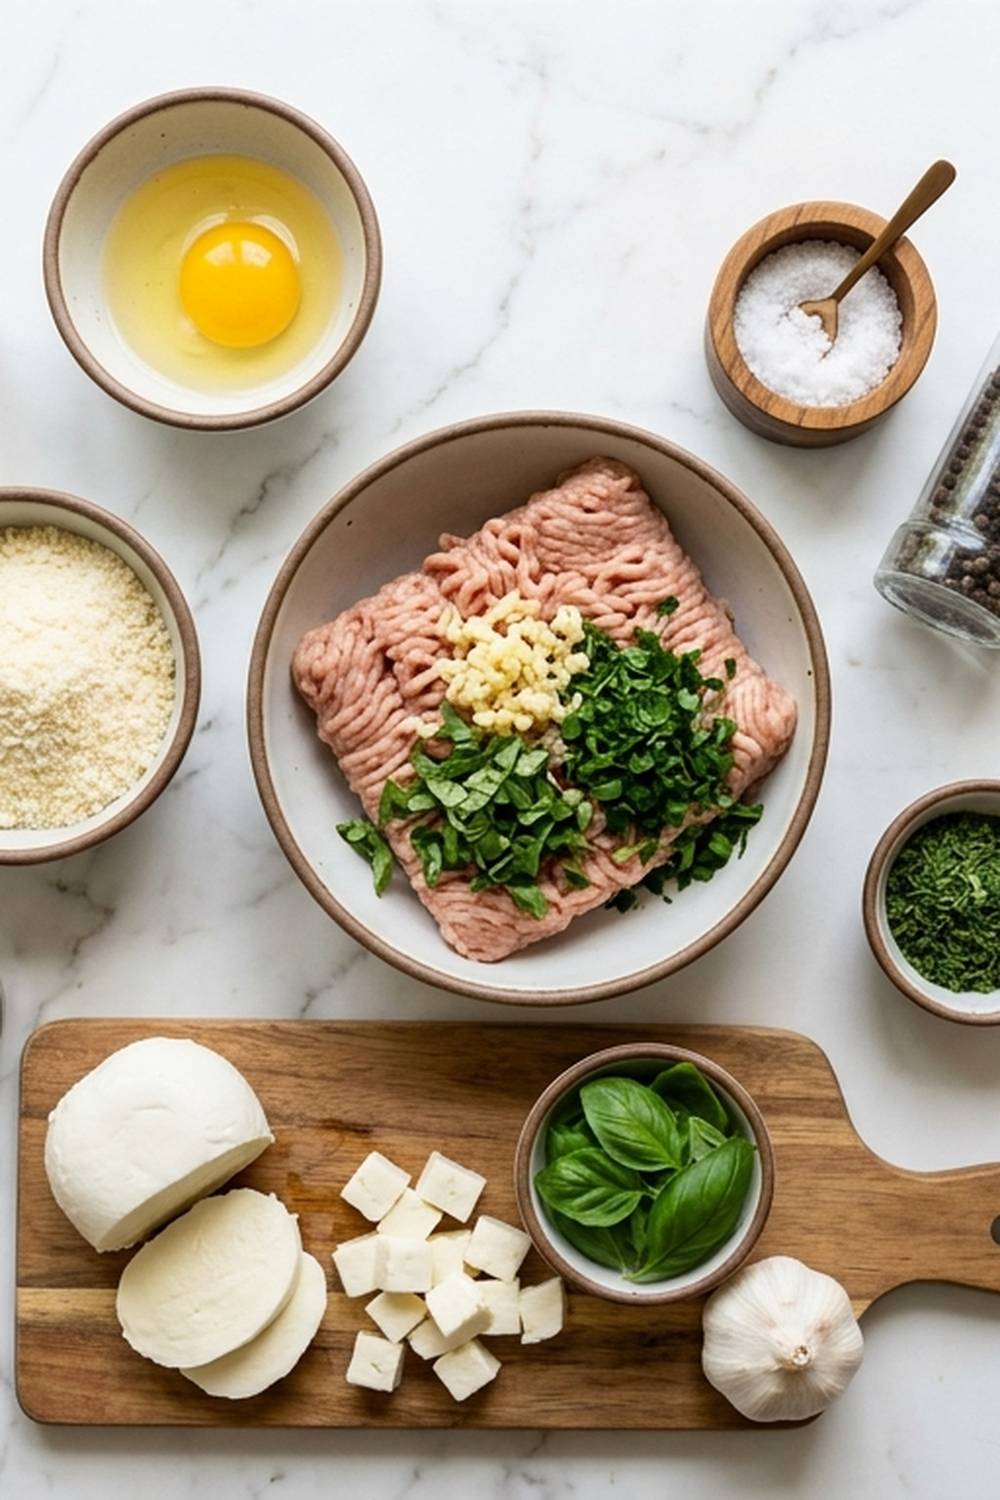
I approach ingredient selection through both a nutritionist’s lens and a visual artist’s eye. Every component here pulls double duty—delivering nutrition while creating the presentation you want. From my decade of dietitian experience, I know that vibrant colors in food signal nutrient density, and these ingredients prove that beautiful doesn’t have to mean complicated.
- 24 ounces marinara sauce, preferably San Marzano-based (the vibrant red backdrop—choose sauce with visible herbs for added visual interest)
- ¾ teaspoon sea salt (enhances all flavors while preventing that flat, one-dimensional taste)
- Zest of 1 lemon (optional but transforms the final dish with brightness and visual pop)
- ½ teaspoon dried oregano (traditional Italian herb that complements chicken and mozzarella beautifully)
- ½ teaspoon red pepper flakes (provides subtle heat and visual intrigue—the tiny red flecks signal sophistication)
- ½ cup all-purpose flour (for dredging—creates the light coating that allows for that perfect sear)
- ¾ teaspoon freshly cracked black pepper (adds visual speckle and complex flavor depth)
- 1 large egg (binds all components while ensuring meatballs stay intact during cooking)
- ¼ cup extra-virgin olive oil (essential for achieving that restaurant-quality seared exterior)
- ½ cup finely grated aged Parmesan cheese (adds umami depth and helps bind the mixture while contributing subtle color)
- ½ teaspoon dried Italian parsley (adds herbaceous flavor and visual interest when scattered throughout)
- ⅓ cup panko breadcrumbs (creates the golden-brown crust through proper searing—choose Japanese panko for extra crispness)
- 12 small fresh mozzarella balls, about ½ ounce each (the surprise element—creamy white interiors create visual drama)
- Fresh basil leaves for garnish, about 10-12 leaves (bright green color and aromatic finish that makes this dish sing)
- 1 pound ground chicken (pale, lean protein base that accepts seasonings beautifully)
Yield: Makes 12 meatballs, serving 4-6 people as a main course or 8-10 as an appetizer.
How to Make Picture-Perfect Chicken Parmesan Meatballs
Creating these meatballs is about understanding the science behind each step—why we do what we do, how it affects both flavor and presentation. I’ve simplified this into a method that ensures success every single time, even if you’re new to meatball making.
Step 1: Prepare Your Mise en Place and Preheat
Start by setting your oven to 350°F and gathering all ingredients within arm’s reach. This matters more than you’d think—when you’re not searching for the basil or the bocconcini at the last minute, you can focus on the actual technique. Line a baking sheet with parchment paper so you have a clean station for your formed meatballs before searing. I always do this because it prevents sticking and gives you a staging area that keeps your counter organized.

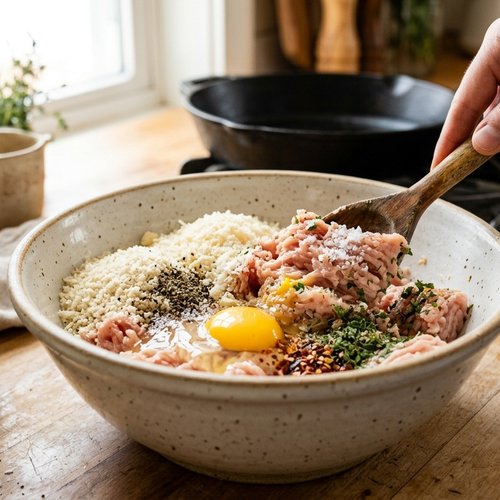
Step 2: Create the Flavor Foundation
In a large mixing bowl, combine the ground chicken, grated Parmesan, panko breadcrumbs, egg, salt, pepper, dried oregano, dried parsley, and red pepper flakes. Use your hands to mix gently but thoroughly—this is crucial. Your hands are your best tool here because they distribute ingredients evenly without overworking the mixture. Overworking ground meat makes it dense and tough, which affects both texture and presentation. You want a mixture that’s combined but still has a delicate, light structure. The mixture should feel barely held together, not packed.
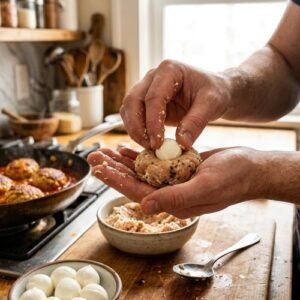
Step 3: Form the Meatballs with Cheese Centers
This is where the magic happens. Scoop approximately 2 tablespoons of the chicken mixture into your palm, then press a mozzarella ball into the center. Working quickly so the cheese doesn’t warm too much, wrap the chicken mixture completely around the cheese, sealing it fully so no white is visible on the outside. The meatballs should be golf-ball-sized—uniform shapes cook evenly and look more polished when presented. I use a small cookie scoop or my hands, rolling gently to create smooth, sphere-like shapes. Place each formed meatball on your prepared baking sheet.

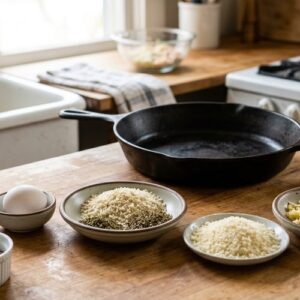
Step 4: The Dredging Technique
Pour the all-purpose flour into a shallow bowl. Working with one meatball at a time, roll it gently in the flour, then shake off excess. You want just a light coating—not a thick, flour-y layer. This thin coating is what creates that beautiful golden crust during searing without adding heaviness. A light touch here makes the difference between restaurant-quality and overdone.

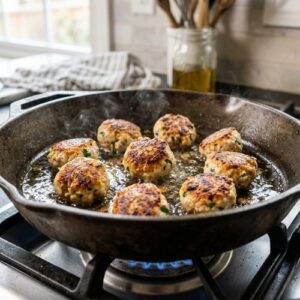
Step 5: Searing for That Golden Exterior
Heat the olive oil in a large, heavy-bottomed skillet over medium-high heat. The oil should shimmer and just barely smoke—this temperature is essential for developing that golden-brown crust. Working in batches to avoid crowding (which steams instead of sears), carefully add half the meatballs to the hot oil. Let them sit undisturbed for 2-3 minutes to develop color, then gently roll them with a spoon or wooden utensil to brown another side. Continue this process for 3-4 minutes total until all sides are beautifully golden-brown.
This searing step is where presentation magic happens. That caramelized exterior doesn’t just taste incredible—it signals quality and care to your guests before they ever taste it. Remove these meatballs to a clean plate, then repeat the searing process with the remaining meatballs. Don’t skip this step or rush through it. The time invested here creates the visual impact that makes people stop and stare.

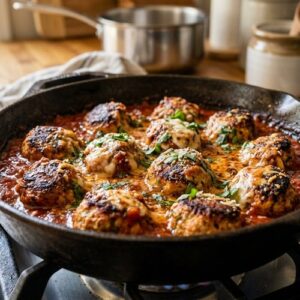
Step 6: The Marinara Bath and Oven Finish
Pour the marinara sauce into the same skillet you used for searing. This captures all those beautiful browned bits (called fond) that add incredible depth. Nestle all the browned meatballs into the sauce—they should be partially submerged, sitting among the red sauce like jewels. Transfer the entire skillet to your preheated 350°F oven and bake for 15-20 minutes, until the meatballs are cooked through and the sauce is gently bubbling around the edges.
The oven finish is gentle and even. It brings everything to temperature without further browning the exterior, which would create a crust that’s too thick. About halfway through baking, you might gently stir to ensure even cooking, but be careful not to damage those beautiful golden exteriors.

Step 7: The Final Garnish and Service
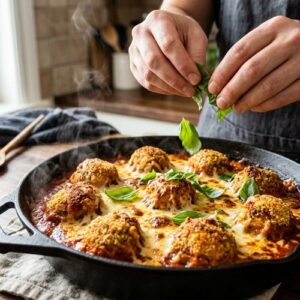
This is the moment presentation becomes reality. Remove from the oven and immediately tear fresh basil leaves over the top while the dish is still steaming. The heat will slightly wilt the basil while releasing its oils, creating an aromatic moment that’s frankly irresistible. If using lemon zest, add it now for brightness and visual interest. Serve immediately in the skillet or transfer to a serving dish that maintains the rustic beauty—the warmth, the vibrant colors, the steam rising up.

The Plating Masterclass
Restaurant-quality presentation doesn’t require fancy techniques—it requires intention and understanding the principles of visual balance. When plating these meatballs, whether for a casual family dinner or a sophisticated gathering, follow these professional guidelines that respect the dish’s natural beauty.
- Sauce placement first – Spoon marinara sauce into the center of each serving bowl or plate first, creating a thin base layer about ¼-inch thick. This establishes the color foundation and prevents meatballs from sliding around. The sauce acts as both flavor delivery and visual anchor.
- Meatball arrangement in odd numbers – Place 3, 5, or 7 meatballs per serving depending on portion size. Odd-numbered arrangements are naturally more visually appealing than even numbers—this is a design principle that holds true even in food. Arrange them in a triangular or scattered pattern rather than a rigid line, which looks homemade in the best way.
- Height and negative space – Lean meatballs slightly against each other to create height and dimension. Leave some space around each meatball so the red marinara shows between them, creating a visual rhythm. This isn’t a crowded dish—negative space is your friend and makes the presentation feel intentional rather than accidental.
- Basil distribution – Tear several basil leaves and distribute them across the top rather than piling them in one spot. Tuck some leaves under the meatballs so they peek out—this creates visual interest and draws the eye around the entire plate. The goal is integration, not garnish-as-afterthought.
- The rim consideration – Keep the plate rim clean. Any sauce splatter around the edge should be wiped away with a clean cloth before serving. This simple attention to detail elevates the entire presentation from “homemade” to “intentional.”
Photography Tips for This Dish
If you’re sharing these meatballs on social media or simply want to capture them beautifully, understanding light and timing is everything. These meatballs photograph gorgeously—let me share what I’ve learned from photographing hundreds of festive gatherings.
- Capture the moment immediately after plating – The steam rising from the marinara and the glossy, fresh appearance of the basil last only minutes. Shoot within 2-3 minutes of finishing the dish when the visual impact is strongest. The warmth creates a living quality that stills shots can’t replicate.
- Use natural side or window light – Position your dish near a window with indirect light. This golden, diffused light makes the golden-brown meatballs absolutely glow while highlighting the vibrant red sauce beneath. Avoid harsh overhead lighting or direct sun, which creates unflattering shadows and washes out colors.
- Shoot from a 45-degree angle – This angle captures the height of the meatballs, the sauce, and the garnish simultaneously. It’s more interesting than straight-overhead and shows the dish’s dimensionality. Move around to find the angle where the light hits the meatballs’ curved surfaces most beautifully.
- Include context sparingly – A linen napkin, fresh basil leaves scattered nearby, or a small glass of wine in the background adds story without cluttering the shot. The meatballs should be the star, with supporting elements that enhance rather than distract.
- Capture the cross-section moment – If you’re shooting content, get a photo of someone cutting into a meatball so the melted mozzarella center is visible. This is the ‘wow’ moment that stops scrollers and makes people want to make this recipe immediately.
Seasonal Color Variations
The beauty of this recipe is its flexibility within the seasonal palette. As a dietitian who works with Colorado families year-round, I’ve adapted these meatballs to celebrate each season’s best ingredients while maintaining that visual impact.
Fall and Winter: Add crispy sage leaves to the basil garnish, or substitute some basil with fresh oregano. The deeper green and earthier tones complement the cozy feeling of autumn entertaining. A light grating of black garlic or aged balsamic over the top adds visual depth without changing the dish fundamentally.
Spring: Replace half the basil with fresh parsley and chives for a lighter, brighter appearance. Add microgreens on top for modern visual interest and delicate texture. Consider using a lighter marinara or even a light cream sauce for a fresher seasonal feel while maintaining the meatball structure.
Summer: Garnish with a mixture of fresh basil, mint, and lemon zest for brightness that signals warmth and freshness. Consider serving at room temperature for outdoor gatherings, which actually showcases the mozzarella center beautifully as it becomes creamier while cooling slightly. Add a drizzle of quality olive oil just before serving for summer elegance.
Expert’s Nutritional Insight
From my decade as a registered dietitian, I want to highlight something often overlooked: ground chicken is nutritionally superior to many realize. It provides complete protein with significantly less saturated fat than ground beef, yet delivers superior flavor when handled properly. The panko coating and searing technique create satiety signals—that feeling of satisfaction—without adding excessive calories. The mozzarella center provides calcium and vitamin A, while the marinara sauce offers lycopene from tomatoes, a powerful antioxidant that actually increases in bioavailability when heated with fat (hello, olive oil in the sauce). These aren’t health-compromising indulgences; they’re thoughtfully constructed nutrition in appetizer form.
Can I Store Chicken Parmesan Meatballs?
Absolutely, and this is where my make-ahead expertise becomes valuable. These meatballs are actually better made 1-2 days ahead, which builds anticipation and reduces day-of stress.
Make-Ahead Method: Form and sear all meatballs completely through step 5, then cool them to room temperature. Transfer to an airtight container and refrigerate for up to 3 days. When ready to serve, simply reheat in a 350°F oven with the marinara sauce for 12-15 minutes until warmed through. The flavors actually deepen during storage as the herbs and cheese infuse into the chicken.
Freezer Storage: Freeze fully cooked, cooled meatballs in an airtight container for up to 3 months. Thaw overnight in the refrigerator, then reheat gently in marinara sauce. For busy holiday seasons, I make these weeks in advance, which takes all pressure off the actual gathering day.
Presentation Preservation: When reheating stored meatballs, always add fresh basil and garnishes just before serving. The fresh elements maintain visual vibrancy that frozen storage can’t preserve, ensuring your dish still looks as beautiful as it tastes.
Common Mistakes to Avoid
In my years of dietitian consultations and holiday hosting workshops, I’ve seen these mistakes repeatedly—they’re easily fixed once you know what to watch for.
Mistake 1: Overmixing the chicken mixture. This creates dense, tough meatballs that feel heavy rather than delicate. Mix just until combined, leaving some texture variation in the mixture. Your hands are the best tool for gentle blending—use them confidently but lightly.
Mistake 2: Using mozzarella that’s too cold or too warm. Cold mozzarella straight from the refrigerator can crack the coating when you wrap it, while room-temperature cheese is too soft to handle. Remove mozzarella from the refrigerator 10 minutes before forming meatballs—it should be cool but pliable.
Mistake 3: Skipping the searing step. I understand the temptation to save time by baking them entirely in the oven, but searing is non-negotiable for achieving that golden-brown exterior that signals quality and delivers on flavor through the Maillard reaction. Don’t skip this step, no matter how busy you are.
Mistake 4: Using pre-shredded Parmesan cheese. Commercial pre-shredded versions contain anti-caking agents that prevent smooth integration into the mixture. Always grate from a block of aged Parmesan for superior binding and flavor. Your finished dish will taste markedly better.
Make-Ahead Strategy Guide
As someone who specializes in stress-free holiday entertaining, I’ve perfected the timeline for these meatballs. Following this guide means your gathering day involves minimal cooking and maximum enjoyment with your guests.
3-4 Days Before: Gather all non-perishable ingredients and organize them in your pantry. Purchase the chicken, Parmesan, and mozzarella, storing them properly in the coldest part of your refrigerator.
2 Days Before: Form and fully cook all meatballs through the searing step. Cool to room temperature, then refrigerate in an airtight container with parchment paper between layers to prevent sticking. Prepare your marinara sauce if making from scratch, or plan to use a quality store-bought version.
Day Of (1 hour before serving): Remove meatballs from refrigerator and bring to room temperature while your guests arrive. This takes about 20 minutes and ensures even heating. Preheat your oven to 350°F about 20 minutes before serving. Pour marinara sauce into your serving skillet, nestle meatballs in, and transfer to the oven for 12-15 minutes. Meanwhile, prepare fresh basil garnish—tear it just as the meatballs come out of the oven.
Serving: Garnish with basil and lemon zest if using, then serve immediately. Your guests will never know you completed the heavy lifting days ago.
Nutrition Information
Based on USDA data, each serving of 3 meatballs contains approximately 385 calories, 24g protein, 22g fat, 18g carbohydrates, and 3g fiber. The protein-to-calorie ratio makes these surprisingly balanced for an appetizer. The colorful ingredients—the red marinara with lycopene, the green basil with vitamins K and A, the white mozzarella with calcium—demonstrate a principle I emphasize constantly: nutritional diversity shows visually through color diversity. When your plate looks like a rainbow, your body is typically receiving a spectrum of nutrients. These meatballs deliver real nutrition alongside satisfaction and beauty.
What to Serve Alongside for a Complete Visual Spread
Creating a cohesive table presentation means selecting complementary dishes that echo the color palette and flavor profile without competing for attention. From my experience designing holiday menus for Colorado gatherings, these pairings transform a single dish into a complete feast.
- Roasted asparagus and corn – The Asparagus Corn Recipe provides fresh green and golden tones that create visual rhythm with the meatballs. The vegetables’ delicate texture contrasts beautifully with the meatballs’ density while delivering nutritional balance.
- Mixed green salad with lemon vinaigrette – Crisp greens and tart dressing lighten the palate between meatball bites. The bright acidity complements the rich cheese and marinara. Arrange on a separate platter for visual interest.
- Crusty bread for sauce soaking – This functional pairing also delivers visual texture. Arrange bread in a rustic heap next to the meatballs, inviting guests to soak up every bit of that incredible marinara sauce.
- Simple arugula with shaved Parmesan – The peppery greens and thin, curled cheese shavings add sophistication while echoing the Parmesan flavor already in your meatballs. The pale greens are visually different enough from the cooked herbs to create interest.
Chicken Parmesan Meatball Recipe
Ingredients
Method
- Start by setting your oven to 350°F and gathering all ingredients within arm's reach. This matters more than you'd think—when you're not searching for the basil or the bocconcini at the last minute, you can focus on the actual technique. Line a baking sheet with parchment paper so you have a clean station for your formed meatballs before searing. I always do this because it prevents sticking and gives you a staging area that keeps your counter organized.
- In a large mixing bowl, combine the ground chicken, grated Parmesan, panko breadcrumbs, egg, salt, pepper, dried oregano, dried parsley, and red pepper flakes. Use your hands to mix gently but thoroughly—this is crucial. Your hands are your best tool here because they distribute ingredients evenly without overworking the mixture. Overworking ground meat makes it dense and tough, which affects both texture and presentation. You want a mixture that's combined but still has a delicate, light structure. The mixture should feel barely held together, not packed.

- This is where the magic happens. Scoop approximately 2 tablespoons of the chicken mixture into your palm, then press a mozzarella ball into the center. Working quickly so the cheese doesn't warm too much, wrap the chicken mixture completely around the cheese, sealing it fully so no white is visible on the outside. The meatballs should be golf-ball-sized—uniform shapes cook evenly and look more polished when presented. I use a small cookie scoop or my hands, rolling gently to create smooth, sphere-like shapes. Place each formed meatball on your prepared baking sheet.
- Pour the all-purpose flour into a shallow bowl. Working with one meatball at a time, roll it gently in the flour, then shake off excess. You want just a light coating—not a thick, flour-y layer. This thin coating is what creates that beautiful golden crust during searing without adding heaviness. A light touch here makes the difference between restaurant-quality and overdone.

- Heat the olive oil in a large, heavy-bottomed skillet over medium-high heat. The oil should shimmer and just barely smoke—this temperature is essential for developing that golden-brown crust. Working in batches to avoid crowding (which steams instead of sears), carefully add half the meatballs to the hot oil. Let them sit undisturbed for 2-3 minutes to develop color, then gently roll them with a spoon or wooden utensil to brown another side. Continue this process for 3-4 minutes total until all sides are beautifully golden-brown. This searing step is where presentation magic happens. That caramelized exterior doesn't just taste incredible—it signals quality and care to your guests before they ever taste it. Remove these meatballs to a clean plate, then repeat the searing process with the remaining meatballs. Don't skip this step or rush through it. The time invested here creates the visual impact that makes people stop and stare.
- Pour the marinara sauce into the same skillet you used for searing. This captures all those beautiful browned bits (called fond) that add incredible depth. Nestle all the browned meatballs into the sauce—they should be partially submerged, sitting among the red sauce like jewels. Transfer the entire skillet to your preheated 350°F oven and bake for 15-20 minutes, until the meatballs are cooked through and the sauce is gently bubbling around the edges. The oven finish is gentle and even. It brings everything to temperature without further browning the exterior, which would create a crust that's too thick. About halfway through baking, you might gently stir to ensure even cooking, but be careful not to damage those beautiful golden exteriors.
- This is the moment presentation becomes reality. Remove from the oven and immediately tear fresh basil leaves over the top while the dish is still steaming. The heat will slightly wilt the basil while releasing its oils, creating an aromatic moment that's frankly irresistible. If using lemon zest, add it now for brightness and visual interest. Serve immediately in the skillet or transfer to a serving dish that maintains the rustic beauty—the warmth, the vibrant colors, the steam rising up.
Notes
FAQs
Can I make these meatballs without the cheese center?
Absolutely. If you prefer, simply form regular meatballs without the mozzarella insertion. The visual and textural impact will be slightly different—you’ll lose that melted cheese surprise—but the flavor remains spectacular. Follow all other steps identically. However, I strongly encourage trying them with the cheese center at least once. That moment when a guest discovers the melted interior is truly special.
What’s the best way to photograph the cheese-center moment?
Shoot when a meatball has been cut in half or when someone has bitten into it, exposing the melted white interior. The contrast between the golden exterior, red sauce, and white cheese is visually dramatic and immediately communicates what makes these special. Use natural light from the side, which will highlight the glossy, melted cheese beautifully. That moment happens quickly—the cheese begins to firm up as it cools—so have your camera ready and shoot several variations.
Can I use different herbs in the mixture?
Yes, within reason. Italian herbs work best—basil, oregano, parsley, thyme, or marjoram all complement the chicken-mozzarella-marinara combination. However, avoid very strong herbs like rosemary or sage in large quantities, as they can overpower the delicate chicken. Keep dried herbs at ½ teaspoon per ingredient so no single flavor dominates. Fresh herbs won’t work in the mixture itself (they’ll wilt and darken), but save them for garnish.
My meatballs look unevenly browned—how do I fix this?
Uneven browning usually indicates uneven heat in your skillet or overcrowding during searing. Use a heavy-bottomed stainless steel or cast-iron skillet, which distributes heat evenly. Allow time between batches for the oil temperature to recover. If you notice one meatball browning much faster than others mid-sear, rotate it more frequently. Uneven browning doesn’t affect flavor, but for presentation, consistency matters. Pro tip: let the skillet reach temperature between batches—patience here creates uniformity.
How do I prevent the mozzarella from leaking out during cooking?
The key is completely sealing the chicken mixture around the cheese so no exposed mozzarella is visible. When forming, press the mixture firmly around the cheese ball, making sure all edges overlap and seal completely. If you see white showing through, you need more chicken mixture around that spot. Also, ensure your mozzarella balls are small—about ½ ounce each. Larger pieces mean you need more chicken mixture to cover them adequately. Finally, don’t crowd the pan during searing; gentle cooking allows the chicken to cook without the mozzarella heating so rapidly it bursts.
Can I make these without panko breadcrumbs?
You can, but panko creates a specific texture. Traditional breadcrumbs work, though they create a finer, denser crust. Crushed crackers, almond flour, or finely grated Parmesan can also work as binders, though each creates different visual and textural results. If using gluten-free needs, certified gluten-free panko or breadcrumbs work identically. The texture varies slightly, but these meatballs remain delicious. However, panko’s larger flakes create that rustic, appealing golden finish that looks restaurant-quality, so it remains my recommendation.
More Visually Stunning Recipes
- this simple cake – A dessert with warm spice tones and rustic elegance that transitions beautifully from appetizers to sweets
- Arroz Con Pollo Best Recipe – A one-pot chicken and rice dish that creates stunning visual contrast with saffron-golden rice and colorful vegetable inclusions
- 3 Meat Lasagna Recipe – A layered classic that demonstrates the beauty of rustic, family-style entertaining when presentation meets comfort food
These chicken parmesan meatballs represent something I’ve learned over a decade of dietitian work and holiday hosting: the most memorable meals feed both eyes and souls simultaneously. When your guests arrive and see those golden meatballs nestled in vibrant red sauce with fresh green basil, when they bite through and discover creamy mozzarella, when they ask for the recipe before dessert—that’s the magic of intentional cooking. I can’t wait to share many more delicious and festive recipes with you!