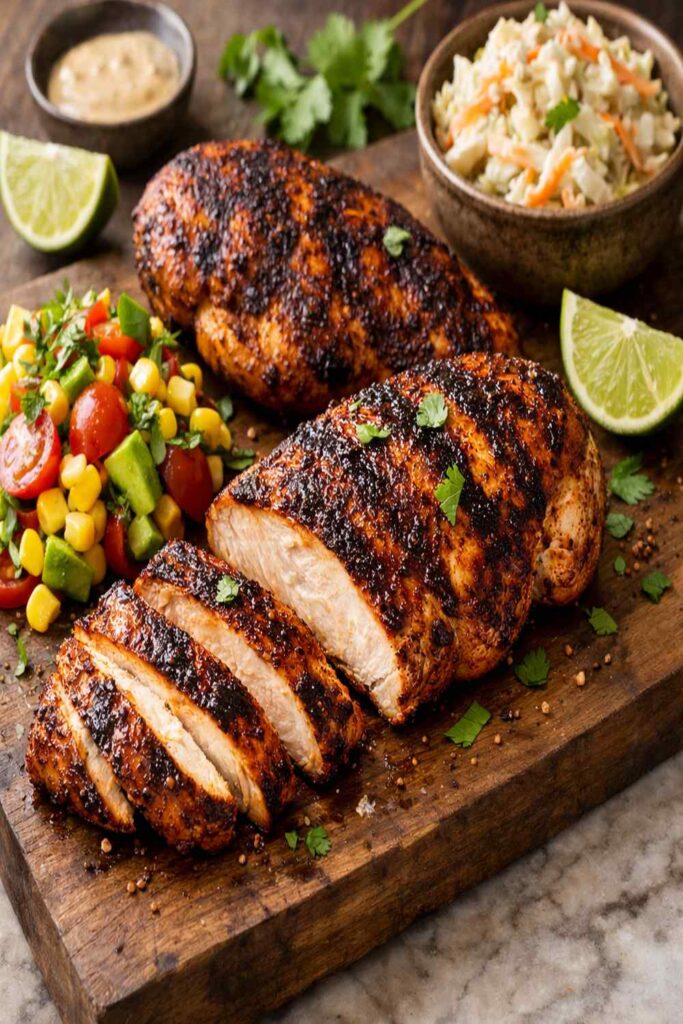
Blackened Grilled Chicken Recipe
This post contains affiliate links. As an Amazon Associate I earn from qualifying purchases.
Blackened Grilled Chicken Recipe for Every Diet: Keto, Vegan, Gluten-Free & More

Whether you’re following keto, embracing a vegan lifestyle, or managing gluten sensitivities, you don’t have to miss out on the smoky, boldly seasoned goodness of blackened grilled chicken. After a decade of working with clients across Colorado who juggle different dietary needs at the same table, I’ve learned that the best festive gatherings are the ones where everyone feels included at mealtime.
I created this comprehensive guide to show you that dietary restrictions don’t mean food restrictions. You’ll find detailed substitutions, nutrition breakdowns for each version, and my professional make-ahead strategies to keep holiday hosting stress-free. Let’s make sure your next gathering brings people together around food that truly works for everyone.
The Ultimate Blackened Grilled Chicken Recipe for Every Diet (Keto, Vegan, Gluten-Free & Dairy-Free)
I remember hosting a summer gathering on my patio in Boulder about seven years ago. My sister had just gone vegan, my brother was deep into his keto phase, and my best friend’s daughter had been diagnosed with celiac disease. I stood at my grill feeling completely overwhelmed—I wanted to serve one main that made everyone feel welcome, not four separate proteins.
That’s when I realized the magic of a well-crafted spice blend. Unlike dishes that rely on dairy, bread crumbs, or animal products as their foundation, blackened chicken is built on bold, honest spices. Those same spices work beautifully across every dietary preference. I spent that evening coaching my sister through her first vegan version using tahini-based garlic butter, helping my brother understand why his keto portion needed zero modifications, and confidently serving my friend’s daughter chicken that was naturally gluten-free.
That one meal sparked years of experimentation. Today, I’m sharing exactly how to make this recipe work for your table—whether that’s one person or a room full of people with different needs.
Which Version Is Right for You?
Before you fire up the grill, let’s identify which approach matches your gathering. Each version maintains that signature smoky, spiced crust while adapting what goes on top. The chicken itself? That stays beautifully consistent across all dietary needs.
- Keto version – Zero changes needed to the core recipe. The spice blend contains zero carbohydrates, and the finishing butter is your friend. This is genuinely the easiest version, and I often joke that keto folks get the best deal at my table.
- Vegan version – Keep every spice unchanged, but swap the dairy butter for tahini-based garlic butter (detailed in the substitutions chart). The flavor shifts slightly to nuttier and herbaceous, which honestly? Elevates the whole experience.
- Gluten-free version – This requires no modifications to the actual recipe. All the spices I recommend are naturally gluten-free, though you’ll want to verify your specific brands if cross-contamination is a concern for your guests.
- Dairy-free version – Similar to vegan, you’ll swap the butter finish for coconut oil, avocado oil, or tahini-based alternatives. The dairy-free route works beautifully for those with lactose intolerance or dairy allergies.
The Base Ingredients (Works for All Versions)
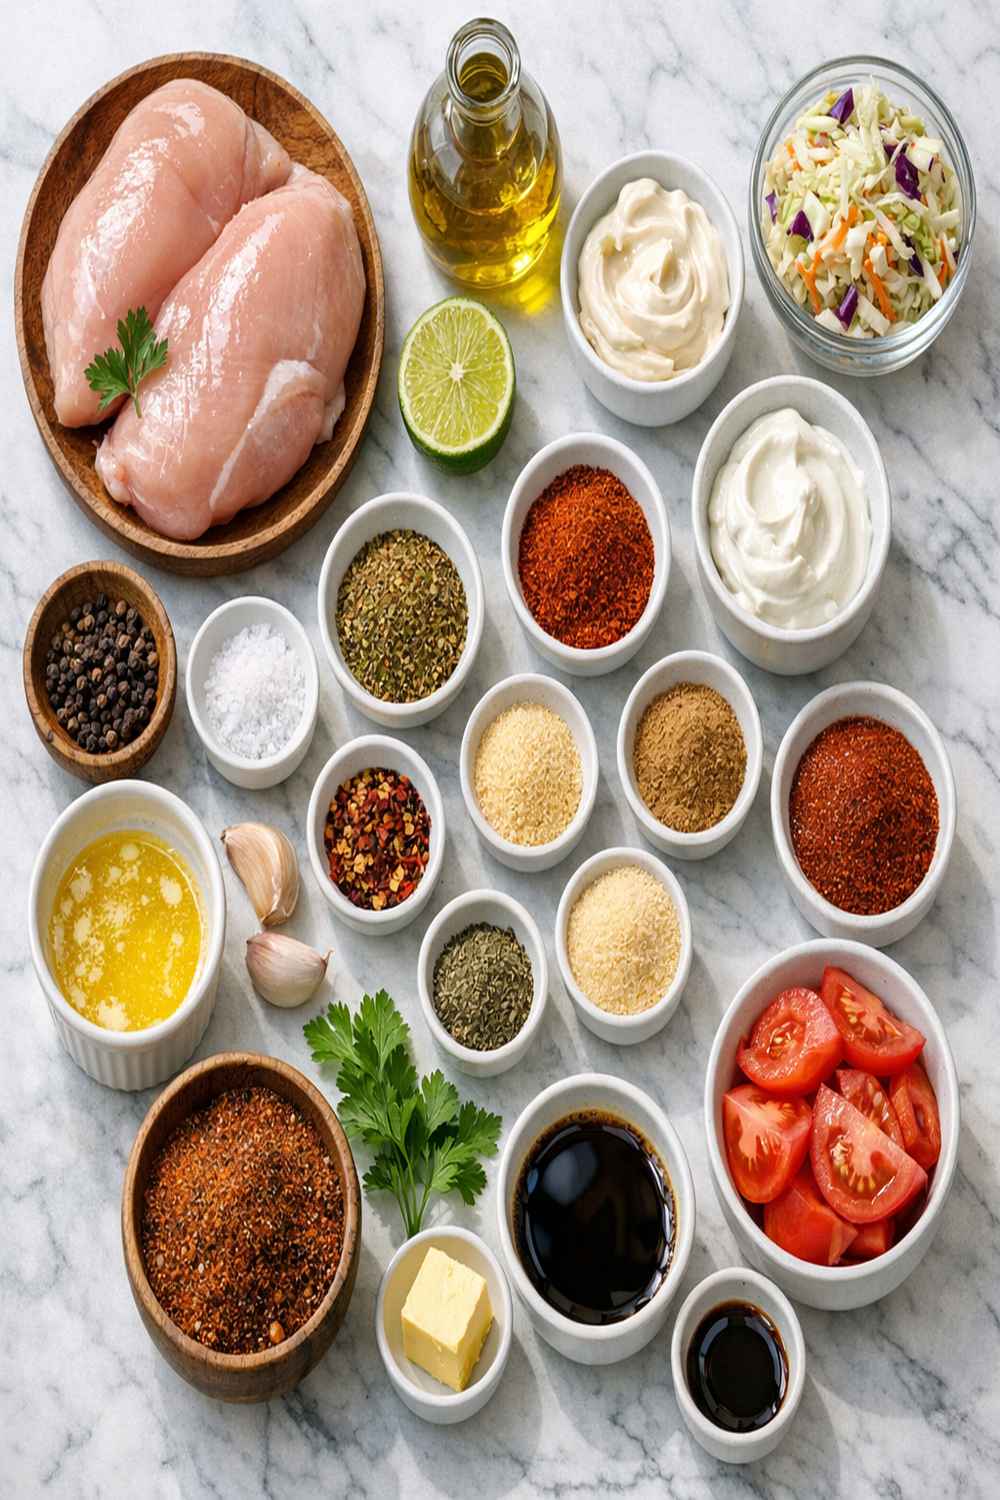
Here’s what makes this recipe so gloriously inclusive: the foundation ingredients are identical across every dietary approach. One pound of chicken breast, one set of spices, one grill temperature. The only variables are the finishing fat and any optional garnishes. This is my favorite type of recipe to serve at gatherings—minimal confusion, maximum flexibility.
- 1 teaspoon Italian seasoning blend (dried oregano, basil, and thyme combined)
- 1 tablespoon unsalted butter OR vegan butter OR tahini (finishing fat—varies by dietary need)
- 1 teaspoon fresh minced garlic (not from a jar, if possible—the flavor is superior)
- ¼ teaspoon sea salt (or kosher salt for better texture)
- ¼ teaspoon garlic powder (not to be confused with garlic salt)
- ¼ teaspoon cayenne pepper (adjust up or down based on heat preference)
- 1 tablespoon smoked paprika (the “blackened” effect comes from this—don’t skip quality here)
- 1 pound boneless, skinless chicken breasts (about 4 medium breasts, preferably similar thickness)
- ¼ teaspoon freshly cracked black pepper (freshly cracked makes a noticeable difference)
- ½ teaspoon fresh lemon juice (brightens the spice profile and aids digestion)
- ¼ teaspoon onion powder (adds depth without sharpness)
- 2 teaspoons avocado oil (for grill brushing—high smoke point essential)
Yield: Serves 4 (1 chicken breast per person) | Prep Time: 10 minutes | Cook Time: 10-12 minutes
Dietary Substitution Chart
Use this chart as your quick reference when you’re prepping for guests with different dietary needs. I keep a laminated version in my kitchen because I’ve learned that a moment of clarity before cooking prevents confusion at the grill.
- Finishing Fat (Butter) -> Keto: Unsalted grass-fed butter | Vegan: Tahini thinned with lemon juice and plant milk | Gluten-Free: Unsalted butter (verify brand) | Dairy-Free: Refined coconut oil or avocado oil
- Optional Garnish: Fresh Herbs -> Keto: Cilantro, parsley | Vegan: Cilantro, parsley, nutritional yeast | Gluten-Free: Cilantro, parsley | Dairy-Free: Cilantro, parsley, fresh lime
- Garlic Finishing -> Keto: Fresh minced garlic in butter | Vegan: Fresh minced garlic in tahini mixture | Gluten-Free: Fresh minced garlic in butter | Dairy-Free: Fresh minced garlic in oil
- All Spices (Paprika, Italian Seasoning, Cayenne, Onion Powder, Garlic Powder, Salt, Pepper) -> Keto: No change | Vegan: No change | Gluten-Free: No change (verify individual brand certifications) | Dairy-Free: No change
How to Make Blackened Grilled Chicken Recipe Your Way
I’ve structured these instructions so you can prepare all four dietary versions simultaneously if needed. The beauty of this recipe is that the chicken cooks identically—only the finishing touches change. This means you can grill one batch and customize at the table, which is honestly my favorite hosting strategy.
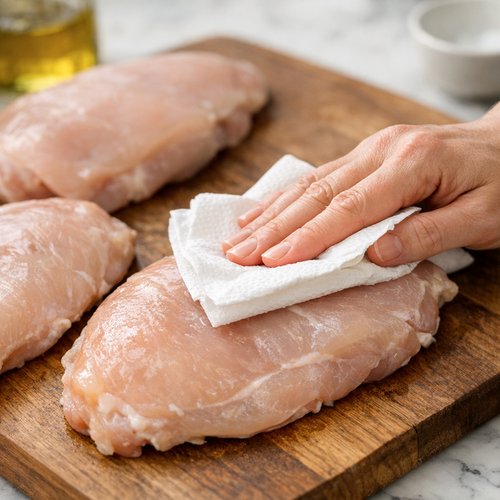
Step 1: Prepare Your Chicken to Even Thickness
Start by patting your chicken breasts completely dry with paper towels. Moisture is the enemy of that perfect crust, so don’t skip this step. Using a meat mallet or the flat bottom of a heavy skillet, gently pound each breast until they’re approximately ¾-inch thick throughout. This matters tremendously—uneven thickness means some sections overcook while others undercook. Professional kitchens obsess over this detail, and now you will too.
If your breasts are particularly large (over 8 ounces each), you can carefully butterfly them horizontally or simply pound them thinner. The goal is uniform thickness for uniform cooking.
Step 2: Create Your Spice Blend
In a small bowl, combine the smoked paprika, Italian seasoning, cayenne, onion powder, garlic powder, salt, and black pepper. Stir thoroughly with a fork, breaking up any clumps. This blend is identical across all dietary versions—there are no substitutions here. This is the moment where you’re building the foundation of flavor.
I recommend making this blend the day before for gatherings. Store it in a small mason jar with a tight-fitting lid. It keeps perfectly for months and saves you precious prep time when guests are arriving.

Step 3: Season Your Chicken Generously and Evenly
Place your pounded chicken breasts on a clean cutting board. Divide your spice blend in half. Sprinkle half the blend across one side of all four chicken breasts, using your fingers to gently press the spices into the meat. This isn’t a light dusting—this is a proper coating. Flip each breast and repeat with the remaining spice blend on the other side.
Here’s a professional tip I learned from working with athletes in Colorado: the spices should stick to the protein, creating a crust that will caramelize on the grill. If spices are sliding off, your chicken might still be slightly damp. Pat it down once more with paper towels.
All dietary versions: No modifications here. Everyone gets the same spice treatment.

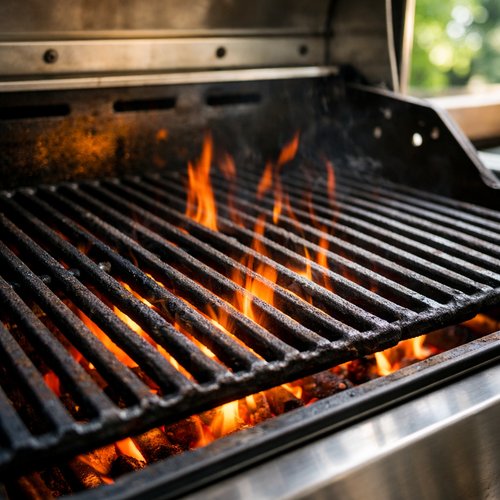
Step 4: Preheat Your Grill to High Heat
Heat your grill to approximately 400-425°F (about 10-15 minutes on high). You want the grill hot enough that when you hold your hand above the grates, you can only count to 2-3 seconds before the heat forces your hand away. This temperature creates the signature blackened crust we’re after.
Brush your grill grates with avocado oil using a grill brush or rolled-up paper towels held with tongs. This prevents sticking and promotes that beautiful caramelization.
All dietary versions: No changes. Everyone grills at the same temperature.
Step 5: Grill the Chicken, First Side
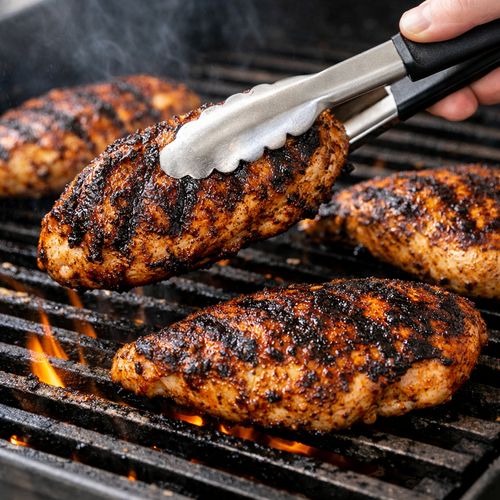
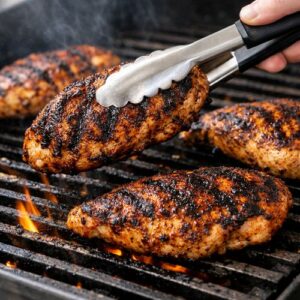
Place your seasoned chicken breasts directly on the hot grates. Do not move them for 4-5 minutes. I know it’s tempting to fuss, but letting them sit creates that gorgeous blackened char. You’ll see the edges begin to caramelize—that’s exactly what you want.
Around the 4-minute mark, you can peek underneath. The chicken should release from the grates easily and have deep brown grill marks. If it’s sticking, give it another minute. Every grill is slightly different, so use visual cues rather than strict timing.
All dietary versions: Same cooking time and method.
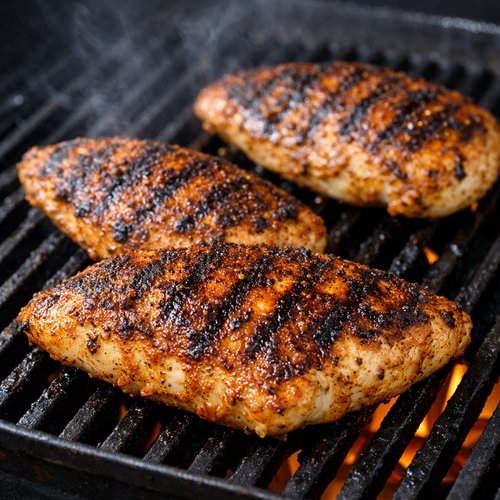
Step 6: Flip and Grill the Second Side
Using tongs (never a fork—you don’t want to pierce the meat and lose juices), carefully flip each breast. Grill the second side for another 4-5 minutes. You’re looking for the same deep browning and charred appearance on this side.
Start checking internal temperature around the 4-minute mark using an instant-read meat thermometer. Insert the thermometer horizontally into the thickest part of the breast. You want to see 165°F (74°C) for food safety. If you’re at 160°F, you need another minute or two.
All dietary versions: Same cooking time. Temperature is non-negotiable for food safety across all diets.
Step 7: Finish With Your Chosen Fat and Garlic
This is where your dietary versions diverge slightly. Remove the chicken from the grill and place on a clean plate. Working quickly while the chicken is still hot, brush or drizzle your chosen finishing fat mixed with fresh minced garlic across each breast.
- Keto & Gluten-Free versions: Warm 1 tablespoon unsalted butter in a small skillet over low heat. Add 1 teaspoon minced fresh garlic and cook for 30 seconds until fragrant. Brush immediately over the hot chicken.
- Vegan version: Mix 1 tablespoon tahini with 1 teaspoon lemon juice, ½ teaspoon minced garlic, and 1-2 tablespoons unsweetened plant milk until you reach a drizzleable consistency. The mixture won’t be as rich as butter, but it’s silky and delicious. Drizzle generously over chicken.
- Dairy-Free version: Warm 1 tablespoon refined coconut oil or avocado oil in a small skillet. Add 1 teaspoon minced fresh garlic and cook for 30 seconds. Brush over the hot chicken immediately.
The heat of the chicken will help the fat coat evenly. This finishing step isn’t just about richness—it adds moisture and ensures the spices don’t dry out as the chicken cools slightly.

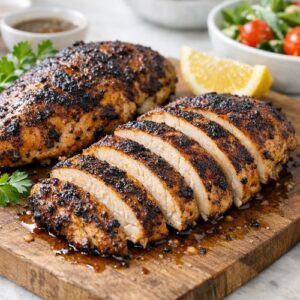
Step 8: Rest and Serve
Let the chicken rest for 3-5 minutes before serving. This allows the juices to redistribute throughout the meat, keeping every bite moist. Meanwhile, you can plate your sides or arrange your serving platter.
If you’re serving multiple dietary versions, consider labeling them lightly so guests know which chicken was finished with which fat. A small paper flag or serving spoon for each version prevents confusion and respects everyone’s dietary choices.
All dietary versions: Same resting time applies.

Expert’s Nutritional Tip: Why Smoked Paprika Matters More Than You Think
As a registered dietitian, I focus on ingredients that deliver flavor and nutrition. Smoked paprika is one of those underrated superstars. It provides antioxidants, particularly carotenoids like capsanthin, which research shows support eye health and reduce inflammation. Unlike some spice blends that rely on salt for flavor, smoked paprika brings depth with minimal sodium contribution.
For my clients managing blood pressure or following sodium-restricted diets, this recipe is a gift because the spice blend creates such bold, complex flavor that you don’t need to compensate with extra salt. The paprika essentially does the heavy lifting.
Make-Ahead Guide: Because Hosting Should Be Easy
Here’s my professional hosting strategy for blackened grilled chicken, whether you’re serving 4 people or 40:
- Up to 24 hours ahead: Pound and season your chicken breasts. Store them in an airtight container in the refrigerator. The seasoning actually penetrates the meat slightly, intensifying flavor. This is genuinely better than cooking completely fresh.
- Up to 3 hours ahead: Prepare your spice blend in a small jar. Mix your finishing fats with garlic and store them in separate small containers (labeled by dietary type if you’re serving multiple versions). Keep everything at room temperature so finishing fats are ready to use immediately after grilling.
- 30 minutes before serving: Remove seasoned chicken from the refrigerator so it comes to room temperature. Room-temperature protein cooks more evenly than cold protein straight from the fridge. Preheat your grill.
- Right before guests arrive: Grill your chicken and finish immediately. This is the only step that truly needs to happen last-minute, and it takes about 12 minutes total.
This make-ahead approach means you’re genuinely relaxed when your guests arrive instead of stressed in the kitchen. That calm energy? People feel it, and it makes the gathering better.
Common Mistakes to Avoid
After ten years of coaching clients and hosting gatherings, I’ve watched the same mistakes derail otherwise delicious meals. Here’s how to avoid them:
- Mistake #1: Wet chicken. Even a light amount of surface moisture prevents proper seasoning adhesion and crust formation. Pat your chicken completely dry before seasoning. I cannot overstate this.
- Mistake #2: Uneven thickness leading to uneven cooking. That one breast that’s twice as thick as the others will either be overcooked on the outside or undercooked at the center. Use your meat mallet—don’t skip this step.
- Mistake #3: Overcrowding the grill or moving the chicken too early. Each breast needs space around it to develop that blackened crust. Resist the urge to flip or move them before 4 minutes have passed. Patience creates the crust; rushing ruins it.
- Mistake #4: Forgetting about carryover cooking. Your chicken continues cooking for a minute or two after you remove it from heat. If you pull it at 165°F exactly, it’ll be perfect. If you wait for it to reach 170°F on the grill, it’ll be slightly overdone by the time you serve it. Use your thermometer strategically.
Nutrition Comparison Across Versions
Here’s the transparency you deserve: the nutritional profile shifts slightly depending on which finishing fat you choose. I’m basing these numbers on USDA FoodData Central and peer-reviewed nutrition research. Each analysis reflects a 4-ounce grilled chicken breast (the protein portion) plus the finishing fat preparation.
- Keto Version (Butter-finished): 245 calories | 34g protein | 12g fat | 0g carbohydrate | 0g fiber | Excellent for sustained energy and satiety
- Vegan Version (Tahini-finished): 225 calories | 32g protein | 10g fat (primarily from sesame) | 3g carbohydrate | 1g fiber | Added benefit of lignans from tahini, which support hormonal balance
- Gluten-Free Version (Butter-finished, identical to Keto): 245 calories | 34g protein | 12g fat | 0g carbohydrate | 0g fiber | Naturally gluten-free at every stage
- Dairy-Free Version (Oil-finished): 240 calories | 34g protein | 12g fat | 0g carbohydrate | 0g fiber | Supports those with lactose intolerance or dairy sensitivity
The protein content remains consistent across all versions (that’s the chicken doing its job beautifully), while fat content varies slightly depending on the finishing method. For those tracking macronutrients, this consistency makes meal planning straightforward.
How Each Version Tastes Different
I think it’s important to be honest about how these versions taste, rather than pretending they’re all identical. They’re not—and that’s actually wonderful because it means everyone gets an experience tailored to their preferences.
- Keto & Gluten-Free (Butter-finished): Rich, luxurious, buttery finish. The garlic becomes caramelized in the butter, creating a subtle sweetness that balances the spice’s heat. This version has the most traditional, restaurant-like quality. The chicken tastes indulgent without being heavy.
- Vegan (Tahini-finished): Nuttier, more herbaceous, with a subtle sesame complexity. The lemon juice adds brightness that cuts through the spice beautifully. This version has an almost Middle Eastern quality—sophisticated and umami-forward. It honestly might be my favorite version for pure flavor complexity, even though I eat dairy.
- Dairy-Free (Oil-finished): Cleaner, lighter finish with the spices as the primary flavor focus. The chicken’s natural flavor shines through without dairy richness. If you’re using coconut oil, you’ll detect a subtle tropical note. Avocado oil is more neutral and lets the spices dominate. This version feels fresh and summery.
Here’s the real talk: if you’re serving mixed dietary needs at one table, everyone should taste everyone else’s chicken. The conversations that happen when your vegan friend tries your buttery version and your keto-focused friend tastes the tahini version? Those are the moments that make inclusive hosting so rewarding.
Can I Store Blackened Grilled Chicken Recipe?
Absolutely, and I have detailed guidance for each version because storage considerations vary slightly by finishing fat.
- Keto & Gluten-Free (Butter-finished): Store in an airtight container in the refrigerator for up to 4 days. The butter will solidify when cold, but reheats beautifully. Gentle reheating in a 300°F oven for 5-8 minutes restores the texture without drying the chicken.
- Vegan (Tahini-finished): Store in an airtight container in the refrigerator for up to 3 days. Tahini-based preparations are best consumed sooner because the lemon juice can eventually break down the texture slightly. Reheat gently or serve at room temperature (which honestly tastes wonderful).
- Dairy-Free (Oil-finished): Store in an airtight container in the refrigerator for up to 4 days. Oil-based finishes keep beautifully. Cold leftover chicken is excellent for salads or grain bowls.
Freezing: All versions freeze well for up to 3 months. I recommend freezing in individual portions for easy reheating. Thaw in the refrigerator overnight, then gently reheat. The texture will be fractionally softer than fresh, but honestly? Still delicious in salads or grain bowls where that’s not noticeable.
Professional tip: If you’re prepping for a busy week, cook your chicken at the beginning of the week, store it plain (without the finishing fat), and add fresh finishing fat when you reheat individual portions. This keeps the flavors brightest and prevents the fat from becoming rancid.
Seasonal Variations: Adapting Blackened Chicken Year-Round
Colorado’s seasons inspire different flavor variations. Here’s how I adapt this recipe throughout the year:
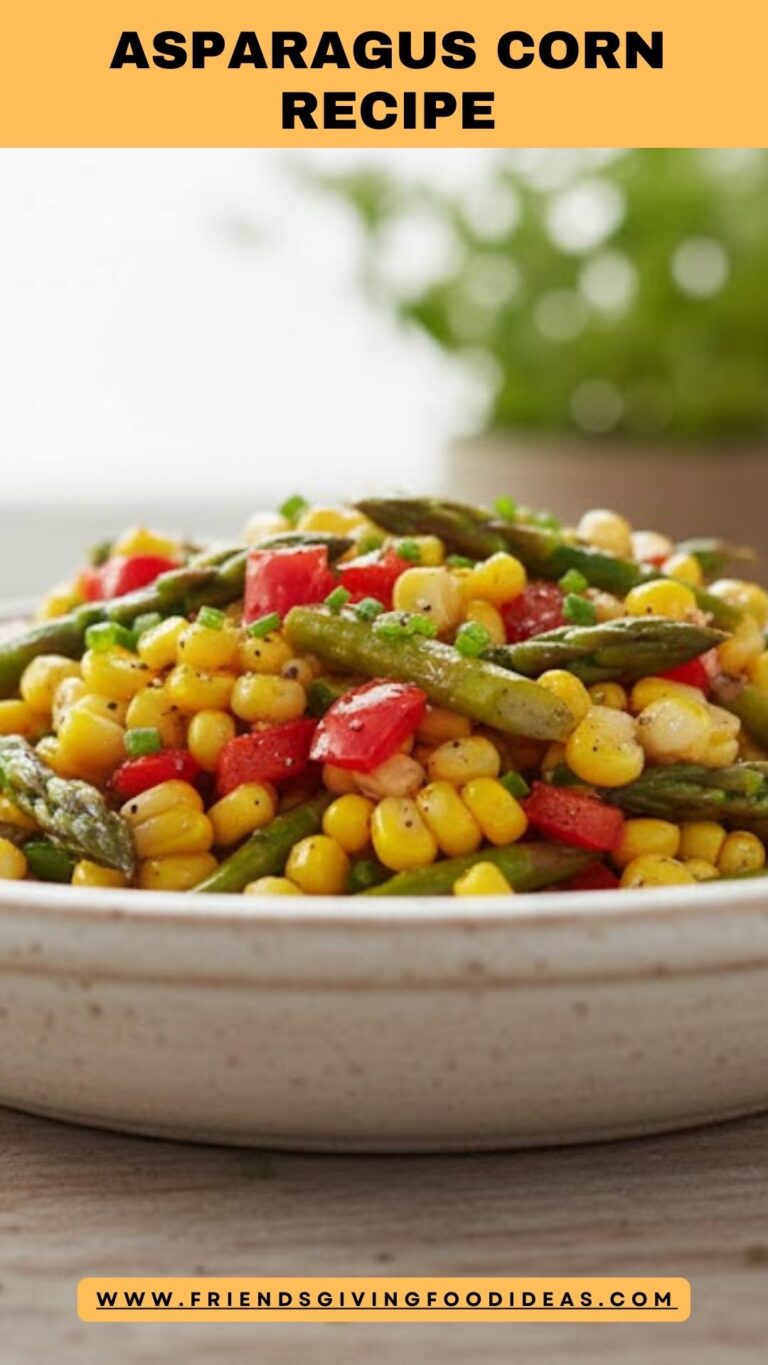
- Spring (March-May): Add fresh tarragon or chives to your spice blend. Increase lemon juice in the finishing step to brighten spring flavors. Serve alongside fresh asparagus or the Asparagus Corn Recipe for a light, verdant meal.
- Summer (June-August): Keep the base recipe unchanged (it’s genuinely perfect for summer grilling), but serve with lime-forward salsas. Try it with the Avocado Tomatillo Salsa Recipe for a Mexican-inspired summer gathering.
- Fall (September-November): Add smoked cumin (¼ teaspoon) to your spice blend for deeper, earthier notes. Serve with roasted root vegetables or pair with the Barbecue Potatoes Recipe for a harvest-inspired plate.
- Winter (December-February): Increase the garlic (use ½ teaspoon of smoked garlic powder in the blend) for more robust winter flavors. Add a pinch of smoked chili powder if your guests enjoy heat. Serve with roasted root vegetables and hearty greens.
What to Serve With Blackened Grilled Chicken Recipe?
The beauty of this boldly spiced chicken is that it plays well with both traditional sides and creative accompaniments. Here are my favorite pairings, organized by dietary compatibility:
- Grilled vegetables (zucchini, bell peppers, asparagus) – Works with all dietary versions. The char from the grill echoes the blackened spices beautifully.
- Fresh salads with citrus vinaigrette – Keto, Vegan, Gluten-Free, Dairy-Free compatible. The brightness cuts through the spice and richness of the finished chicken.
- Roasted root vegetables – All versions. The sweetness from roasted vegetables (carrots, beets, parsnips) provides beautiful contrast to the savory spice.
- Cauliflower rice or regular rice – All versions (verify rice is gluten-free for GF guests). Acts as a neutral base to showcase the chicken’s flavors.
- Avocado Tomatillo Salsa – Avocado Tomatillo Salsa Recipe works beautifully with all versions, adding brightness and herbaceous notes.
- Fresh lime or lemon wedges – All versions. A squeeze of fresh citrus at the table lets guests customize the brightness level.
- Simple green salad – All versions. Greens with a light vinaigrette provide textural contrast and palate cleansing between bites of the rich, spiced chicken.
- Grilled corn or corn salad – All versions. The natural sweetness of corn beautifully complements the savory spice profile.
Blackened Grilled Chicken Recipe
Ingredients
Method
- Start by patting your chicken breasts completely dry with paper towels. Moisture is the enemy of that perfect crust, so don't skip this step. Using a meat mallet or the flat bottom of a heavy skillet, gently pound each breast until they're approximately ¾-inch thick throughout. This matters tremendously—uneven thickness means some sections overcook while others undercook. Professional kitchens obsess over this detail, and now you will too. If your breasts are particularly large (over 8 ounces each), you can carefully butterfly them horizontally or simply pound them thinner. The goal is uniform thickness for uniform cooking.

- In a small bowl, combine the smoked paprika, Italian seasoning, cayenne, onion powder, garlic powder, salt, and black pepper. Stir thoroughly with a fork, breaking up any clumps. This blend is identical across all dietary versions—there are no substitutions here. This is the moment where you're building the foundation of flavor. I recommend making this blend the day before for gatherings. Store it in a small mason jar with a tight-fitting lid. It keeps perfectly for months and saves you precious prep time when guests are arriving.

- Place your pounded chicken breasts on a clean cutting board. Divide your spice blend in half. Sprinkle half the blend across one side of all four chicken breasts, using your fingers to gently press the spices into the meat. This isn't a light dusting—this is a proper coating. Flip each breast and repeat with the remaining spice blend on the other side. Here's a professional tip I learned from working with athletes in Colorado: the spices should stick to the protein, creating a crust that will caramelize on the grill. If spices are sliding off, your chicken might still be slightly damp. Pat it down once more with paper towels. All dietary versions: No modifications here. Everyone gets the same spice treatment.

- Heat your grill to approximately 400-425°F (about 10-15 minutes on high). You want the grill hot enough that when you hold your hand above the grates, you can only count to 2-3 seconds before the heat forces your hand away. This temperature creates the signature blackened crust we're after. Brush your grill grates with avocado oil using a grill brush or rolled-up paper towels held with tongs. This prevents sticking and promotes that beautiful caramelization. All dietary versions: No changes. Everyone grills at the same temperature.

- Place your seasoned chicken breasts directly on the hot grates. Do not move them for 4-5 minutes. I know it's tempting to fuss, but letting them sit creates that gorgeous blackened char. You'll see the edges begin to caramelize—that's exactly what you want. Around the 4-minute mark, you can peek underneath. The chicken should release from the grates easily and have deep brown grill marks. If it's sticking, give it another minute. Every grill is slightly different, so use visual cues rather than strict timing. All dietary versions: Same cooking time and method.

- Using tongs (never a fork—you don't want to pierce the meat and lose juices), carefully flip each breast. Grill the second side for another 4-5 minutes. You're looking for the same deep browning and charred appearance on this side. Start checking internal temperature around the 4-minute mark using an instant-read meat thermometer. Insert the thermometer horizontally into the thickest part of the breast. You want to see 165°F (74°C) for food safety. If you're at 160°F, you need another minute or two. All dietary versions: Same cooking time. Temperature is non-negotiable for food safety across all diets.
- This is where your dietary versions diverge slightly. Remove the chicken from the grill and place on a clean plate. Working quickly while the chicken is still hot, brush or drizzle your chosen finishing fat mixed with fresh minced garlic across each breast. Keto & Gluten-Free versions: Warm 1 tablespoon unsalted butter in a small skillet over low heat. Add 1 teaspoon minced fresh garlic and cook for 30 seconds until fragrant. Brush immediately over the hot chicken. Vegan version: Mix 1 tablespoon tahini with 1 teaspoon lemon juice, ½ teaspoon minced garlic, and 1-2 tablespoons unsweetened plant milk until you reach a drizzleable consistency. The mixture won't be as rich as butter, but it's silky and delicious. Drizzle generously over chicken. Dairy-Free version: Warm 1 tablespoon refined coconut oil or avocado oil in a small skillet. Add 1 teaspoon minced fresh garlic and cook for 30 seconds. Brush over the hot chicken immediately. The heat of the chicken will help the fat coat evenly. This finishing step isn't just about richness—it adds moisture and ensures the spices don't dry out as the chicken cools slightly.

- Let the chicken rest for 3-5 minutes before serving. This allows the juices to redistribute throughout the meat, keeping every bite moist. Meanwhile, you can plate your sides or arrange your serving platter. If you're serving multiple dietary versions, consider labeling them lightly so guests know which chicken was finished with which fat. A small paper flag or serving spoon for each version prevents confusion and respects everyone's dietary choices. All dietary versions: Same resting time applies.
Notes
FAQs
Can I make this chicken if I’m vegan? Do I need to change anything besides the finishing butter?
Yes! The beautiful part is that the chicken preparation itself doesn’t change. The only modification is the finishing fat. Use the tahini-based garlic finish I detailed in Step 7. Mix 1 tablespoon tahini with 1 teaspoon lemon juice, ½ teaspoon minced fresh garlic, and 1-2 tablespoons unsweetened plant milk to create a silky drizzle. All the spices are naturally vegan, and you’ll end up with a genuinely delicious plate that feels special, not compromised. I’ve had omnivorous guests specifically request the vegan version because they loved the nuttiness.
Is this recipe gluten-free? My daughter has celiac disease and I want to be certain.
The base recipe is naturally gluten-free: chicken, paprika, Italian seasoning, spices, salt, and pepper contain no gluten. However, here’s where dietitian honesty matters: verify your specific spice brands. Some Italian seasoning blends or pre-mixed spice blends might be processed in facilities with gluten or contain additives with gluten. For your daughter’s safety, purchase individual spices (paprika, oregano, basil, thyme) and combine them yourself, or choose a brand explicitly certified gluten-free. The finishing fats (butter, tahini, coconut oil, avocado oil) are all naturally gluten-free. When in doubt, check labels—your daughter’s health is worth the two minutes.
What’s the difference between onion powder and garlic powder? Can I just use more garlic?
They’re completely different flavor contributions. Onion powder brings subtle sweetness and umami depth, while garlic powder brings pungent, sharp heat. Using more garlic would make the chicken taste one-dimensional and harsh. The balance of both creates a sophisticated spice profile. If you genuinely dislike onion, you can omit it and increase garlic powder to ½ teaspoon, but I’d encourage you to try the balanced version first. Professional cooks obsess over these ratios because they matter.
My chicken came out dry. What went wrong, and how do I fix it next time?
Dryness usually comes from one of three issues: (1) The chicken was cooked beyond 165°F internal temperature—you went too far. Use your thermometer at 4 minutes and check frequently. (2) The chicken breasts were inconsistent thickness, so thicker pieces cooked longer while thinner pieces dried out. Use your meat mallet. (3) You didn’t finish with fat, or the fat was applied after the chicken cooled. Finish the chicken while it’s still hot so the fat coats and adds moisture. If your chicken was already overcooked, the leftover is perfect for shredding into salads or grain bowls where the texture won’t matter as much.
Can I make this in the oven instead of grilling? I don’t have a grill.
You can, but it won’t be “blackened” in the traditional sense because your home oven can’t reach the intense surface heat a grill provides. That said, here’s the workaround: preheat your oven to 425°F and season your chicken identically. Heat a cast iron skillet on the stovetop over medium-high heat until very hot, add a touch of avocado oil, then sear your chicken 2-3 minutes per side on the stovetop to develop color. Transfer the skillet to the oven for 8-10 minutes until the chicken reaches 165°F internally. Finish with your chosen fat immediately. You’ll get a darker crust than pure oven-baking and the flavor will be closer to grilled. It’s not identical, but it’s genuinely good.
How do I know if my chicken is cooked through without cutting into it (which releases the juices)?
An instant-read meat thermometer is genuinely the best $15-20 investment for any home cook. Insert it horizontally into the thickest part of the chicken breast, aiming for the center without touching bone. 165°F (74°C) is the safe temperature. Wait three seconds for the reading to stabilize. This is the only foolproof method that doesn’t compromise the chicken. If you don’t have a thermometer, I strongly encourage you to get one—it changes everything about your confidence in the kitchen.
More Diet-Friendly Recipes You’ll Love
- Alambres Recipe – Grilled protein skewers adaptable for multiple dietary needs
- Arroz Con Pollo Best Recipe – One-pot chicken and rice that works beautifully for inclusive gatherings
- Barbecue Potatoes Recipe – Perfect side dish to accompany your blackened chicken
Final Thoughts: Inclusive Cooking Isn’t Complicated
After a decade of hosting gatherings