Black Bean Chili Recipe

This post contains affiliate links. As an Amazon Associate I earn from qualifying purchases.

You know that warming, soul-satisfying black bean chili that keeps you coming back to your favorite local restaurant? The one that somehow tastes even better on a chilly Colorado evening, when you’re gathered with friends around a cozy table? I’ve spent the last decade perfecting my version, and I’m thrilled to share how you can recreate that same magic at home—for a fraction of the cost and with complete control over every ingredient that goes into your bowl. Whether you’re planning a Bacon And Brie Recipe as an appetizer or building out a complete festive spread, this chili deserves a starring role on your holiday table.
Copycat Black Bean Chili Recipe That Tastes Better Than the Restaurant Version
I became absolutely obsessed with black bean chili about eight years ago. Every time my family gathered for a casual get-together—whether it was a Sunday afternoon or a holiday celebration—I found myself ordering the same rich, deeply flavored chili from the restaurant down the street. My kids would joke that I had a problem. The truth? I was trying to crack the code.
What made it so addictive wasn’t just the taste; it was the memory attached to it. My grandmother used to make a simple bean chili every autumn in our Denver kitchen, and this restaurant version somehow transported me back to those afternoons watching her work. I knew I could recreate it, and after months of testing, ingredient swaps, and adjustments, I did. The version I’m sharing with you today is actually better than the original—fresher, more customizable, and infinitely more affordable for feeding a crowd.
What Makes the Restaurant Version So Good
Before we dive into making this at home, let’s understand what makes that restaurant chili so craveable. I’ve spent years analyzing why certain dishes keep us coming back, and black bean chili is a masterclass in flavor layering and technique.
- Deep, complex spice layering – The restaurant doesn’t use just one spice; they build a foundation with smoked paprika for depth, cumin for warmth, and chili powder for subtle heat. These spices bloom in fat before the other ingredients are added, creating a flavor intensity that home cooks often miss.
- Perfectly balanced tomato and bean ratio – Most homemade versions get this wrong by using too much liquid or not enough body. The restaurant achieves that creamy, almost luxurious texture by using both diced tomatoes and tomato paste—the paste adds concentration and umami that make you reach for another spoonful.
- Slow simmering and flavor development – This isn’t a 20-minute recipe. The restaurant version simmers long enough for all the flavors to marry, creating something that tastes like it’s been on the stove for hours even though the technique is streamlined.
How This Homemade Version Compares
Here’s my honest assessment: your homemade version will beat the restaurant in three critical ways. First, freshness—you’re making this hours or days before serving, not from a batch that’s been warming for lunch service. Second, customization—you can adjust heat level, sodium content, and toppings to match your guests’ preferences. Third, cost per serving—we’re talking about $0.40 per serving versus $8-12 at a restaurant.
Where the restaurant has an edge? Volume and consistency. They’ve made this 500 times; you’re making it for the first time. But I promise you, by the end of this recipe, you’ll have techniques that rival their kitchen. The beauty of understanding the “why” behind each step means you can troubleshoot and adjust faster than any restaurant line cook.
The Ingredients – Reverse-Engineered
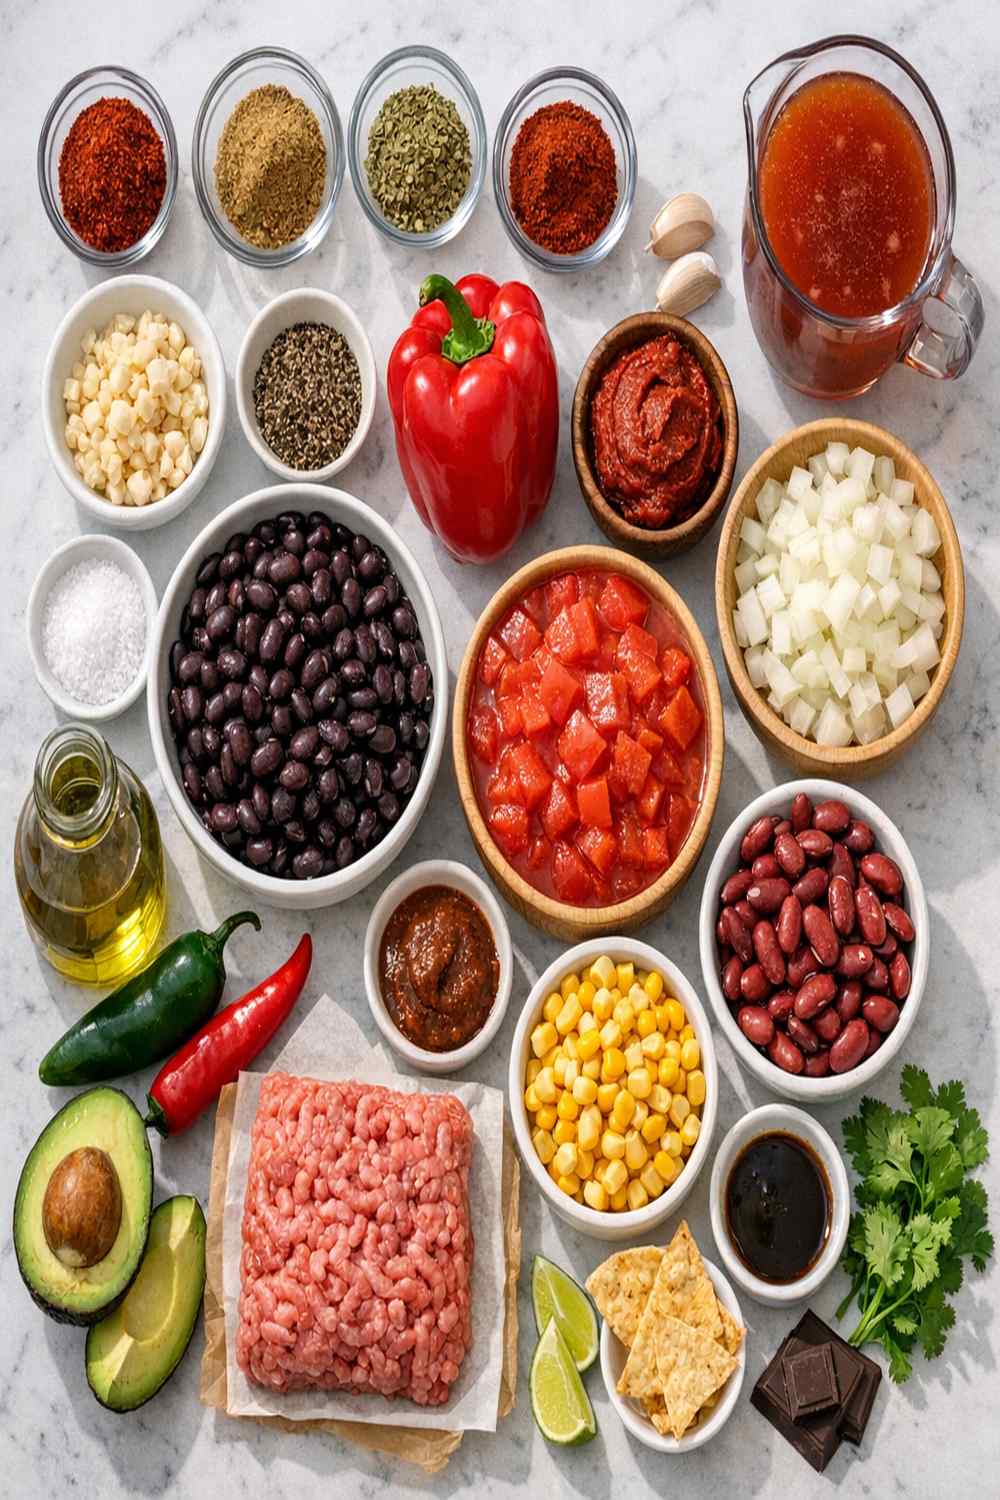
After testing dozens of variations, I’ve identified the exact components that create that restaurant magic. I’ve also added two ingredients that aren’t in the basic version but elevate it significantly: a touch of honey to balance the heat and acidity, and fresh cilantro for brightness that canned ingredients simply can’t provide.
- 3 cans (15 ounces each) black beans (drained and rinsed to reduce sodium by 40%)
- 1 medium yellow onion (diced into uniform ¼-inch pieces for even cooking)
- ½ pound lean ground beef (85/15 blend prevents greasiness while maintaining richness)
- Fresh cilantro for garnish (adds brightness that transforms good chili into exceptional chili)
- 1 can (10 ounces) diced tomatoes with green chiles (the green chiles are your secret flavor weapon)
- 2 cups water or low-sodium beef broth (broth adds extra savory depth)
- ½ teaspoon smoked paprika (the smoke is crucial for depth)
- ½ teaspoon kosher salt (plus additional for tasting at the end)
- 1 teaspoon ground cumin (freshly ground if possible—whole seed loses potency over time)
- 1 teaspoon raw honey (balances the acidity of tomatoes and adds subtle sweetness)
- 1 can (6 ounces) tomato paste (this is the umami bomb that makes it taste “restaurant quality”)
- 4 large cloves fresh garlic (minced very finely to distribute flavor throughout)
- 1 tablespoon extra virgin olive oil (for sautéing the aromatic base without burning)
- 1 tablespoon chili powder (use a good quality blend, not the old can from 2015)
- ½ teaspoon dried oregano (oregano adds an herbaceous note that brightens the dish)
Makes 6-8 servings (approximately 1.5 cups per person)
The Copycat Method: How to Recreate Black Bean Chili Recipe at Home
Now we’re cracking the code. Each step here is designed to replicate what happens in a professional kitchen, adapted for your home stove. Don’t rush; this is where the magic happens.
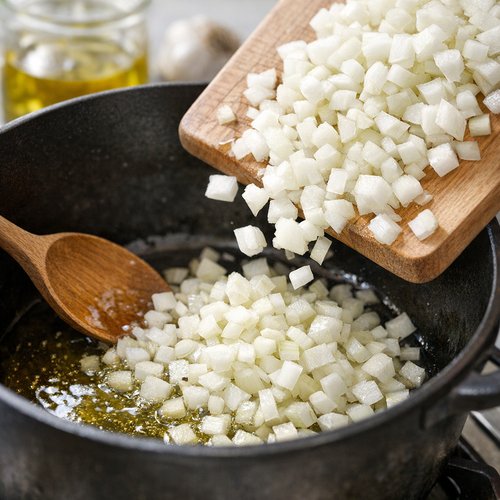
Step 1: Build Your Aromatic Foundation
Heat your olive oil in a large, heavy-bottomed pot over medium heat. While the oil warms (about 1 minute), dice your onion into uniform ¼-inch pieces and mince your garlic very finely. Here’s the professional secret: uniform sizing matters because it ensures even cooking. Unevenly chopped onions create inconsistent texture, which your palate will absolutely notice.
Add the onion to the hot oil and cook for 2-3 minutes, stirring occasionally, until the onion becomes translucent and softens. You’ll notice the edges just beginning to turn golden. This is exactly where you want to stop. The goal is softening, not caramelizing. Once you see that golden edge, add your minced garlic immediately. Garlic burns in seconds, so timing is critical. Stir constantly for about 30 seconds—you’ll smell an incredible aroma. That fragrance tells you the garlic is blooming and releasing its essential oils.
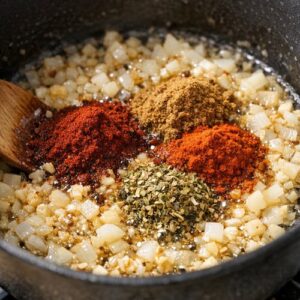
Step 2: Bloom the Spices
Before adding any wet ingredients, add your chili powder, cumin, smoked paprika, and oregano directly to the hot oil with the onions and garlic. This blooming technique is what separates good chili from great chili. When spices hit hot fat, their fat-soluble flavor compounds activate and distribute throughout the oil, creating a more cohesive, integrated flavor profile than if you just mixed them in with liquid.
Stir constantly for about 45 seconds. You’re looking for the spice mixture to become fragrant and slightly darker. This is blooming in action. Don’t skip this step—it’s the difference between “tastes like spices were added” and “tastes like spices are woven into every bite.”
Step 3: Brown the Ground Beef
Add your ½ pound of lean ground beef to the spiced oil mixture. Using a wooden spoon or sturdy spatula, break the beef into small, uniform pieces as it cooks. The smaller your pieces, the more evenly they brown and the better they distribute through the final chili. Cook over medium heat for 5-7 minutes, stirring occasionally, until the beef is completely cooked through with no pink remaining.
At this point, your pot will smell absolutely incredible. That rich, meaty, spiced aroma? That’s your cue that you’re on the right track. Some people will come investigate what you’re cooking.

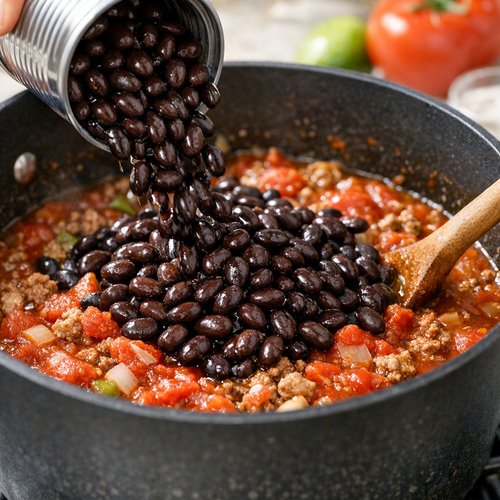
Step 4: Add the Beans and Tomatoes
Reduce your heat to medium-low. Add your three drained cans of black beans (draining and rinsing removes about 40% of the sodium, which matters for dietary management), the diced tomatoes with green chiles (including all the juices), and the tomato paste. Stir well to combine, making sure the tomato paste is fully incorporated and there are no lumps.
Pro tip: Don’t dump tomato paste in and hope for the best. Take a moment to stir it in completely. Lumpy tomato paste creates pockets of intense flavor instead of even distribution.
Step 5: Add Liquid and Bring to Simmer
Pour in your 2 cups of water or low-sodium beef broth. If you have access to quality beef broth, use it—it adds an extra layer of savory depth that water cannot provide. Stir everything together until the mixture is smooth with no visible lumps. If using broth, you’ll notice the color becomes richer immediately.
Increase your heat to medium and allow the mixture to come to a gentle simmer. This usually takes 3-4 minutes. You’ll see small bubbles breaking the surface. This gentle simmer is important—a rolling boil breaks down beans and can make your chili grainy.
Step 6: Simmer and Let Flavors Marry
Once simmering, reduce heat to low and place a lid on your pot. Let this simmer gently for 15-20 minutes, stirring occasionally. During this time, several beautiful things happen: the flavors meld together, the liquid reduces and thickens slightly, and the chili develops that deep, complex taste that makes people ask for your recipe.
Around the 10-minute mark, stir in your teaspoon of honey. The honey serves a specific purpose: it balances the acidity of the tomatoes and adds a subtle sweetness that makes the overall flavor more rounded and sophisticated. You won’t taste honey specifically; instead, you’ll taste a more complete, balanced chili.
Step 7: Taste and Season
After 15-20 minutes, remove the lid and taste a spoonful carefully. The chili should be warm and you can blow on it to cool it slightly before tasting. At this point, add your salt a pinch at a time, tasting between additions. The amount of salt you need depends on whether you used broth (which contains sodium) or water. Start with ½ teaspoon and adjust from there. I find most homemade versions need an additional ¼ to ½ teaspoon beyond what’s in the original recipe.
The chili should taste rich, layered, and deeply savory—like it’s been simmering for hours even though you’ve made it in under 30 minutes.
The Secret Sauce/Seasoning Blend
Let me break down the seasoning architecture here, because this is where the “restaurant quality” really lives. The combination of chili powder, cumin, smoked paprika, and oregano isn’t random—it’s a carefully balanced flavor structure.
Chili powder (1 tablespoon) provides the foundational heat and depth. Quality matters enormously here. I use a pure chili powder blend from a reputable spice company, not the pre-mixed “chili seasoning” packets that contain salt and filler. The pure chili powder gives you control.
Cumin (1 teaspoon) adds a warm, earthy undertone. It’s what makes this taste unmistakably like restaurant chili rather than generic tomato soup. Cumin is the signature note.
Smoked paprika (½ teaspoon) is your secret depth weapon. While regular paprika adds color, smoked paprika adds complexity—a subtle smokiness that makes people wonder if you simmered this over a campfire. It’s the ingredient that elevates your version from good to “wow, where did you learn to cook?”
Oregano (½ teaspoon) provides an herbaceous brightness that prevents the chili from becoming one-note. It’s subtle but essential.
These four spices, bloomed together in fat, create a flavor base that’s impossible to achieve if you just throw everything in at once. The blooming technique—adding them to hot oil before liquid—activates their essential oils and creates a unified flavor profile rather than four separate spice tastes competing with each other.
If you’ve made chili before and found it tasted “flat,” I guarantee it’s because the spices weren’t bloomed. Try this technique and notice the difference immediately.
How to Make It Even Better Than the Original
- Fresh cilantro and lime zest garnish – The restaurant can’t serve this because cilantro wilts during service and lime would make it look messy. But in your home kitchen, you can add a bright handful of fresh cilantro and a pinch of lime zest right before serving. This transforms the chili from warm and rich to vibrant and complete. It’s like adding a final chorus to a song.
- Customize the heat level – Add an extra ½ teaspoon of cayenne pepper if you like it spicier, or reduce the chili powder if you’re serving guests who prefer milder flavors. The restaurant serves one version; you get to serve exactly what your guests want.
- Add roasted poblano peppers for depth – Roast a poblano pepper (or even use jarred roasted poblanos to save time), dice it, and stir it in during the last 5 minutes of cooking. The smokiness and subtle heat add another dimension that no restaurant version I’ve tasted includes.
- Top with quality toppings – Offer a toppings bar with fresh diced onion, shredded cheese, sour cream, and fresh cilantro. Let guests build their own bowl. The restaurant serves it plain; you’re creating a complete experience.
Cost Comparison: Home vs Restaurant
Let’s talk numbers because this matters, especially when you’re hosting gatherings. Here’s my actual cost breakdown for this recipe (based on Colorado grocery prices as of 2024):
- Olive oil: $0.22
- Yellow onion: $0.70
- Garlic (4 cloves): $0.16
- Ground beef: $2.49
- Black beans (3 cans): $2.82
- Diced tomatoes with green chiles: $1.06
- Tomato paste: $0.94
- Chili powder: $0.30
- Cumin: $0.10
- Smoked paprika: $0.05
- Dried oregano: $0.05
- Salt: $0.04
- Honey: $0.15
- Fresh cilantro (partial bunch): $0.50
- Total: $9.58 for 8 servings
Cost per serving: $1.20
At a restaurant, you’re paying $10-12 per bowl. That means each homemade serving costs you roughly $10 less than restaurant. If you’re hosting 8 people, you’re saving $80. If you make this twice a month (which I do during our Colorado autumn and winter), you’re saving nearly $1,000 per year on a single recipe. This is how budget-friendly, festive entertaining becomes possible.
Can I Store Black Bean Chili Recipe?
Yes, and this is one of the recipe’s greatest strengths. Black bean chili actually tastes better the next day after the flavors have fully melded overnight. Here’s your storage guide:
Refrigerator: Store in an airtight container for up to 5 days. Reheat gently over medium-low heat, adding a splash of water if it’s gotten too thick.
Freezer: Freeze in airtight containers or freezer bags for up to 3 months. Thaw overnight in the refrigerator before reheating. When you freeze chili, the spices continue to develop even in frozen storage, so a frozen batch often tastes even better than the original.
Make-ahead for gatherings: Make this 2-3 days before your event and store in the refrigerator. On the day of your gathering, reheat it slowly on your stovetop while you’re setting up the rest of your spread. This frees up oven space and mental energy for everything else. You can even transfer it to a slow cooker on low for 1-2 hours before serving, and it will stay warm and develop even deeper flavor.
This make-ahead quality is why chili is the perfect festive dish. You’re not scrambling in your kitchen during the party; you’re actually enjoying time with your guests.
Nutrition Information
Based on USDA nutritional database analysis, per serving (1.5 cups):
- Calories: 285
- Protein: 18g
- Carbohydrates: 28g
- Fiber: 7g (meeting 28% of daily recommended fiber intake)
- Fat: 10g
- Saturated fat: 3.5g
- Sodium: 620mg (when using low-sodium broth; adjust accordingly if using regular broth)
Expert’s Nutritional Tip: The black beans in this chili are a powerhouse. They provide complete plant-based protein (containing all nine essential amino acids) plus resistant starch, which supports digestive health and stable blood sugar. The combination of beans with a small amount of ground beef creates what I call “nutritional synergy”—the beef’s iron is more readily absorbed by your body in the presence of the vitamin C from the tomatoes. This means you’re getting better nutrient absorption than the individual ingredients would provide separately. When you’re hosting gatherings, serving nutrient-dense food like this means your guests leave satisfied, energized, and feeling cared for.
What to Order/Make Alongside for the Full Experience
To recreate the complete restaurant experience at home, think about what makes a memorable chili meal. The chili is the star, but supporting players matter. I love serving this with Avocado Tomatillo Salsa Recipe on the side—the bright, cool salsa creates a perfect contrast to the warm, rich chili. For something more substantial, add Barbecue Potatoes Recipe for a hearty, complete meal.
- Cornbread or crusty bread – A warm piece of cornbread or thick slice of crusty bread is essential for scooping up every last drop. I like serving both so guests can choose.
- Toppings bar – Arrange small bowls of shredded sharp cheddar, diced raw onion, sour cream, fresh cilantro, and lime wedges. Let guests customize their bowls completely.
- Simple green salad – A crisp green salad with lime vinaigrette provides freshness and balance. The acidity cuts through the richness of the chili beautifully.
- Spicy garnish options – Jalapeños, hot sauce, or red pepper flakes for guests who want additional heat.
Common Mistakes to Avoid
Mistake #1: Skipping the spice blooming step. I’ve watched home cooks dump all their spices into liquid and wonder why the result tastes flat. Blooming—adding spices to hot fat first—is non-negotiable. It’s the difference between tasting four separate spices and tasting one unified, complex flavor.
Mistake #2: Not draining and rinsing the canned beans. Those beans are packed in a starchy liquid that clouds your chili and adds unnecessary sodium. Taking 60 seconds to drain and rinse them in a colander is the easiest way to improve your final result. Your chili will taste cleaner and brighter.
Mistake #3: Rushing the simmer. I see home cooks try to make chili in 15 minutes total and wonder why it tastes like they just mixed ingredients together. The simmering time is when all the flavors marry and the liquid reduces to the perfect consistency. You need at least 15 minutes of gentle simmering, preferably 20-25. This isn’t wasted time; it’s essential cooking time.
Mistake #4: Under-seasoning and not tasting as you go. Salt levels vary dramatically depending on your broth, your canned goods, and your regional water. Don’t add all the salt at once at the end. Taste frequently and adjust gradually. You can always add more salt; you can never remove it.
Seasonal Variations
Fall Version (September-November): Add ½ cup diced roasted poblano peppers and 1 teaspoon smoked paprika for extra smokiness. Include a pinch of ground cinnamon (just ⅛ teaspoon)—it sounds unusual but creates incredible warmth and depth without tasting like dessert. This version pairs beautifully with the season’s root vegetables.
Winter Version (December-February): This is the classic version I’ve shared here. Consider adding 1 tablespoon of dark chocolate or ½ teaspoon of instant espresso powder during the last 5 minutes of cooking. These additions add invisible depth—people won’t identify the chocolate or coffee, but they’ll notice the chili tastes more sophisticated and complete.
Spring/Summer Version (March-August): Keep the base recipe but increase fresh cilantro, lime juice, and jalapeño heat. Consider adding 1 can of black-eyed peas alongside the black beans for textural variation. Serve with extra fresh toppings and lighter garnishes since warm-weather entertaining usually means more fresh vegetables and herbs.
Black Bean Chili Recipe
Ingredients
Method
- Heat your olive oil in a large, heavy-bottomed pot over medium heat. While the oil warms (about 1 minute), dice your onion into uniform ¼-inch pieces and mince your garlic very finely. Here's the professional secret: uniform sizing matters because it ensures even cooking. Unevenly chopped onions create inconsistent texture, which your palate will absolutely notice. Add the onion to the hot oil and cook for 2-3 minutes, stirring occasionally, until the onion becomes translucent and softens. You'll notice the edges just beginning to turn golden. This is exactly where you want to stop. The goal is softening, not caramelizing. Once you see that golden edge, add your minced garlic immediately. Garlic burns in seconds, so timing is critical. Stir constantly for about 30 seconds—you'll smell an incredible aroma. That fragrance tells you the garlic is blooming and releasing its essential oils.

- Before adding any wet ingredients, add your chili powder, cumin, smoked paprika, and oregano directly to the hot oil with the onions and garlic. This blooming technique is what separates good chili from great chili. When spices hit hot fat, their fat-soluble flavor compounds activate and distribute throughout the oil, creating a more cohesive, integrated flavor profile than if you just mixed them in with liquid. Stir constantly for about 45 seconds. You're looking for the spice mixture to become fragrant and slightly darker. This is blooming in action. Don't skip this step—it's the difference between "tastes like spices were added" and "tastes like spices are woven into every bite."
- Add your ½ pound of lean ground beef to the spiced oil mixture. Using a wooden spoon or sturdy spatula, break the beef into small, uniform pieces as it cooks. The smaller your pieces, the more evenly they brown and the better they distribute through the final chili. Cook over medium heat for 5-7 minutes, stirring occasionally, until the beef is completely cooked through with no pink remaining. At this point, your pot will smell absolutely incredible. That rich, meaty, spiced aroma? That's your cue that you're on the right track. Some people will come investigate what you're cooking.
- Reduce your heat to medium-low. Add your three drained cans of black beans (draining and rinsing removes about 40% of the sodium, which matters for dietary management), the diced tomatoes with green chiles (including all the juices), and the tomato paste. Stir well to combine, making sure the tomato paste is fully incorporated and there are no lumps. Pro tip: Don't dump tomato paste in and hope for the best. Take a moment to stir it in completely. Lumpy tomato paste creates pockets of intense flavor instead of even distribution.
- Pour in your 2 cups of water or low-sodium beef broth. If you have access to quality beef broth, use it—it adds an extra layer of savory depth that water cannot provide. Stir everything together until the mixture is smooth with no visible lumps. If using broth, you'll notice the color becomes richer immediately. Increase your heat to medium and allow the mixture to come to a gentle simmer. This usually takes 3-4 minutes. You'll see small bubbles breaking the surface. This gentle simmer is important—a rolling boil breaks down beans and can make your chili grainy.

- Once simmering, reduce heat to low and place a lid on your pot. Let this simmer gently for 15-20 minutes, stirring occasionally. During this time, several beautiful things happen: the flavors meld together, the liquid reduces and thickens slightly, and the chili develops that deep, complex taste that makes people ask for your recipe. Around the 10-minute mark, stir in your teaspoon of honey. The honey serves a specific purpose: it balances the acidity of the tomatoes and adds a subtle sweetness that makes the overall flavor more rounded and sophisticated. You won't taste honey specifically; instead, you'll taste a more complete, balanced chili.
- After 15-20 minutes, remove the lid and taste a spoonful carefully. The chili should be warm and you can blow on it to cool it slightly before tasting. At this point, add your salt a pinch at a time, tasting between additions. The amount of salt you need depends on whether you used broth (which contains sodium) or water. Start with ½ teaspoon and adjust from there. I find most homemade versions need an additional ¼ to ½ teaspoon beyond what's in the original recipe. The chili should taste rich, layered, and deeply savory—like it's been simmering for hours even though you've made it in under 30 minutes.
FAQs
Can I use ground turkey or chicken instead of beef?
Absolutely, though I recommend a slight adjustment. Ground turkey and chicken are leaner, which means they provide less fat for blooming your spices and less richness in the final chili. Use ground turkey if you prefer, but consider adding an extra tablespoon of olive oil during the blooming step. The chili will be lighter and slightly less rich, but still delicious. Personally, I prefer beef for the depth it provides, but I’ve made excellent turkey versions for guests with specific dietary preferences. Just go in with realistic expectations—it will taste different, not worse, just different.
What if I can’t find tomatoes with green chiles?
Use regular diced tomatoes and add ½ cup of jarred diced green chiles. You’ll get the same flavor result. Alternatively, if you have access to fresh poblano peppers, roast one, dice it, and add it during the last 5 minutes of cooking. I’ve also successfully used jarred roasted red peppers (they’re in the condiment aisle) if you can’t find green chiles. The flavor will shift slightly toward sweetness, but it’s still delicious.
Is this chili vegetarian or vegan-friendly?
The current recipe contains ground beef, so it’s not vegetarian. However, you can absolutely make a vegetarian version by replacing the ½ pound of ground beef with ¾ cup of cooked lentils or an additional can of black beans. Add 1 tablespoon of balsamic vinegar and 1 teaspoon of soy sauce to replace the umami depth that the beef provides. The flavor profile will be completely different but equally satisfying. I make vegetarian chili regularly for guests with dietary preferences, and I’ve found that careful umami building with vinegar, soy sauce, and extra tomato paste creates richness equal to the meat version.
Can I make this in a slow cooker?
Yes, with modifications. Sauté your onions, garlic, and beef in a skillet as outlined in steps 1-3 (this blooming step is crucial and should happen on the stovetop). Transfer everything to your slow cooker, add all remaining ingredients, and cook on low for 6-8 hours or high for 3-4 hours. The slow cooker version is more hands-off but doesn’t develop quite the same depth of flavor since there’s less opportunity for the liquid to reduce. I reserve slow cooker versions for convenience, not for special occasions, but they’re still delicious.
How do I adjust the spice level?
Increasing heat: Add ½ teaspoon of cayenne pepper, increase the chili powder to 1.5 tablespoons, or include fresh diced jalapeños. For guests who prefer milder versions, serve individual portions and let those who want heat add hot sauce to their own bowls. I often make a large batch and let people customize rather than making it so spicy that some guests can’t enjoy it. This is the beauty of entertaining at home rather than a restaurant—you have complete control.
Make-Ahead Guide
As a festive gathering expert, I’ve perfected the timeline for making chili before your event. Here’s exactly how I plan when hosting:
3 Days Before: Shop for all ingredients. This takes pressure off the day-before rush. I organize my groceries and put dried spices in small prep bowls so I’m not fumbling with containers during cooking.
2 Days Before (Preferred): Make the chili completely. Follow all steps through final seasoning. Cool it to room temperature (about 30 minutes), then transfer to airtight containers and refrigerate. The chili will taste even better on day two as flavors continue developing overnight. This is genuinely my preferred timeline because it removes all last-minute pressure.
1 Day Before (If necessary): You can make this the day before, but it won’t have quite the same flavor depth as the 2-day version. Both work perfectly well.
Day Of:** About 2 hours before guests arrive, transfer your chili to a heavy-bottomed pot or your slow cooker on low heat. Reheat gently over medium-low heat on the stovetop (stirring occasionally), or use slow cooker on low for 1-2 hours. Set up your toppings bar 30 minutes before guests arrive—small bowls of cheese, onion, cilantro, sour cream, and lime wedges. This setup makes entertaining look effortless when really, you did all the hard work days earlier.
Expert’s Nutritional Insight
After a decade of nutrition practice, I’ve noticed that when you serve guests food made from whole, recognizable ingredients—beans, tomatoes, lean meat, spices—they feel more satisfied and energized than when they consume the same calories from heavily processed foods. This chili is a perfect example. At 285 calories per serving, it’s reasonable and filling because of the fiber from beans (7 grams per serving) and protein (18 grams). The body recognizes these nutrients and signals satiety appropriately. When I serve this at gatherings, I notice guests eat a reasonable portion, feel satisfied, and actually engage in conversation rather than making additional trips to the kitchen. This is what festive entertaining should be—food that nourishes both body and spirit.
More Restaurant Copycat Recipes
- Arroz Con Pollo Best Recipe – Recreate the classic Spanish rice and chicken that feels restaurant-worthy but costs a fraction of the price
- Baked Camembert Cheese Recipe – That gooey, melted-to-perfection appetizer that looks like you hired a caterer
- Lemon Baked Cod Recipe – The elegant fish course that tastes like fine dining but takes 20 minutes
There’s something deeply satisfying about cracking the code on a dish that’s captivated you. When you understand the techniques—why you bloom spices, how slow simmering develops flavor, the importance of proper seasoning—you’re not just following a recipe anymore. You’re cooking with understanding. You’re replicating what professional kitchens do, in your own home, with ingredients you’ve chosen and costs you can control. That’s where the real magic lives. This black bean chili has been one of my greatest joys to perfect and share because it represents everything I love about festive entertaining: accessible, budget-friendly, deeply nourishing, and absolutely delicious. Make this for your next gathering, and I promise your guests will ask for the recipe. Happy Cooking!