
Ingredients
Method
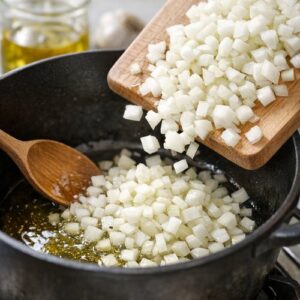
Step 1: Build Your Aromatic Foundation
- Heat your olive oil in a large, heavy-bottomed pot over medium heat. While the oil warms (about 1 minute), dice your onion into uniform ¼-inch pieces and mince your garlic very finely. Here's the professional secret: uniform sizing matters because it ensures even cooking. Unevenly chopped onions create inconsistent texture, which your palate will absolutely notice. Add the onion to the hot oil and cook for 2-3 minutes, stirring occasionally, until the onion becomes translucent and softens. You'll notice the edges just beginning to turn golden. This is exactly where you want to stop. The goal is softening, not caramelizing. Once you see that golden edge, add your minced garlic immediately. Garlic burns in seconds, so timing is critical. Stir constantly for about 30 seconds—you'll smell an incredible aroma. That fragrance tells you the garlic is blooming and releasing its essential oils.
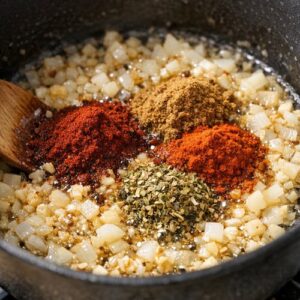
Step 2: Bloom the Spices
- Before adding any wet ingredients, add your chili powder, cumin, smoked paprika, and oregano directly to the hot oil with the onions and garlic. This blooming technique is what separates good chili from great chili. When spices hit hot fat, their fat-soluble flavor compounds activate and distribute throughout the oil, creating a more cohesive, integrated flavor profile than if you just mixed them in with liquid. Stir constantly for about 45 seconds. You're looking for the spice mixture to become fragrant and slightly darker. This is blooming in action. Don't skip this step—it's the difference between "tastes like spices were added" and "tastes like spices are woven into every bite."
Step 3: Brown the Ground Beef
- Add your ½ pound of lean ground beef to the spiced oil mixture. Using a wooden spoon or sturdy spatula, break the beef into small, uniform pieces as it cooks. The smaller your pieces, the more evenly they brown and the better they distribute through the final chili. Cook over medium heat for 5-7 minutes, stirring occasionally, until the beef is completely cooked through with no pink remaining. At this point, your pot will smell absolutely incredible. That rich, meaty, spiced aroma? That's your cue that you're on the right track. Some people will come investigate what you're cooking.
Step 4: Add the Beans and Tomatoes
- Reduce your heat to medium-low. Add your three drained cans of black beans (draining and rinsing removes about 40% of the sodium, which matters for dietary management), the diced tomatoes with green chiles (including all the juices), and the tomato paste. Stir well to combine, making sure the tomato paste is fully incorporated and there are no lumps. Pro tip: Don't dump tomato paste in and hope for the best. Take a moment to stir it in completely. Lumpy tomato paste creates pockets of intense flavor instead of even distribution.
Step 5: Add Liquid and Bring to Simmer
- Pour in your 2 cups of water or low-sodium beef broth. If you have access to quality beef broth, use it—it adds an extra layer of savory depth that water cannot provide. Stir everything together until the mixture is smooth with no visible lumps. If using broth, you'll notice the color becomes richer immediately. Increase your heat to medium and allow the mixture to come to a gentle simmer. This usually takes 3-4 minutes. You'll see small bubbles breaking the surface. This gentle simmer is important—a rolling boil breaks down beans and can make your chili grainy.

Step 6: Simmer and Let Flavors Marry
- Once simmering, reduce heat to low and place a lid on your pot. Let this simmer gently for 15-20 minutes, stirring occasionally. During this time, several beautiful things happen: the flavors meld together, the liquid reduces and thickens slightly, and the chili develops that deep, complex taste that makes people ask for your recipe. Around the 10-minute mark, stir in your teaspoon of honey. The honey serves a specific purpose: it balances the acidity of the tomatoes and adds a subtle sweetness that makes the overall flavor more rounded and sophisticated. You won't taste honey specifically; instead, you'll taste a more complete, balanced chili.
Step 7: Taste and Season
- After 15-20 minutes, remove the lid and taste a spoonful carefully. The chili should be warm and you can blow on it to cool it slightly before tasting. At this point, add your salt a pinch at a time, tasting between additions. The amount of salt you need depends on whether you used broth (which contains sodium) or water. Start with ½ teaspoon and adjust from there. I find most homemade versions need an additional ¼ to ½ teaspoon beyond what's in the original recipe. The chili should taste rich, layered, and deeply savory—like it's been simmering for hours even though you've made it in under 30 minutes.