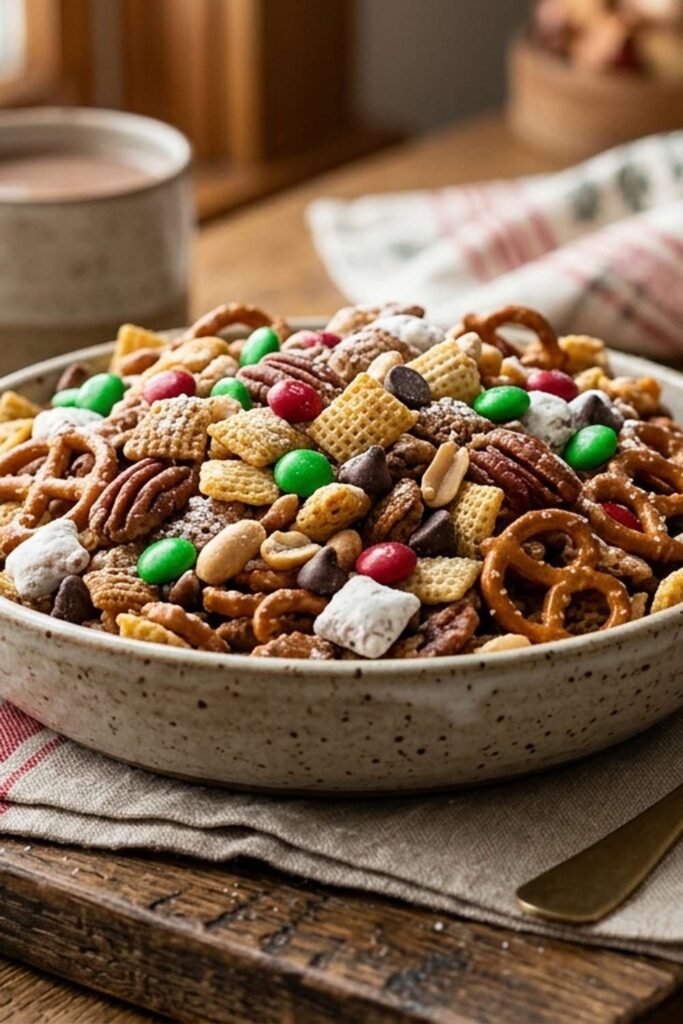
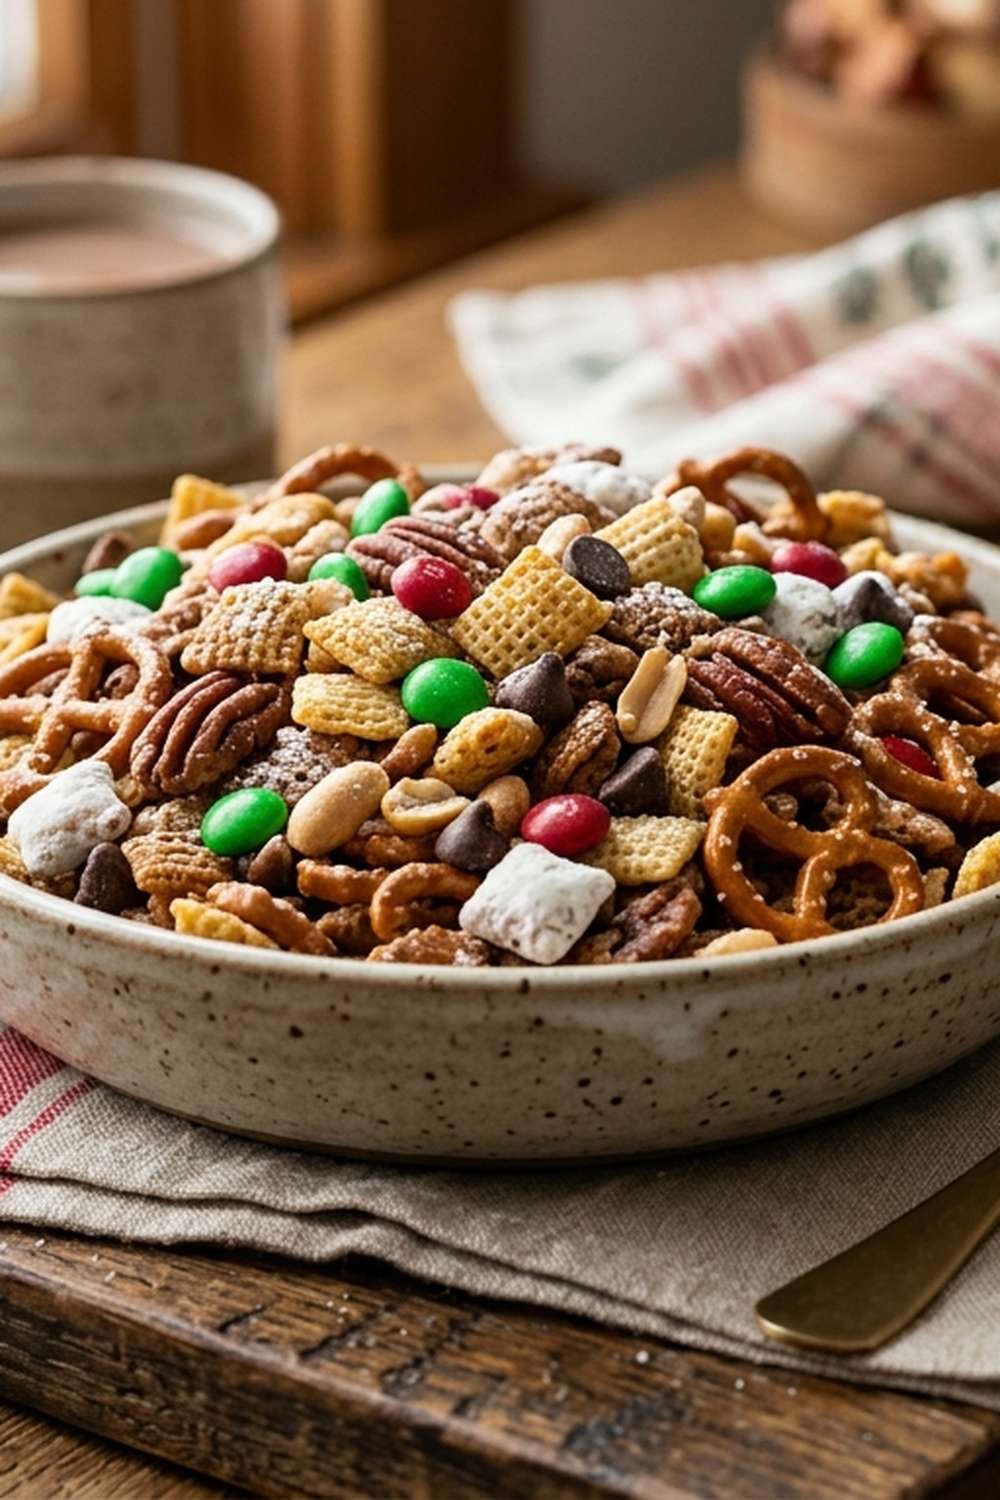
Chex Holiday Mix Recipe
This post contains affiliate links. As an Amazon Associate I earn from qualifying purchases.
Learning to make a showstopping holiday Chex mix isn’t just about this one recipe—it’s about mastering a technique that unlocks dozens of other celebratory snacks and party favorites. When I started hosting family gatherings in Colorado over a decade ago, I quickly realized that the most memorable moments happen around food that brings people together. This particular technique taught me how to transform humble pantry staples into something that guests actually crave. Whether you’re hosting a Friendsgiving dinner or a casual holiday get-together, knowing how to properly coat and temper chocolate while managing texture is a skill that will elevate every festive gathering you host. I can’t wait to share many more delicious and festive recipes with you!
Master the Technique Behind Holiday Snack Coating (And Never Struggle With Clumpy, Uneven Mixes Again)
I’ll never forget the moment this technique finally clicked for me. It was December 2014, and I was hosting my first large holiday party in my Denver kitchen. I’d attempted a chocolate-covered snack mix the year before, and it was a disaster—some pieces were coated so thick they were unpleasant to eat, while others barely got a whisper of chocolate. My guests were gracious, but I could tell the texture was off. The next year, I decided to approach it differently, treating the coating process like a professional confectioner would. I melted my chocolate more carefully, applied it gradually, and tossed everything thoroughly to ensure even distribution. That’s when everything changed. My guests were asking for the recipe before they’d even finished their first handful, and someone actually asked if I’d made it professionally. That moment taught me that technique isn’t about being fancy—it’s about understanding the why behind each step.
The Core Technique Explained
The fundamental technique you’re mastering here is called tempering and even coating—a method used by chocolatiers and pastry chefs to create smooth, glossy chocolate layers that set properly and taste luxurious. Here’s the science: chocolate contains cocoa butter, which can crystallize in different ways depending on temperature. When you melt chocolate over a double boiler (never direct heat), you’re gently dissolving those crystals without burning them. The key is keeping the temperature low and steady. Once melted, you’re creating an emulsion between the chocolate and the dry ingredients by gradually incorporating them and tossing repeatedly. This ensures every piece gets contact with the melted chocolate without clumping. The drying time allows the chocolate coating to harden into a proper shell that snaps slightly when you bite it, rather than creating that waxy, unpleasant texture you get from improper coating.
What This Technique Unlocks
Once you master the art of even chocolate coating and gradual incorporation, you’ll be able to create dozens of festive snacks and treats. This technique isn’t limited to one recipe—it’s a foundation skill that professional bakers use constantly. Here are five dishes where this exact same method applies:
- Chocolate-Covered Pretzel Bark – uses the same tempering and coating technique to create thin, snappable chocolate layers
- Chocolate-Drizzled Popcorn Clusters – requires the same gradual melting, tossing, and even distribution method
- Festive Trail Mix Varieties – applies identical coating principles to different nut and dried fruit combinations
- Holiday Candy Clusters – uses the double-boiler melting method and coating distribution to create professional-looking treats
- Chocolate-Covered Cereal Bites – requires the same tempering skill and careful tossing technique for even results
The Ingredients—Chosen to Teach the Technique
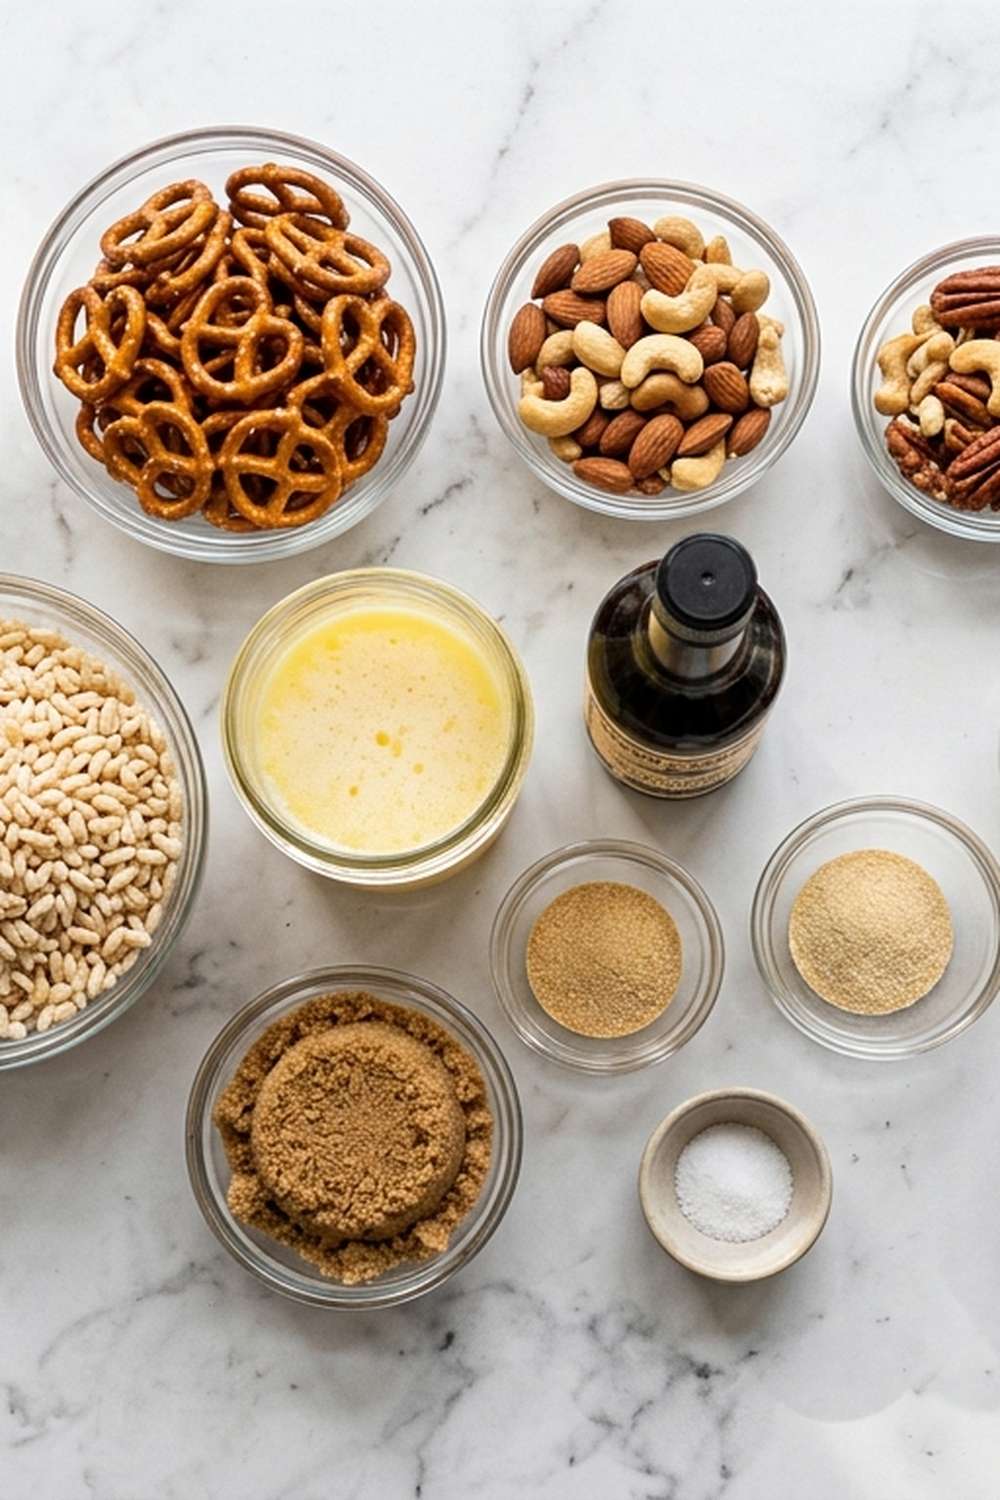
I’ve selected each ingredient in this recipe to demonstrate a specific aspect of the coating technique. The variety of cereals teaches you how to handle different densities and textures. The pretzel sticks introduce something crunchy and sturdy that requires different handling than delicate cereal pieces. The chocolate candies add visual appeal while teaching you restraint—you don’t want to overwhelm the mix with too much sweetness. Most importantly, the white chocolate is your primary teaching tool. Quality matters here because you’re learning proper melting and coating technique, and inferior chocolate will frustrate you with grainy texture or burning. Here’s what you’ll need:
- 3 cups crispy rice squares (these distribute chocolate smoothly and teach you about texture contrast)
- 2 cups corn-flavored crispy squares (lighter and crunchier, showing you how to handle delicate pieces)
- 1 cup pretzel sticks broken into bite-sized pieces (demonstrates sturdy ingredient handling)
- 2 to 3 cups colorful chocolate candies (adds visual excitement and teaches restraint in sweetness)
- ¼ teaspoon sea salt (balances sweetness and brings professional flavor depth)
- ½ teaspoon vanilla extract (enhances chocolate flavor subtly and teaches you about flavor layering)
- 3 cups old-fashioned oat cereal rings (this whole grain option provides structure and absorbs chocolate evenly)
- 2 to 4 ounces additional white chocolate if needed (backup chocolate for complete coverage without oversaturation)
- 3 cups wheat-flavored crispy squares (adds nutritional depth and demonstrates how different cereals coat differently)
- 24 ounces high-quality white chocolate chips or chopped white chocolate bar (your primary teaching ingredient—choose a brand with cocoa butter, not palm oil)
Expert’s Nutritional Tip
As a registered dietitian, I know that traditional holiday Chex mix can deliver about 150 calories per half-cup serving, with much of that coming from chocolate and added candies. Here’s my professional insight: by using whole grain cereals (oat, wheat-based options) instead of only refined choices, you’re adding approximately 2 grams of additional fiber per serving. That small swap improves satiety, meaning your guests will feel satisfied longer and won’t overindulge as quickly. I also love that the salty pretzel component naturally reduces the need for excess chocolate coating—the salt creates a taste memory that makes the treat feel more indulgent than it actually is. For budget-conscious hosts, this technique also teaches portion control beautifully. One half-cup of properly made holiday snack mix feels luxurious and satisfying, stretching your ingredients further than you’d expect.
The Masterclass: How to Make Holiday Snack Mix
This isn’t just a recipe—it’s a step-by-step lesson in chocolate coating technique that you’ll use for years. I’m going to walk you through each step as if you’re standing in my kitchen, and I want you to understand not just what to do, but why you’re doing it. This makes you a confident cook rather than someone just following directions.
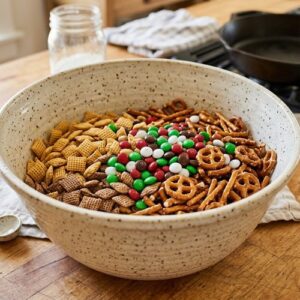
Step 1: Assemble and Dry Your Base Ingredients
Begin by gathering all your cereals, pretzel pieces, and chocolate candies in a very large mixing bowl—and I mean large. You need at least a 6-quart capacity because you’ll be tossing vigorously in the next steps, and cramped space creates uneven coating. Measure your oat rings, rice squares, wheat squares, and corn squares directly into the bowl. Break your pretzel sticks into roughly bite-sized pieces (about ½ to ¾ inch) and add them to the bowl. Sprinkle in your chocolate candies last. Now here’s the professional step that most home cooks skip: gently toss everything together with your hands for about 30 seconds to distribute the ingredients evenly before adding any chocolate. This pre-mixing ensures that when you add the melted chocolate, you’re starting with an already-balanced base. No ingredient will hide in corners waiting to be missed. Your mixture should look evenly distributed, with no piles of any single cereal dominating. This step teaches you about mise en place—the French technique of organizing ingredients before cooking begins.

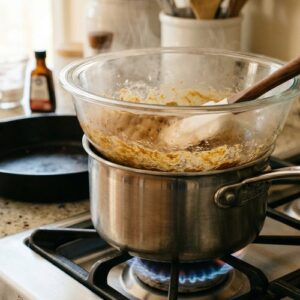
Step 2: Set Up Your Double Boiler with Intention
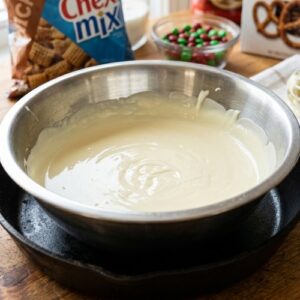
This step separates amateur chocolate work from professional results. Fill a medium saucepan with about 2 inches of water and bring it to a gentle simmer (not a rolling boil—that creates too much steam). Place a heatproof bowl on top of the saucepan, making sure the bowl’s bottom doesn’t actually touch the water. This is called a double boiler, and the indirect heat is crucial. Direct heat will scorch chocolate, creating grainy texture and bitter flavor. Add your 24 ounces of white chocolate (either chips or chopped pieces from a quality bar) to the bowl. Now, here’s the technique most people miss: don’t stir constantly. Stir only occasionally, allowing the residual heat to do the melting work. Constant stirring incorporates air bubbles and actually slows the melting process. Instead, stir every 20-30 seconds, checking that the chocolate is melting evenly. This teaches you patience and proper heat management. The chocolate should reach about 110-115°F if you have a thermometer, but you can judge by eye—it should be completely smooth and pourable without any visible chunks, and it should look glossy rather than dull.

Step 3: Create Your Flavor Base
Once your white chocolate is completely melted and smooth, remove the bowl from heat and let it cool for exactly 1 minute. This is more important than you think—chocolate that’s too hot will break apart the cereal pieces and create a mushy texture rather than crispy coatings. While you’re waiting, stir in your ¼ teaspoon of sea salt and ½ teaspoon of vanilla extract into the melted chocolate. This is where the flavor magic happens. The salt cuts the sweetness of white chocolate (which can be cloying on its own) and makes the chocolate taste richer. The vanilla adds depth and complexity. This technique of layering flavor is something professional chocolatiers do with every batch. These tiny additions completely transform how your guests experience the final product. Stir these additions in thoroughly until completely incorporated, about 30 seconds of steady stirring. Your chocolate should now have a subtle, sophisticated flavor rather than tasting like pure sugar.

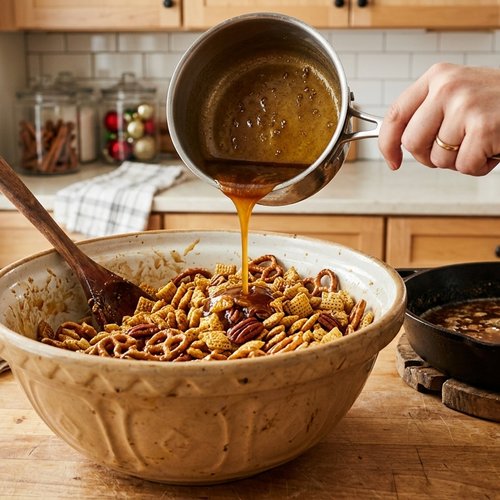
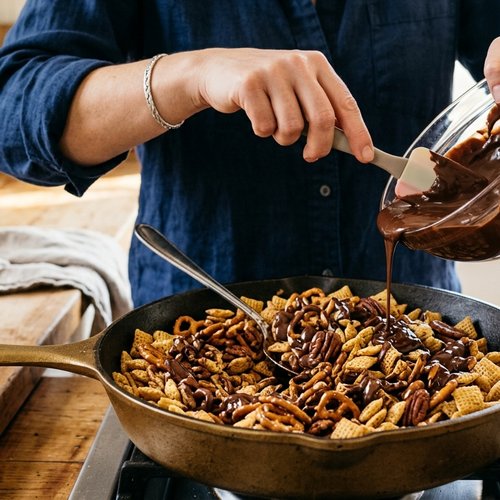
Step 4: Begin the Coating Process—The Critical Step
This is where your technique truly matters. Return your large bowl of cereal mixture to your work surface, making sure you have plenty of counter or table space around it. With a wooden spoon or sturdy silicone spatula, drizzle approximately one-third of your melted chocolate over the cereal mixture in thin streams, working across the entire bowl rather than pouring it all in one spot. This is the moment where patience determines your success. Don’t dump the chocolate; distribute it gradually. Now, toss the entire mixture thoroughly using a gentle but firm motion, reaching to the bottom of the bowl and folding the mixture over itself. You’re looking for the chocolate to coat everything evenly, but you’re not trying to create clumps. This should take about 1-2 minutes of tossing. The goal is to see chocolate on every piece, with no dry cereal visible. After this first round of tossing, pause and visually inspect the mixture. About 70% should be coated, with some pieces still showing their original color. This is exactly right. The remaining chocolate will be added gradually to prevent oversaturation.
Step 5: Add Remaining Chocolate in Stages
Add the remaining melted chocolate in two more additions, tossing thoroughly between each addition. This staged approach is the professional secret that prevents clumpy, over-saturated snack mix. If you dump all the chocolate at once, you’ll create thick, unpleasant clumps that feel heavy rather than providing that perfect chocolate coating. After adding the second third of chocolate, toss for another 1-2 minutes until all pieces are coated. Check that you’re not seeing any dry cereal. Then add the final portion of chocolate (keeping a little in reserve) and toss again. You should now have a glossy, evenly-coated mixture where every single piece has a thin, uniform chocolate layer. If you notice some pieces are still dry after this final addition, add a small amount of your reserved chocolate and toss again. You want complete coverage, but you don’t want chocolate-soaked pieces that feel heavy or soggy. The coating should be thin enough that you can still taste the individual cereal flavors.
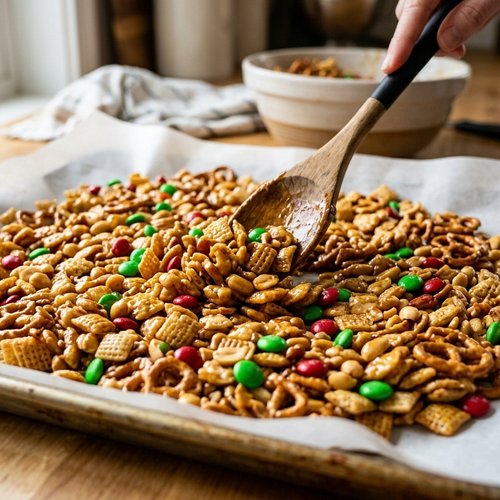
Step 6: Spread for Proper Setting
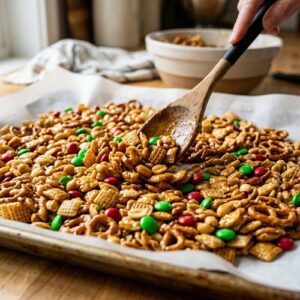
This step requires patience but produces professional results. Line a large baking sheet (or two if needed) with parchment paper or wax paper. Using your wooden spoon, carefully spread the chocolate-coated mixture across the parchment in a single layer. This is not the time to be aggressive. You want pieces spread apart so they can set individually without sticking to each other. Spread gently, leaving small gaps between clusters. If the mixture is too crowded, the chocolate will take longer to set and pieces may stick together. Aim for pieces that are touching but not piled on top of each other. This is especially important for the chocolate candies, which can stick to each other and create large clumps. Resist the urge to spread things flat or break apart naturally-formed clusters at this stage—let them set first, then you can break them apart if needed. The spacing teaches you about proper cooling technique and prevents texture problems.
Step 7: The Crucial Setting Period
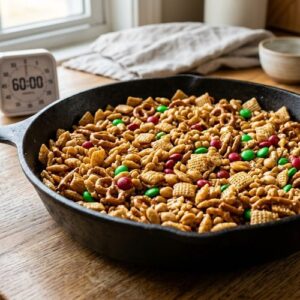
Now comes the hardest part for an impatient cook like me: let the mixture set undisturbed for exactly 1 hour at room temperature. Don’t move it, don’t poke it, don’t taste it yet. The white chocolate needs this time to crystallize properly and harden into that satisfying snap you’re looking for. You’ll see the surface transform from glossy to matte, and the chocolate will firm up from the outside in. After 1 hour, touch a piece gently—the chocolate should feel firm and snap cleanly when you break it. If it’s still soft or feels greasy, it needs another 15-20 minutes. This waiting period is actually teaching you about chocolate crystallization, which is fundamental knowledge for all chocolate work. Once set, break the mixture into medium-sized pieces (roughly 1-2 inch clusters) by hand, working gently to preserve the shape. Store immediately in an airtight container.

How to Know You’ve Mastered the Technique
Technique mastery isn’t mysterious—it’s about recognizing specific sensory signals that confirm you’ve done everything correctly. Here are the indicators that prove you’ve truly mastered the holiday snack mix coating technique:
- The Snap Factor – when you bite into a finished piece, the chocolate should snap cleanly between your teeth with an audible crunch, then melt immediately on your tongue. If it bends or feels chewy, your chocolate didn’t set properly (either it was too warm when applied, or it wasn’t given enough cooling time). If it shatters in a way that sends shards everywhere, it may have been cooled too quickly in the refrigerator. The perfect snap indicates proper tempering and setting time.
- Even Coverage Appearance – every single piece in your finished mix should have visible chocolate coating, with no cereal showing its original color. The coating should look glossy and uniform in thickness, not blotchy or thick in some spots and thin in others. When you hold a piece up to the light, the chocolate should appear translucent and smooth, not grainy or dull.
- Non-Sticky Texture – finished pieces should feel completely dry to the touch with no tacky or oily residue. If your fingers feel greasy after handling the mix, the chocolate hasn’t fully set or contains too much cocoa butter (indicating lower-quality chocolate). Properly made holiday snack mix feels crisp and clean.
- Individual Piece Definition – while pieces may form natural clusters during setting, each individual cereal piece should be distinguishable and breakable apart. You shouldn’t have large, connected clumps where three or four pieces are stuck together as one unit. This indicates even coating and proper spacing during the setting process.
- The Flavor Balance – the chocolate should taste rich and slightly sweet, but the underlying cereal flavors should still shine through. The sea salt and vanilla should be noticeable but subtle—you shouldn’t taste them as separate flavors, but rather as a layer of sophistication beneath the chocolate. This indicates proper flavoring technique.
Common Technique Mistakes and How to Fix Them
- Clumpy, Over-Chocolate Mix – this happens when you add all the chocolate at once instead of in stages. The excess chocolate creates thick coatings that pool at the bottom of the bowl. Prevention: add chocolate in three separate portions as instructed, tossing between each addition. If this happens mid-process, spread the mixture immediately and don’t try to salvage it by adding more chocolate. Sometimes acknowledging the mistake and starting fresh produces better results than fighting to fix an over-saturated batch.
- Chocolate That Seizes (Becomes Grainy and Clumpy) – this occurs when water gets into the chocolate during melting, causing the cocoa solids to clump irreversibly. This is why a double boiler is essential—never melt chocolate over direct heat or with steam escaping into it. If this happens, you cannot fix seized chocolate; you’ll need to start over with fresh chocolate. Prevention is everything: ensure your bowl is completely dry before starting, and use a proper double boiler setup.
- Cereal Becomes Soggy or Mushy – this happens when you apply chocolate that’s still too hot, which softens the cereal pieces. The solution is waiting that full 1 minute after removing the bowl from heat before adding the mixture. Additionally, if your chocolate is hotter than 115°F, it will break down the cereal structure. Always let melted chocolate cool slightly before incorporating the cereal. If pieces are already mushy, they’ve absorbed moisture and the batch should be spread immediately and cooled completely—sometimes even slightly soggy pieces will crisp up during the full cooling period.
- Chocolate That Won’t Set Hard – if after 1 hour the chocolate still feels soft or greasy, you have three potential issues: the chocolate quality was poor (lacking cocoa butter), you didn’t allow enough cooling time, or the room is too warm. Solutions include extending cooling time to 2 hours at room temperature (never refrigerate at first), moving the batch to a cooler location if possible, or accepting that lower-quality chocolate simply won’t set as firmly. In the future, invest in quality chocolate with real cocoa butter.
- Uneven Coating Where Some Pieces Are Bare – this results from inadequate tossing between chocolate additions or spreading the mixture too thickly on the baking sheet. Prevention: toss thoroughly for 1-2 minutes between each chocolate addition, ensuring even distribution. When spreading on parchment, aim for single-layer spacing with small gaps between pieces. If you notice bare spots after spreading, you can sometimes carefully add a tiny drizzle of reserved chocolate to problem areas, but it’s better to achieve complete coverage during the tossing stage.
Make-Ahead Guide: Prepare Like a Professional
As a dietitian who’s hosted hundreds of gatherings, I’ve learned that smart preparation is the foundation of stress-free entertaining. Here’s how to prepare this snack mix with maximum flexibility:
- Assemble ingredients up to 3 days ahead – measure all cereals, pretzels, and candies into labeled containers or bags. Store in airtight containers at room temperature. This takes the guesswork out of recipe day and prevents last-minute measuring mistakes.
- Complete the full recipe (through coating and setting) up to 5 days before serving – make the entire batch, let it set completely, break into pieces, and store in airtight containers. The chocolate coating protects the cereal from absorbing humidity. Store at room temperature, never in the refrigerator, which can create condensation that softens the chocolate.
- Make multiple batches with a freezing strategy – if you’re hosting a large gathering, make one batch 5 days ahead and store at room temperature. Make a second batch 3 days ahead and freeze it in airtight containers (it lasts up to 3 weeks frozen). Remove from freezer 2 hours before serving so it reaches room temperature and the chocolate sets properly.
- Pre-portion into bags 2 days ahead – measure finished snack mix into individual treat bags or small jars if you’re giving it as gifts or party favors. This shows intentionality and makes serving effortless.
- Prep your workspace the morning of – set out your double boiler, bowls, parchment paper, and baking sheets. Having everything ready means you can complete the actual cooking process in just 30 minutes of active work.
Practice Variations to Build Your Skill
True mastery comes through deliberate practice. Here are three progressively challenging variations that build your technique skills:
- The Beginner Variation: Dark Chocolate Holiday Mix – replace the white chocolate with high-quality dark chocolate (60% cacao). Dark chocolate has more cocoa solids and sets faster, which is actually more forgiving for beginners. The technique remains identical, but you’ll notice faster setting times (closer to 30-45 minutes instead of 1 hour) and the coating hardens more firmly. This teaches you how different chocolate types require different approaches. Add a pinch of cayenne pepper for sophistication.
- The Intermediate Variation: Chocolate Striped Holiday Mix – make half the batch with white chocolate coating as instructed, then create a second batch with dark chocolate. When both have set completely, layer them in your storage container so each bite has the chance to include both white and dark chocolate pieces. This teaches you how to manage multiple chocolate types simultaneously and requires more careful timing to ensure both batches are ready at the same time.
- The Advanced Variation: Milk Chocolate with Flavor Infusions – replace white chocolate with quality milk chocolate and add ¼ teaspoon of espresso powder dissolved in the vanilla extract before adding to the melted chocolate. You’ll also need to add 1 tablespoon of coconut oil to the melted chocolate to thin it slightly (milk chocolate sets slightly thicker than white). This advanced variation teaches you how to work with different chocolate viscosities, how to infuse subtle flavors, and how to adjust your technique based on ingredient changes. The espresso flavor is traditional in Colorado and elevates the mix significantly.
Seasonal Variations: Make It Yours Year-Round
The beauty of mastering this technique is adapting it for different seasons and occasions. Here are my favorite variations:
- Spring Easter Version – use pastel-colored chocolate candies instead of standard colors, and include freeze-dried strawberry pieces. The pink hues feel festive for spring gatherings, and the strawberry flavor pairs beautifully with white chocolate. Include white chocolate-covered pretzels for extra elegance.
- Summer Patriotic Version – use red, white, and blue chocolate candies and include crushed freeze-dried blueberries. This works beautifully for Fourth of July gatherings and other summer celebrations. The blue coloring comes naturally from the blueberries rather than artificial candies, which appeals to health-conscious guests.
- Fall Harvest Version – replace some cereals with pumpkin-flavored squares (if available), use orange and brown chocolate candies, and add ¼ teaspoon of pumpkin pie spice to the melted white chocolate. Include candied pecans for extra autumn flavor. This version bridges Halloween and Thanksgiving.
- Winter Holiday Version – the classic recipe with the addition of crushed candy canes (added after the chocolate sets to prevent dissolving). Red and white candies and evergreen-scented presentation make this quintessentially festive. Store away from heat so the candy cane pieces remain crunchy.
Can I Store Holiday Snack Mix?
Storage is straightforward if you follow these guidelines. Room temperature storage lasts up to 2 weeks in an airtight container. The chocolate coating acts as a protective barrier, preventing the cereal from absorbing humidity. I recommend using glass containers with rubber seals rather than plastic, as plastic can hold moisture. Never store in the refrigerator initially because temperature fluctuations create condensation that softens the chocolate coating and can cause a white bloom (crystallization pattern) to appear on the surface.
For longer storage, freezing extends shelf life to 3 weeks. Place finished mix in airtight freezer containers or heavy-duty freezer bags. Allow to come to room temperature (about 2 hours) before opening to prevent condensation. The chocolate will re-set properly as it warms. For gift-giving or holiday parties, prepare batches up to 5 days ahead and store at room temperature, which is actually the ideal storage method. The chocolate becomes more stable and develops a deeper flavor after a few days.
Individual portions in sealed treat bags stay fresh for 10 days if you’re offering them at a party or as gifts. This is actually perfect timing—make them up to 10 days before your event, portion them, and you’ve got beautiful, shelf-stable party favors ready to go.
Nutrition Information
Based on USDA nutritional database analysis, this recipe yields approximately 36 half-cup servings. Each serving contains approximately 145 calories, 7 grams of fat, 19 grams of carbohydrates, and 2 grams of protein. The whole grain cereals provide 2 grams of dietary fiber per serving, which is significant for a snack. The white chocolate contributes 35mg of sodium per serving (mostly from the chocolate itself), while the pretzel component adds additional sodium for a total of about 75mg of sodium per serving—reasonable for a party snack. The mix contains approximately 15 grams of sugar per serving, with roughly 8 grams coming from the chocolate and 7 grams from the cereals and candies combined. For those monitoring sugar intake, this is moderate for a dessert-style snack. The whole grain cereals mean you’re getting more sustained energy from this snack compared to refined-only versions, making it less likely to cause blood sugar spikes and crashes.
What to Serve With Holiday Snack Mix?
I’ve learned that serving this snack mix thoughtfully transforms your gathering. Here are pairings that let your technique shine:
- Coffee or Hot Chocolate – the classic pairing that makes holiday entertaining feel intentional. Serve this mix alongside a hot beverage station and guests feel cared for. The chocolate coating complements both beverages beautifully.
- Sparkling Cider or Champagne – for more elegant gatherings, present the snack mix in beautiful bowls alongside sparkling beverages. The sweetness of the mix balances the bubbles, creating a sophisticated flavor combination. This pairing signals celebration.
- Herbal Tea – peppermint or cranberry tea pairs surprisingly well with white chocolate-coated snacks. The herbal notes cut through the sweetness and feel festive. I love offering this pairing at holiday open houses.
- Assorted Seasonal Cookies and Treats – serve your holiday snack mix as part of a larger dessert spread. It provides texture contrast to cake-based treats and gives guests a lighter option alongside richer sweets. Consider pairing with something like a Banana Pie Recipe With Pudding for a dessert spread that feels complete.
- Savory Accompaniments – for non-traditional gatherings, serve alongside 5 Star Guacamole Recipe and other savory appetizers. The sweet-salty contrast keeps guests interested and prevents palate fatigue.
Chex Holiday Mix Recipe
Ingredients
Method
- Begin by gathering all your cereals, pretzel pieces, and chocolate candies in a very large mixing bowl—and I mean large. You need at least a 6-quart capacity because you'll be tossing vigorously in the next steps, and cramped space creates uneven coating. Measure your oat rings, rice squares, wheat squares, and corn squares directly into the bowl. Break your pretzel sticks into roughly bite-sized pieces (about ½ to ¾ inch) and add them to the bowl. Sprinkle in your chocolate candies last. Now here's the professional step that most home cooks skip: gently toss everything together with your hands for about 30 seconds to distribute the ingredients evenly before adding any chocolate. This pre-mixing ensures that when you add the melted chocolate, you're starting with an already-balanced base. No ingredient will hide in corners waiting to be missed. Your mixture should look evenly distributed, with no piles of any single cereal dominating. This step teaches you about mise en place—the French technique of organizing ingredients before cooking begins.
- This step separates amateur chocolate work from professional results. Fill a medium saucepan with about 2 inches of water and bring it to a gentle simmer (not a rolling boil—that creates too much steam). Place a heatproof bowl on top of the saucepan, making sure the bowl's bottom doesn't actually touch the water. This is called a double boiler, and the indirect heat is crucial. Direct heat will scorch chocolate, creating grainy texture and bitter flavor. Add your 24 ounces of white chocolate (either chips or chopped pieces from a quality bar) to the bowl. Now, here's the technique most people miss: don't stir constantly. Stir only occasionally, allowing the residual heat to do the melting work. Constant stirring incorporates air bubbles and actually slows the melting process. Instead, stir every 20-30 seconds, checking that the chocolate is melting evenly. This teaches you patience and proper heat management. The chocolate should reach about 110-115°F if you have a thermometer, but you can judge by eye—it should be completely smooth and pourable without any visible chunks, and it should look glossy rather than dull.
- Once your white chocolate is completely melted and smooth, remove the bowl from heat and let it cool for exactly 1 minute. This is more important than you think—chocolate that's too hot will break apart the cereal pieces and create a mushy texture rather than crispy coatings. While you're waiting, stir in your ¼ teaspoon of sea salt and ½ teaspoon of vanilla extract into the melted chocolate. This is where the flavor magic happens. The salt cuts the sweetness of white chocolate (which can be cloying on its own) and makes the chocolate taste richer. The vanilla adds depth and complexity. This technique of layering flavor is something professional chocolatiers do with every batch. These tiny additions completely transform how your guests experience the final product. Stir these additions in thoroughly until completely incorporated, about 30 seconds of steady stirring. Your chocolate should now have a subtle, sophisticated flavor rather than tasting like pure sugar.
- This is where your technique truly matters. Return your large bowl of cereal mixture to your work surface, making sure you have plenty of counter or table space around it. With a wooden spoon or sturdy silicone spatula, drizzle approximately one-third of your melted chocolate over the cereal mixture in thin streams, working across the entire bowl rather than pouring it all in one spot. This is the moment where patience determines your success. Don't dump the chocolate; distribute it gradually. Now, toss the entire mixture thoroughly using a gentle but firm motion, reaching to the bottom of the bowl and folding the mixture over itself. You're looking for the chocolate to coat everything evenly, but you're not trying to create clumps. This should take about 1-2 minutes of tossing. The goal is to see chocolate on every piece, with no dry cereal visible. After this first round of tossing, pause and visually inspect the mixture. About 70% should be coated, with some pieces still showing their original color. This is exactly right. The remaining chocolate will be added gradually to prevent oversaturation.

- Add the remaining melted chocolate in two more additions, tossing thoroughly between each addition. This staged approach is the professional secret that prevents clumpy, over-saturated snack mix. If you dump all the chocolate at once, you'll create thick, unpleasant clumps that feel heavy rather than providing that perfect chocolate coating. After adding the second third of chocolate, toss for another 1-2 minutes until all pieces are coated. Check that you're not seeing any dry cereal. Then add the final portion of chocolate (keeping a little in reserve) and toss again. You should now have a glossy, evenly-coated mixture where every single piece has a thin, uniform chocolate layer. If you notice some pieces are still dry after this final addition, add a small amount of your reserved chocolate and toss again. You want complete coverage, but you don't want chocolate-soaked pieces that feel heavy or soggy. The coating should be thin enough that you can still taste the individual cereal flavors.

- This step requires patience but produces professional results. Line a large baking sheet (or two if needed) with parchment paper or wax paper. Using your wooden spoon, carefully spread the chocolate-coated mixture across the parchment in a single layer. This is not the time to be aggressive. You want pieces spread apart so they can set individually without sticking to each other. Spread gently, leaving small gaps between clusters. If the mixture is too crowded, the chocolate will take longer to set and pieces may stick together. Aim for pieces that are touching but not piled on top of each other. This is especially important for the chocolate candies, which can stick to each other and create large clumps. Resist the urge to spread things flat or break apart naturally-formed clusters at this stage—let them set first, then you can break them apart if needed. The spacing teaches you about proper cooling technique and prevents texture problems.
- Now comes the hardest part for an impatient cook like me: let the mixture set undisturbed for exactly 1 hour at room temperature. Don't move it, don't poke it, don't taste it yet. The white chocolate needs this time to crystallize properly and harden into that satisfying snap you're looking for. You'll see the surface transform from glossy to matte, and the chocolate will firm up from the outside in. After 1 hour, touch a piece gently—the chocolate should feel firm and snap cleanly when you break it. If it's still soft or feels greasy, it needs another 15-20 minutes. This waiting period is actually teaching you about chocolate crystallization, which is fundamental knowledge for all chocolate work. Once set, break the mixture into medium-sized pieces (roughly 1-2 inch clusters) by hand, working gently to preserve the shape. Store immediately in an airtight container.
Notes
FAQs
Can I use milk chocolate instead of white chocolate?
Absolutely! Milk chocolate works beautifully and teaches you how to adapt the technique. However, milk chocolate sets slightly thicker and slower than white chocolate, so you may need to add 1 tablespoon of coconut oil to thin it slightly. The coating process remains identical, but you’ll notice the chocolate sets in about 1.5 hours instead of 1 hour. Milk chocolate has more cocoa solids than white chocolate, so it actually creates a firmer snap when properly set—it’s an excellent choice for someone learning the technique. The flavor becomes richer and less sweet, which some guests prefer.
What happens if I don’t use a double boiler?
This is where technique becomes critical. Direct heat will scorch the chocolate, creating a grainy, bitter texture that you cannot fix. The chocolate will actually seize (become clumpy) and become unusable. However, if you don’t have a proper double boiler, you can create one: place a heatproof bowl on top of a pot of simmering water, ensuring the bowl doesn’t touch the water. Even a pyrex bowl over a pot of hot (not boiling) water works. The principle is crucial—you need indirect, gentle heat. Never tempt fate with direct heat; it will fail every time.
How do I know if my chocolate is good quality?
As a dietitian, I read ingredient labels constantly. Quality chocolate should list cocoa butter in the first three ingredients, not palm oil or vegetable oil. The ingredient list should be simple: cocoa solids, cocoa butter, sugar, maybe vanilla or lecithin. Avoid anything listing “chocolate flavoring” or “artificial vanilla.” I look for chocolate that costs at least $3-4 per ounce from specialty brands. Honestly, using a quality chocolate bar that you chop yourself often works better than chocolate chips, which sometimes contain additives for stability that interfere with proper melting. For this recipe, I recommend Lindt, Ghirardelli, or Callebaut as reliable choices available at most grocery stores.
Can I add nuts or dried fruit to this mix?
Yes, and this is an excellent way to customize the recipe! Add roasted almonds, candied pecans, or dried cranberries (about 1 cup total). The technique remains identical. However, understand that nuts add fat content, which can slightly thin your melted chocolate. If you add nuts, reduce the coconut oil addition (if using any) and watch your chocolate consistency carefully. Dried fruit should be added after the chocolate sets (if using delicate pieces like cranberries) to prevent them from absorbing chocolate and becoming sticky. This variation teaches you how to adapt the base technique for personal preferences while maintaining proper texture and coating.
Why is my finished mix sticky instead of crisp?
Stickiness indicates one of three issues: your chocolate didn’t set completely (needs more time), your room temperature was too warm (try a cooler location), or your chocolate contained low cocoa butter content (quality issue). The solution depends on timing: if it’s been less than 1 hour, simply give it more time. If it’s been longer, move the batch to a cooler room (basement, unheated porch) and give it another hour. If it’s still sticky after 2 hours total, the chocolate quality was likely the issue—next time, invest in better chocolate. For immediate serving, you can spread the sticky mix in a single layer on new parchment and refrigerate for 15 minutes, then break apart. However, this indicates the chocolate crystallization didn’t complete properly, so the texture may remain slightly soft.