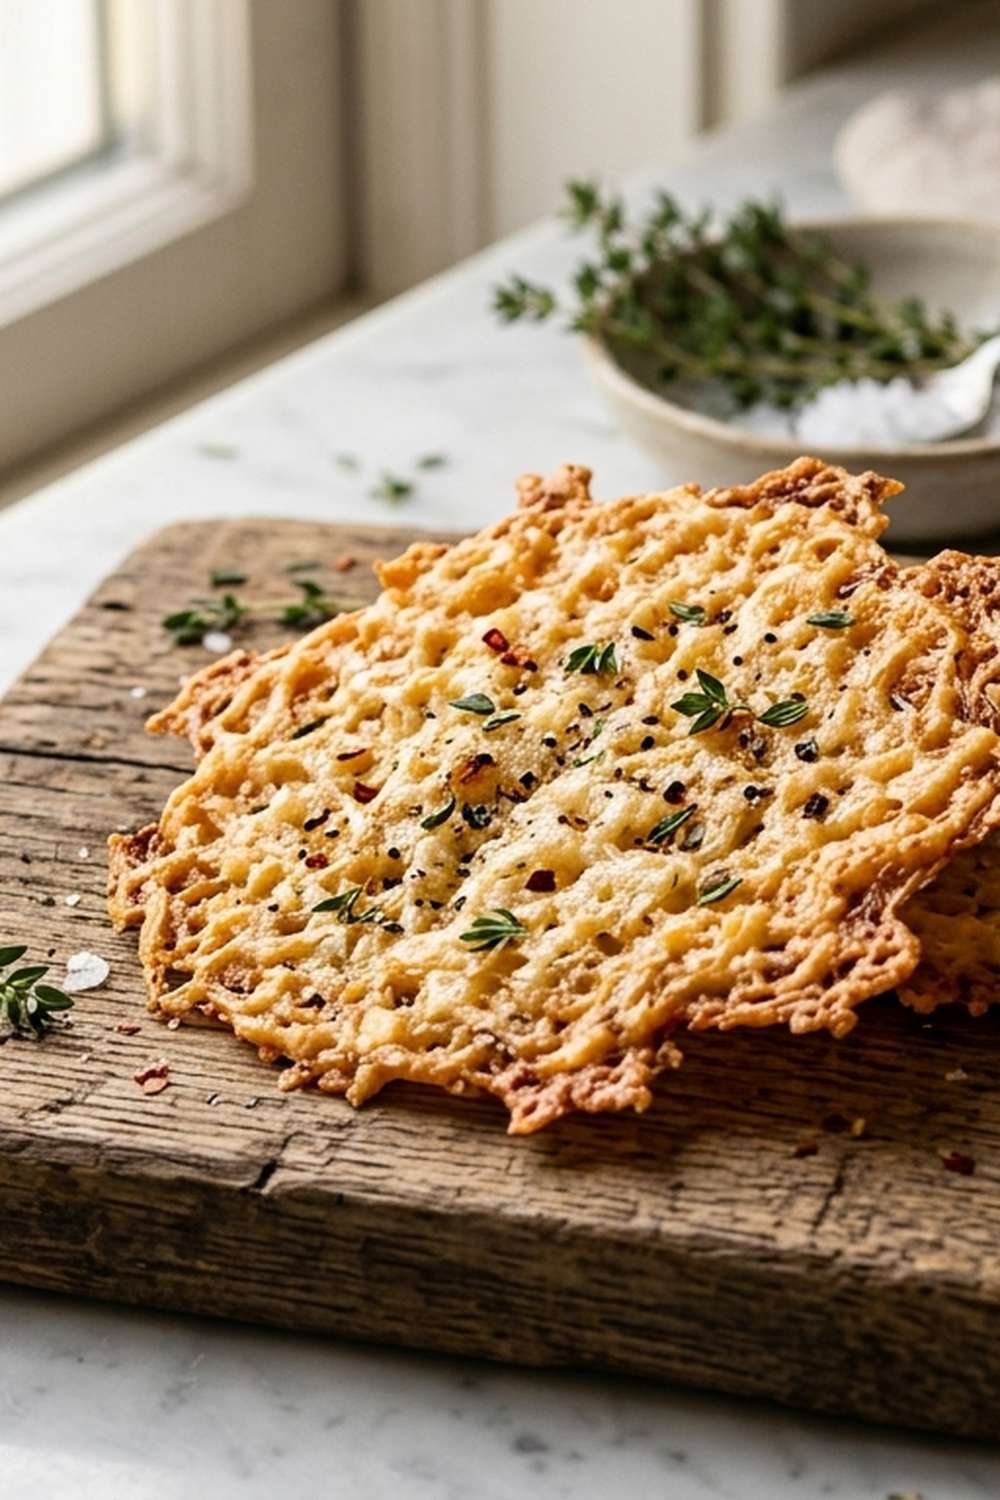
Cheese Crisp Recipe

This post contains affiliate links. As an Amazon Associate I earn from qualifying purchases.
There’s one ingredient in this cheese crisp that does all the heavy lifting—and once you understand it, you’ll cook with it everywhere. I’m talking about sharp cheddar cheese, that golden hero that transforms a humble tortilla into something absolutely irresistible. After a decade of helping Colorado families host festive gatherings, I’ve learned that the best party appetizers are the ones that look elegant but require almost no effort. This is exactly that recipe. When my cousin Sarah arrived at our New Year’s Eve gathering three years ago stressed about what to bring, I handed her this five-minute recipe and told her she’d be the star of the party. She was. Now it appears at every celebration she hosts. Let me share why this simple appetizer has become the secret weapon in my entertaining arsenal, and how you can make it the talk of your next gathering.
The One Ingredient That Makes This Cheese Crisp Unforgettable
Here’s something most people don’t realize: not all cheddar cheese is created equal, and it completely changes how your crisp turns out. My love affair with quality cheddar began during my first Thanksgiving as a young dietitian, when I was trying to recreate my grandmother’s famous cheese board. I bought the standard orange block from the supermarket, shredded it myself, and watched in dismay as it became a greasy, separated mess when melted. The turning point came when a local Colorado cheesemaker explained that sharp, aged cheddar has better fat structure and melts into that silky, cohesive layer that makes a crisp truly exceptional.
Since then, I’ve become somewhat obsessed with understanding cheddar’s personality. The sharpness comes from longer aging, which develops complex flavors and changes how the protein structure behaves under heat. This is why I always recommend seeking out a good quality cheddar for this recipe—it’s literally the only ingredient doing the heavy lifting, so it deserves your attention. The difference between a mediocre crisp and one that has your guests asking for the recipe comes down to this single choice.
Everything You Need to Know About Cheddar Cheese
Cheddar originated in Somerset, England, but has become a beloved staple worldwide. What makes cheddar special is its versatility and the range of flavors you can find depending on aging time and origin. American cheddar, particularly from quality producers in states like Wisconsin and Vermont, has developed its own reputation for excellence. For this recipe specifically, you want to look for cheddar that’s been aged at least six months—the label will typically say “sharp” or “extra sharp.” These varieties have lost moisture during aging, which means they melt more smoothly and create that beautiful, even layer across your tortilla.
- Sharp cheddar – aged 6 months to 2 years, ideal for this recipe because it melts evenly and develops rich, complex flavors that shine through in a simple preparation
- Mild cheddar – aged less than 3 months, I don’t recommend for crisps because it tends to become oily when melted and doesn’t develop interesting flavor
- Extra sharp cheddar – aged 2+ years, creates an even more intense flavor profile and pairs beautifully with fresh salsa and pico if you prefer bold, assertive taste
The Nutritional Power of Cheddar Cheese
As a registered dietitian, I approach cheese with a balanced perspective. Yes, cheddar is calorie-dense and contains saturated fat—a one-ounce serving has about 110 calories and 7 grams of fat. But here’s what excites me about cheddar from a nutritional standpoint: it’s an exceptional source of bioavailable calcium, providing about 200 milligrams per ounce, which is roughly 20% of the daily recommended value. According to USDA data, the calcium in cheese is absorbed more efficiently than many other sources because of cheese’s unique composition and the presence of casein phosphopeptides.
Protein is another superpower of cheddar—each ounce delivers about 7 grams of complete protein containing all nine essential amino acids. This makes your cheese crisp not just a delicious appetizer, but one with real nutritional staying power. The fat in cheese also facilitates absorption of fat-soluble vitamins like vitamin A and vitamin D. When you’re hosting, serving an appetizer with actual nutritional substance means guests feel satisfied and energized, not just temporarily full from empty calories.
I always recommend enjoying quality cheese in appropriate portions rather than avoiding it entirely. This recipe actually teaches portion control naturally—you’re spreading half a cup of cheese across a large tortilla, which means no one is eating massive amounts while still getting that satisfying, indulgent experience.
The Ingredients – Supporting Cast for the Star
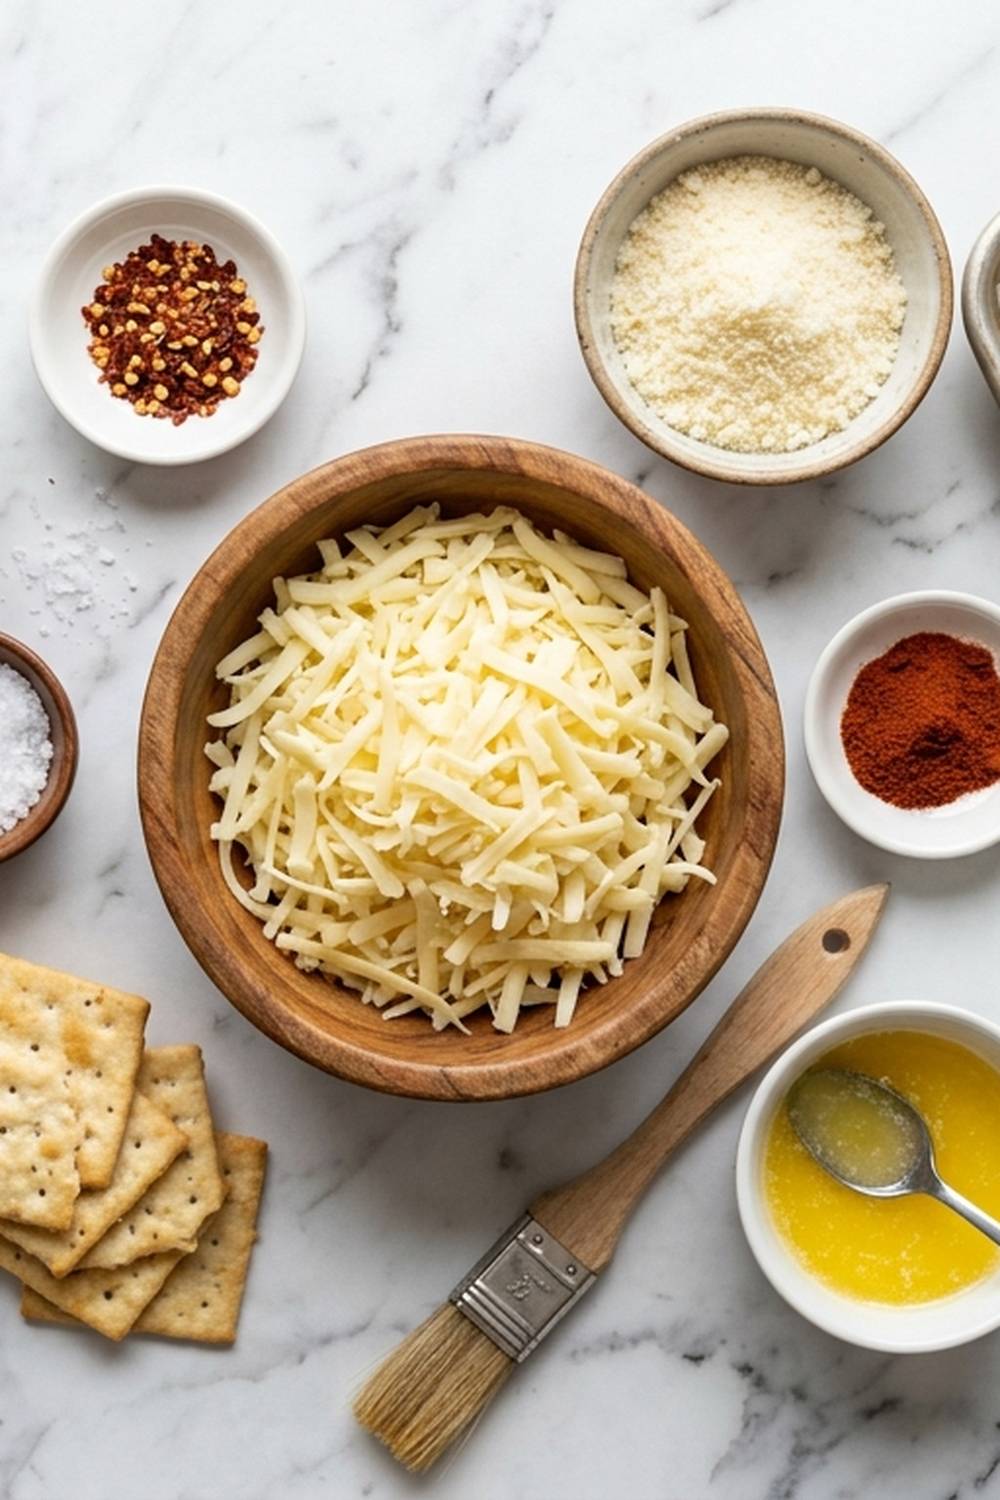
Every ingredient in this recipe exists to support your cheddar’s moment to shine. The flour tortilla becomes your canvas, the butter helps everything crisp beautifully, and the toppings add texture and freshness that let the cheese’s complexity truly sing. I’ve included some optional additions that my entertaining clients request constantly—these are the details that make guests feel like you’ve fussed over them when you really haven’t.
- 1 tablespoon fresh cilantro, roughly chopped (adds herbaceous complexity that enhances the cheese’s flavor)
- ½ cup sharp cheddar cheese, freshly grated (the hero ingredient—never use pre-shredded if possible, as anti-caking agents prevent even melting)
- 1 large flour tortilla, burrito-sized at 13 inches or larger (creates the perfect base for even melting and allows crispy edges)
- ¼ cup fresh salsa, preferably homemade (provides brightness and cuts through the richness of melted cheese)
- 2 tablespoons fresh guacamole or sliced avocado (introduces healthy fats and creamy texture)
- ¼ cup fresh pico de gallo (adds textural contrast and fresh vegetable nutrition)
- 1 tablespoon unsalted butter (ensures even browning and creates those irresistible crispy edges)
How to Make Cheese Crisp Letting the Hero Ingredient Shine
The technique here is all about respecting your cheddar and giving it the conditions to perform its magic. This isn’t complicated, but there are a few critical moments where attention matters. I’ve streamlined this for maximum impact with minimum fuss—it’s the kind of recipe you can make while chatting with arriving guests.
Step 1: Prepare Your Oven and Workspace
Start by preheating your oven to 350°F and position your rack in the middle of the oven—this ensures even heat circulation and prevents the bottom from burning while the cheese finishes melting. This temperature is crucial because it’s hot enough to crisp the tortilla and melt the cheese thoroughly, but not so hot that it browns too quickly and scorches your cheddar before it melts evenly. While your oven heats, line a standard baking sheet with parchment paper for easy cleanup. Have all your toppings prepped and ready in small bowls—this matters because once your crisp comes out of the oven, you want to add toppings immediately while everything is warm and the cheese is still slightly tacky, helping them adhere beautifully.

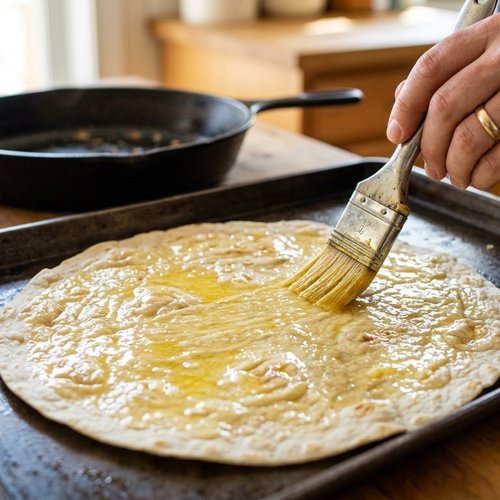
Step 2: Butter Your Tortilla Generously
Take your large flour tortilla and place it on the prepared baking sheet. This is where many home cooks make their first mistake—they under-butter. Use your tablespoon of unsalted butter, softened slightly so it spreads easily, and generously coat the entire surface of the tortilla, making sure to go all the way to the edges. Don’t be shy here. The butter is your ticket to that golden, crispy texture that makes this feel like you ordered from a fancy restaurant rather than throwing something together at home. I like to use a pastry brush to ensure even distribution, but your fingers work perfectly well too. Make sure the edges get good coverage—they’re where you’ll get those magical crispy bits that make people fight over the last piece.
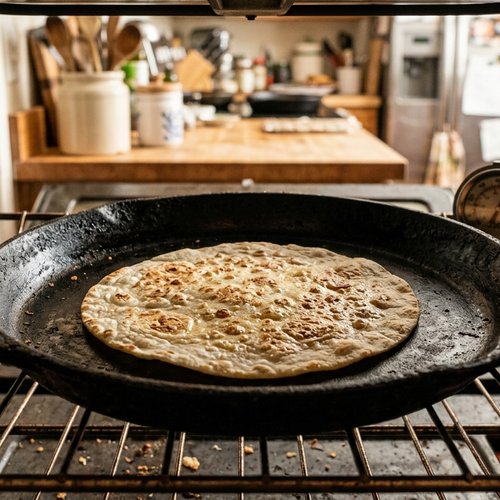
Step 3: Give the Tortilla a Head Start
Pop your buttered tortilla into the preheated 350°F oven for approximately 6 minutes. You’re looking for it to become lightly toasted and slightly firm but not yet brown. This brief initial baking accomplishes something important: it removes some of the moisture from the tortilla so it can crisp rather than become chewy, and it starts the butter browning process without burning it. Set a timer so you don’t forget about it. At this point, the aroma coming from your oven should be absolutely lovely—toasted flour and butter is an unmistakable smell of good food being prepared.
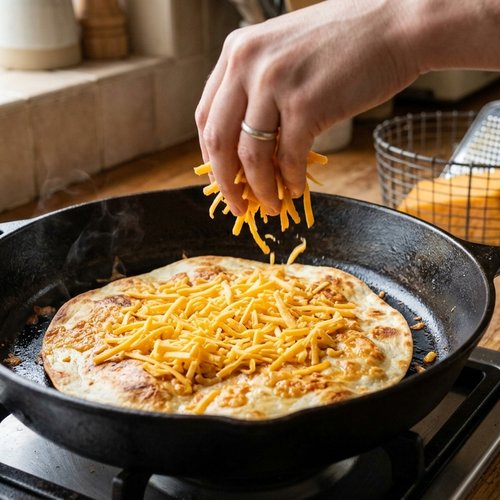
Step 4: Add Your Cheddar and Return to Heat
Remove the partially baked tortilla from the oven and immediately sprinkle your freshly grated sharp cheddar evenly across the surface, leaving approximately a half-inch border around all edges. This border is important—it gives the cheese room to spread slightly as it melts without overflowing onto your baking sheet and burning. The tortilla should still be warm enough that the cheese immediately begins to soften, which is a good sign. Return the baking sheet to your 350°F oven and bake for exactly 2 more minutes, watching carefully as the cheese transforms from distinct shreds into a unified, melted layer. The timing here is specific because you want the cheese fully melted and slightly bubbly, but you don’t want to cook the tortilla so long that it becomes brittle.
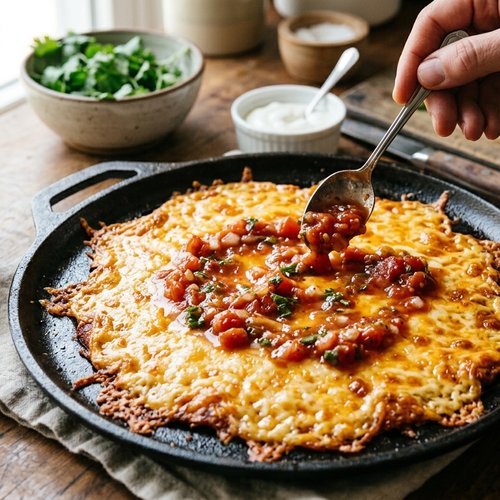
Step 5: Top and Serve Immediately
The moment your cheese is completely melted—and I mean immediately—remove the crisp from the oven and add your toppings in this order: first the salsa drizzled lightly across the top, then scattered pico de gallo, then your avocado slices or guacamole dollops, and finally the fresh cilantro. The heat from the tortilla and cheese will slightly warm these fresh toppings while maintaining their brightness and texture. Cut into 6-8 wedges with a pizza cutter or sharp knife and serve immediately while everything is warm and crispy. This is the moment when your simple appetizer becomes magic—the contrast of warm, melty cheese against cool, fresh toppings is exactly what makes people reach for another piece.
Expert’s Nutritional Tip
Here’s something my clients are always surprised to learn: adding the fresh vegetables and guacamole isn’t just about flavor—it dramatically changes the nutritional profile of this appetizer. The fiber from the salsa and pico helps slow the absorption of cheese’s saturated fat, meaning your blood sugar stays more stable. The healthy monounsaturated fats in avocado actually work synergistically with the cheese to promote satiety and nutrient absorption. If your gathering includes guests with various dietary needs, this is also easily adaptable—skip the guac for those avoiding extra fat, reduce salsa for those watching sodium, or add extra cilantro for those seeking fresh, herbaceous flavors. After ten years of helping families navigate festive meals, I’ve learned that the most inclusive recipes are the ones that taste so good that modifications feel like upgrades, not compromises.
Make-Ahead Guide for Stress-Free Hosting
Let me share the hosting wisdom I’ve gathered from a decade of helping Colorado families celebrate together: this recipe is designed for minimal stress, but a few prep-ahead steps make it even easier. Prepare all your toppings up to 4 hours in advance—chop your cilantro, measure your salsa into a small bowl, slice your avocado (toss lightly with a bit of lime juice to prevent browning), and arrange your pico de gallo in its own container. Keep everything covered in the refrigerator until serving time.
Grate your cheddar cheese up to 8 hours ahead, but here’s the critical detail: store it uncovered in the refrigerator on a paper towel. The paper towel absorbs excess moisture that pre-shredded cheese accumulates, which helps prevent clumping. If you can’t find a large burrito-sized tortilla, you can substitute with two medium ones, though the presentation won’t be quite as impressive. The beautiful thing about this recipe is that you literally wait until your guests are arriving to do the actual cooking—it takes exactly 8 minutes of active oven time, which means you’re free to greet people, pour drinks, and create that warm, gathered feeling that makes holidays memorable.
Common Mistakes to Avoid
Using pre-shredded cheese – This is the number one mistake I see. Those anti-caking agents that keep pre-shredded cheese from clumping also prevent it from melting into an even layer. It becomes grainy and separated instead of silky and cohesive. Fresh-grated is genuinely worth the 90 seconds it takes.
Skipping the initial tortilla toast – Some cooks try to skip the first 6-minute bake and add cheese right away. This results in a chewy, dense crisp instead of one with that satisfying crispness. That first stage is what transforms a soft tortilla into the right base.
Overcrowding the toppings – I’ve watched guests add too much salsa, and suddenly you have a soggy crisp that falls apart. Remember: less is more. You want each bite to be mostly cheese and tortilla with bright pockets of fresh toppings, not the reverse.
Using overly hot oven temperatures – People often think hotter equals better. If you crank your oven to 425°F to speed things up, your tortilla burns before your cheese has time to melt properly. Trust the 350°F temperature—it’s calibrated for perfect results every single time.
5 Other Ways to Use Sharp Cheddar
- Loaded baked potatoes – Sharp cheddar melts beautifully over hot baked potatoes, and the flavor is complex enough to shine without heavy toppings. Pair with Barbecue Potatoes for a complete side dish experience.
- Vegetable gratins – Layer sharp cheddar with roasted asparagus, corn, or root vegetables for a casserole that’s elegant enough for holiday tables. The aged cheese’s complexity elevates simple vegetables.
- Cheese board focal point – A wedge of sharp aged cheddar deserves center stage on any charcuterie arrangement, especially when paired with nuts, dried fruit, and quality crackers.
- Savory scones – Grate sharp cheddar directly into scone dough before baking for savory appetizers that surprise and delight. The cheese adds richness without needing heavy additions.
- Mac and cheese with complexity – Move beyond mild varieties and build your creamy sauce with a combination of sharp cheddar and creamier cheeses like baked camembert for depth and sophistication.
How to Buy and Store Sharp Cheddar Cheese
Quality cheddar doesn’t have to be expensive, but it does deserve intentional shopping. Visit your grocery store’s specialty cheese section rather than grabbing the first block you see. Look for cheddar labeled “sharp” or “extra sharp”—these words indicate the aging duration. Reading the label also matters: you want to see a short ingredient list (ideally just milk, salt, and cultures) without a long list of additives. If possible, ask to taste a small sample before committing. Different regions produce distinctly different cheddars—Vermont cheddar tends toward sharp and slightly crumbly, while Wisconsin cheddar often has nuttier notes.
Once you bring cheddar home, storage matters for maintaining quality. Keep it wrapped tightly in parchment paper (not plastic wrap, which traps moisture) and store in your refrigerator’s cheese drawer or coldest section. Properly stored, sharp cheddar keeps for 3-4 weeks. You might notice white crystalline spots developing—these are harmless flavor compounds called tyrosine crystals that actually indicate good aging and development. If mold develops on the surface, you can cut it away and enjoy the rest. Cheddar is forgiving in this way.
Seasonal Variations
While this cheese crisp is excellent year-round, seasonal adaptations make it feel fresh and intentional. Summer calls for maximum fresh toppings—add sweet corn kernels, heirloom tomato pico, and fresh basil alongside your standard cilantro. Fall is when I add crispy bacon bits, roasted apple slices, and maybe a touch of hot sauce for complexity. Winter variations might include caramelized onions, roasted jalapeños, or even a drizzle of hot honey over the cheese while it’s still warm. Spring is perfect for incorporating fresh herbs like tarragon or chives, and bright, zippy salsa made with fresh spring vegetables.
Can I Store Cheese Crisp?
Here’s the honest truth: cheese crisp is absolutely best eaten immediately after it comes out of the oven. The magic is in that moment when the cheese is still slightly tacky, the tortilla is still crisp, and the toppings are still fresh. However, I understand that life happens and sometimes you need to prepare ahead.
You can bake the tortilla with cheese up to 1 hour ahead and hold it at room temperature, then add fresh toppings just before serving. The crisp will lose some of its textural perfection but will still be delicious. Do not refrigerate a fully assembled crisp—the toppings will wilt and the cheese will become dense and less appealing when reheated.
If you have leftover crisp (which rarely happens at our gatherings), store it uncovered in the refrigerator for up to 1 day. You can refresh it in a 300°F oven for about 3 minutes before serving, though again, it won’t have quite the magic of the original preparation. The real solution is making exactly the right amount based on your guest count—six to eight wedges per guest is my standard formula.
Nutrition Information
Per serving (one wedge of crisp with toppings):
- Calories: 185
- Fat: 10g (6g saturated)
- Protein: 8g
- Carbohydrates: 14g
- Fiber: 1.5g
- Sodium: 320mg
- Calcium: 160mg (16% daily value)
The sharp cheddar contributes most of the protein and calcium, making this appetizer more nutritionally substantial than many traditional party foods. The fresh toppings add minimal calories while maximizing nutritional value and satiety. This is why I feel confident serving this at any gathering—it’s delicious, it’s elegant, and it actually nourishes your guests rather than just temporarily satisfying cravings. When you’re hosting, that balance matters.
What Pairs Perfectly With Cheese Crisp?
The beauty of this appetizer is that it works beautifully within almost any menu. Its flavors complement both light and substantial dishes. If you’re planning a lighter appetizer spread, pair it with lemon baked cod for brightness and protein, or with fresh vegetable options. For a more substantial gathering, serve alongside bacon and brie recipes that offer richness and complexity that play beautifully with the cheddar’s sharpness.
The cheese crisp’s toasted flavors and fresh toppings pair exceptionally well with cold beverages—crisp white wines, refreshing sparkling ciders, or even craft beers with citrus notes. The acidity in these drinks cuts through the cheese’s richness beautifully. If you’re serving desserts, the savory elements of the crisp offer wonderful contrast. I’ve seen guests absolutely delight in the transition from savory cheese to something sweet like basic tiramisu.
- Crisp white wines (Sauvignon Blanc, Pinot Grigio) – The bright acidity cuts through the cheese’s richness and complements the fresh cilantro and lime in toppings
- Spanish chorizo or cured meats – The smoky, spiced flavors of cured meats enhance sharp cheddar’s complexity beautifully
- Black bean or corn salads – Hearty, grain-based sides complement the cheese crisp’s richness while adding nutritional substance
- Grilled lime chicken – The brightness of citrus and the lean protein balance the richness of the cheese perfectly
- Fresh tomato-based soups – The acidity and freshness of tomato soup creates wonderful flavor contrast with melted sharp cheddar
Cheese Crisp Recipe
Method
- Start by preheating your oven to 350°F and position your rack in the middle of the oven—this ensures even heat circulation and prevents the bottom from burning while the cheese finishes melting. This temperature is crucial because it's hot enough to crisp the tortilla and melt the cheese thoroughly, but not so hot that it browns too quickly and scorches your cheddar before it melts evenly. While your oven heats, line a standard baking sheet with parchment paper for easy cleanup. Have all your toppings prepped and ready in small bowls—this matters because once your crisp comes out of the oven, you want to add toppings immediately while everything is warm and the cheese is still slightly tacky, helping them adhere beautifully.
- Take your large flour tortilla and place it on the prepared baking sheet. This is where many home cooks make their first mistake—they under-butter. Use your tablespoon of unsalted butter, softened slightly so it spreads easily, and generously coat the entire surface of the tortilla, making sure to go all the way to the edges. Don't be shy here. The butter is your ticket to that golden, crispy texture that makes this feel like you ordered from a fancy restaurant rather than throwing something together at home. I like to use a pastry brush to ensure even distribution, but your fingers work perfectly well too. Make sure the edges get good coverage—they're where you'll get those magical crispy bits that make people fight over the last piece.

- Pop your buttered tortilla into the preheated 350°F oven for approximately 6 minutes. You're looking for it to become lightly toasted and slightly firm but not yet brown. This brief initial baking accomplishes something important: it removes some of the moisture from the tortilla so it can crisp rather than become chewy, and it starts the butter browning process without burning it. Set a timer so you don't forget about it. At this point, the aroma coming from your oven should be absolutely lovely—toasted flour and butter is an unmistakable smell of good food being prepared.

- Remove the partially baked tortilla from the oven and immediately sprinkle your freshly grated sharp cheddar evenly across the surface, leaving approximately a half-inch border around all edges. This border is important—it gives the cheese room to spread slightly as it melts without overflowing onto your baking sheet and burning. The tortilla should still be warm enough that the cheese immediately begins to soften, which is a good sign. Return the baking sheet to your 350°F oven and bake for exactly 2 more minutes, watching carefully as the cheese transforms from distinct shreds into a unified, melted layer. The timing here is specific because you want the cheese fully melted and slightly bubbly, but you don't want to cook the tortilla so long that it becomes brittle.

- The moment your cheese is completely melted—and I mean immediately—remove the crisp from the oven and add your toppings in this order: first the salsa drizzled lightly across the top, then scattered pico de gallo, then your avocado slices or guacamole dollops, and finally the fresh cilantro. The heat from the tortilla and cheese will slightly warm these fresh toppings while maintaining their brightness and texture. Cut into 6-8 wedges with a pizza cutter or sharp knife and serve immediately while everything is warm and crispy. This is the moment when your simple appetizer becomes magic—the contrast of warm, melty cheese against cool, fresh toppings is exactly what makes people reach for another piece.

FAQs
Can I use a different type of tortilla for this recipe?
You can, but I recommend sticking with all-purpose flour tortillas for the best results. Whole wheat tortillas tend to be thicker and absorb more butter, which can make them dense rather than crispy. Corn tortillas will become brittle rather than crispy. The beauty of a standard flour tortilla is that it has just enough structure to crisp beautifully while still being tender enough to bite through easily. Look for a larger size (13 inches) to ensure you have adequate surface area for melting and topping.
What if I can’t find sharp cheddar where I live?
If sharp cheddar isn’t available, you have a few options. Look for “aged” cheddar or any cheddar labeled with a time designation (like “2-year” or “3-year”)—these will have the better melting qualities and complex flavors you’re seeking. In a pinch, you can combine mild cheddar with a small amount of extra-sharp cheddar to create a blend with good melting properties and sufficient flavor. However, I genuinely encourage seeking out a quality aged cheddar if possible—it’s one of the ingredients where the quality difference is truly noticeable.
Can I make this recipe for a large crowd?
Absolutely! This is one of my go-to recipes for larger gatherings precisely because it scales beautifully. Make multiple crisps simultaneously using your oven space—I typically prepare 3-4 at a time, which means 18-32 servings in the time it takes to make one. Have your toppings prepped and assembled in a station where guests can add their own preferred amounts. Some people love extra guacamole, others prefer more salsa, and allowing personalization makes everyone feel considered.
Is there a dairy-free version of this recipe?
This recipe is truly built around the cheese, so substituting dairy-free cheese changes the fundamental character significantly. Many dairy-free cheese options don’t melt as smoothly or develop the same complex flavors. If you need a dairy-free appetizer for your gathering, I’d honestly recommend making a different recipe rather than trying to force this one into that category. That said, if you have guests with dairy sensitivity, you could make some crisps with dairy-free butter and a quality dairy-free cheese alongside traditional ones, so everyone feels included in the experience.
Can I add other toppings or ingredients?
Absolutely—this is a template that welcomes creativity. I’ve made versions with crispy bacon, roasted jalapeños, caramelized onions, fresh herbs like basil or tarragon, and even crumbled chorizo. The key is respecting the cheese as your star and not overloading the crisp with toppings that compete for attention. Add one or two complementary ingredients maximum, and always include at least one fresh element (herb or fresh vegetable) to balance the richness. The best variations are usually additions that enhance rather than distract from that perfect melted sharp cheddar.
More Recipes Featuring Sharp Cheddar
- Asparagus Corn Recipe – Roasted vegetables gain depth and richness when combined with quality cheddar in a creamy gratin
- Banana Cream Pie Nilla Wafers Recipe – While sweet, a savory cheese course before dessert creates memorable meal transitions
This cheese crisp has become my secret weapon for stress-free, impressive entertaining. It’s the recipe I share when someone asks, “What can I bring that won’t stress me out?” It’s the appetizer that disappears first at every gathering. It’s proof that you don’t need complicated techniques or long ingredient lists to create something that feels special and tastes absolutely delicious. The magic comes from respecting your ingredients—particularly that beautiful, aged sharp cheddar—and giving them the space to shine. As you explore this recipe and make it your own, I’d love to hear how you personalize it. Whether you’re hosting a casual Friday night with friends, a holiday celebration with family, or a sophisticated dinner party, this cheese crisp will make you look like you’ve been working in the kitchen all day. I can’t wait to share many more delicious and festive recipes with you!