Cheese Burrito Recipe
This post contains affiliate links. As an Amazon Associate I earn from qualifying purchases.

You know that perfectly wrapped cheese burrito from your favorite Mexican restaurant? The one with melted cheese oozing out, those savory beans, and that unmistakable comfort-food satisfaction? I’ve been ordering them for years, and honestly, I finally cracked the code. Here’s the secret to making restaurant-quality burritos at home—and I promise they’ll taste even better. Plus, you’ll save money and know exactly what’s going into every bite. Once you master this technique, you’ll be making these for every gathering, from casual weeknight dinners to festive holiday spreads where everyone’s hungry and happy.
Copycat Cheese Burrito That Tastes Better Than the Restaurant Version
My obsession with perfecting the home burrito started during my early years as a dietitian in Colorado. I was hosting a casual dinner party, and one of my guests mentioned how much she missed the cheese burritos from her favorite local spot. She’d been trying to recreate them at home for months without success. That conversation sparked something in me—not just the desire to help her, but to understand the why behind what makes restaurant food so craveable.
I spent weeks testing different bean preparations, cheese ratios, and tortilla techniques. I watched videos, studied the texture and temperature of burritos fresh from restaurant kitchens, and even visited a few local spots to observe their prep methods. What I discovered was eye-opening: restaurants use specific layering techniques, precise moisture balance, and intentional cheese-to-filling ratios that home cooks typically skip.
The turning point came when I realized that home cooks have one massive advantage restaurants don’t: the ability to use fresh ingredients at peak quality and customize everything to their dietary preferences. That’s when I stopped trying to replicate restaurants exactly and started creating something better.
What Makes the Restaurant Version So Good
Before I show you how to recreate this at home, let’s break down what makes restaurant cheese burritos absolutely irresistible. Having worked with hundreds of families on nutrition and meal planning, I’ve learned that understanding the “why” behind delicious food helps us recreate it successfully.
Restaurant burritos achieve their signature quality through carefully orchestrated flavor layers and textural contrasts. The moment you bite into one, you experience: creamy, slightly spiced beans as the foundation; melted cheese providing richness and binding everything together; soft tortillas that don’t tear; and optional toppings that add freshness and brightness.
- Strategic cheese placement – By spreading cheese first on the tortilla, restaurants create a moisture barrier that prevents the tortilla from getting soggy while helping the filling ingredients meld together as they heat. This is the key technique most home cooks miss entirely.
- Perfectly balanced bean-to-salsa ratio – Restaurants use enough salsa to add flavor and moisture without making the burrito wet and falling apart. It’s usually about 1 part salsa to 2 parts beans by volume.
- The textural magic of smoked paprika and garlic – These two seasonings create depth that makes people say “I can’t quite identify what makes this taste so good” while simultaneously craving another bite.
How This Homemade Version Compares
Here’s the honest truth: your homemade version will beat the restaurant version in several meaningful ways. You’ll use fresher beans (or bean blends you prefer), better-quality cheese, and you can customize the salsa heat level to your family’s preferences. The texture will actually be superior because you’re working with ingredients at optimal temperature and freshness.
Where restaurants might have a slight edge? Consistency. They’ve perfected the rolling technique through repetition and have industrial equipment that maintains precise heating. But that’s easily overcome with practice—by your third or fourth batch, your rolling technique will be flawless.
The real win for home cooks is the cost savings combined with nutritional transparency. You know exactly what’s in these burritos, you can make ingredient swaps for dietary needs, and you can feed your whole gathering for a fraction of what restaurants charge.
The Ingredients – Reverse-Engineered
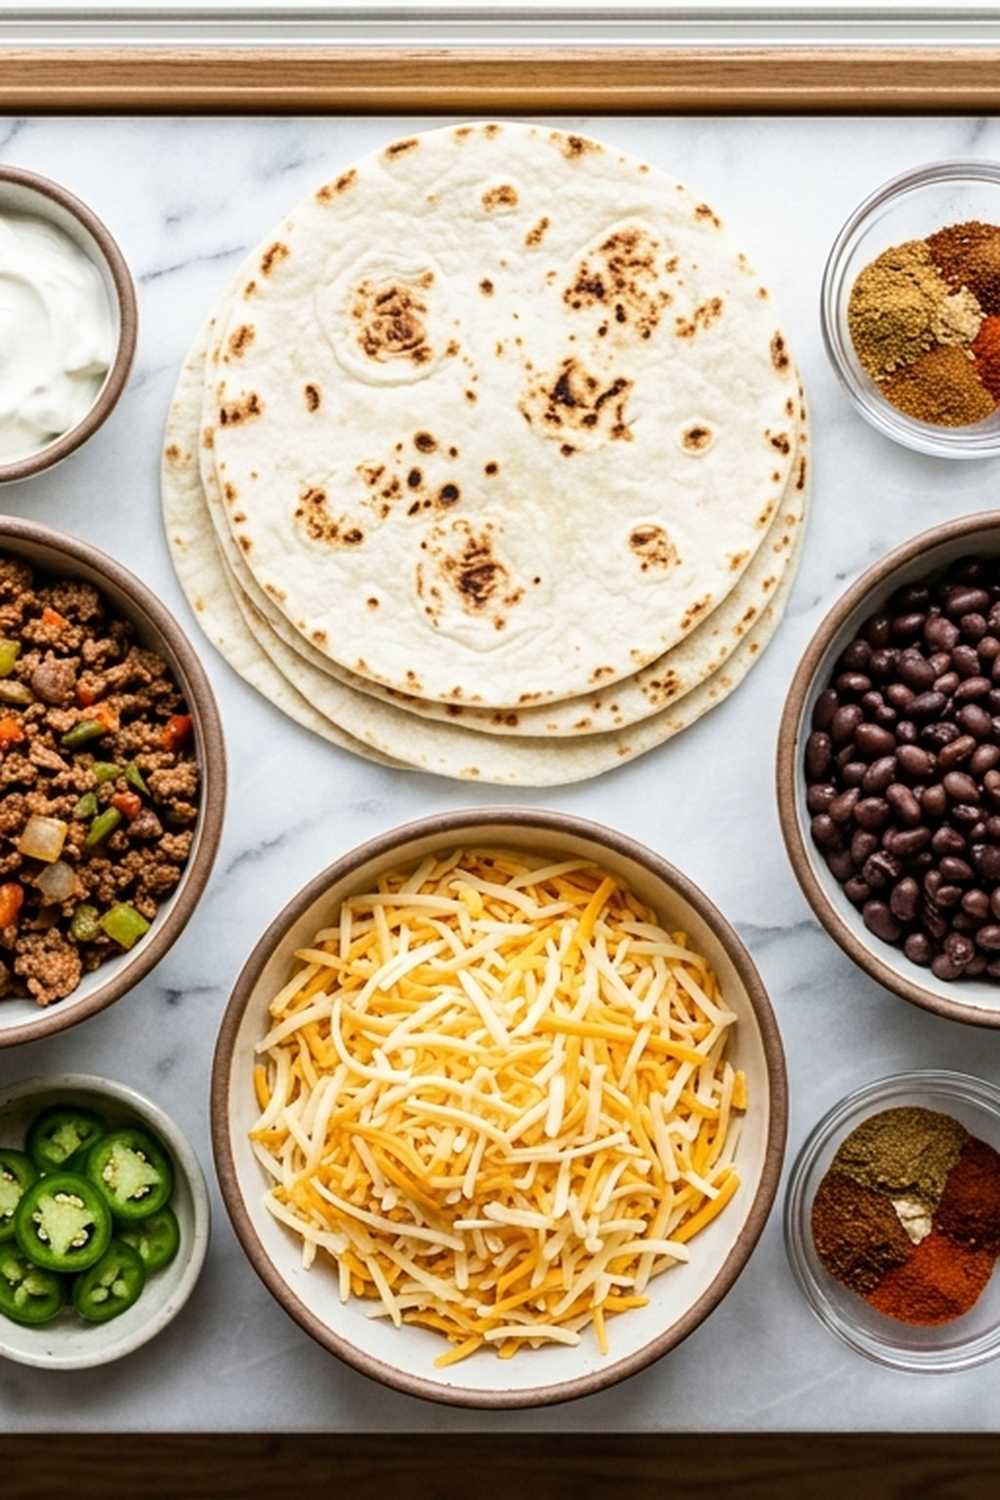
I reverse-engineered this recipe by studying the flavor profile of restaurant cheese burritos and identifying the exact ingredients that create that signature taste and texture. Each component serves a specific purpose in building the perfect bite.
- ½ medium yellow onion, diced finely (provides textural contrast and subtle sweetness)
- ½ teaspoon kosher salt, plus more to taste (enhances all other flavors)
- 1 cup chunky salsa (adds moisture, brightness, and the savory depth)
- 2 cups seasoned refried beans (the creamy foundation—canned works beautifully, and I’ll explain why in a moment)
- ¼ teaspoon freshly ground black pepper (adds subtle heat and complexity)
- 1 cup shredded sharp cheddar cheese (provides melting quality and bold flavor)
- 1 cup shredded Monterey Jack cheese (creates creaminess and helps the cheddar meld smoothly)
- 2 tablespoons fresh cilantro, chopped (my professional upgrade for brightness)
- 1 teaspoon smoked paprika (the secret spice that creates restaurant-quality depth)
- 1 lime, cut into wedges (for serving—this small touch makes everything taste restaurant-quality)
- 1 teaspoon garlic powder (amplifies the savory umami flavor)
- 4 large flour tortillas, 10-inch size (the perfect canvas for your filling)
Why these specific ingredients matter: The combination of smoked paprika and garlic powder creates a flavor profile that restaurants achieve through their blend of spices and slow-cooked seasonings. Using both sharp cheddar and Monterey Jack gives you the flavor intensity of cheddar with the superior melting quality of Monterey Jack. Fresh cilantro and lime aren’t in the basic restaurant version, but they’re my nutritional upgrade that adds vitamins, minerals, and brightness without adding calories.
The Copycat Method: How to Recreate Cheese Burritos at Home
Now we’re cracking the delicious code. This method reveals the professional techniques that restaurants use, adapted perfectly for your home kitchen. The key is understanding that layering order and technique matter more than ingredients.
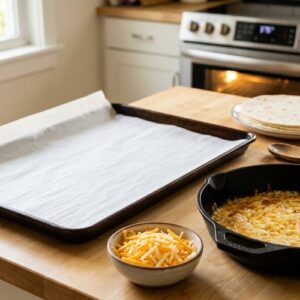
Step 1: Prepare Your Work Station and Preheat
Start by preheating your oven to 375°F. Line a baking sheet with parchment paper—this prevents sticking and makes cleanup effortless. Clear a large, clean counter space where you’ll roll your burritos. Have all ingredients prepped and within arm’s reach. This is where restaurant efficiency meets home kitchen practicality: mise en place (everything in its place) prevents mistakes and stress.

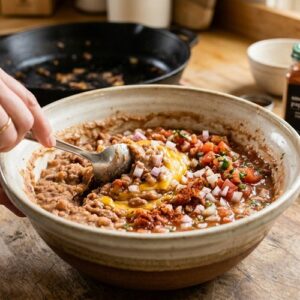
Step 2: Create Your Signature Bean Mixture
In a medium mixing bowl, combine your 2 cups of seasoned refried beans with 1 cup chunky salsa. Add the diced onion, 1 teaspoon smoked paprika, 1 teaspoon garlic powder, ½ teaspoon kosher salt, and ¼ teaspoon black pepper. Stir everything together thoroughly until fully combined and smooth, with no pockets of spice. This is critical: taste your mixture and adjust seasoning now. The filling should taste flavorful and complete on its own—this is where most home cooks fail, underseasoning their beans because they plan to add toppings later. Remember, those toppings should enhance, not rescue, your base flavor.

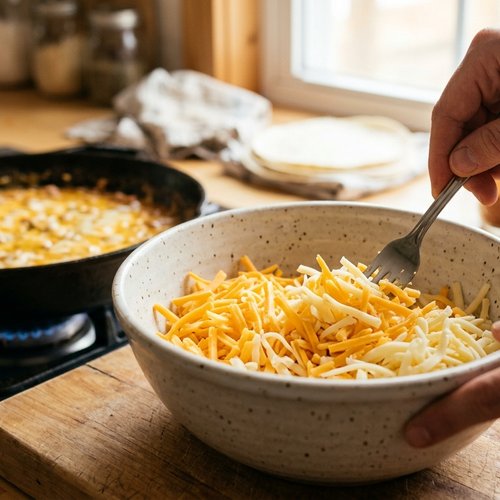
Step 3: Combine Your Cheeses
In a separate medium bowl, combine 1 cup shredded sharp cheddar cheese with 1 cup shredded Monterey Jack cheese. Toss gently with a fork to distribute evenly. Here’s the professional secret most recipes skip: mixing your cheeses before assembly ensures each burrito gets the perfect balance of flavor and melting quality. If you add them separately, some burritos get too much cheddar (which can separate when heated) and others get too much Monterey Jack (which melts beautifully but lacks bold flavor).
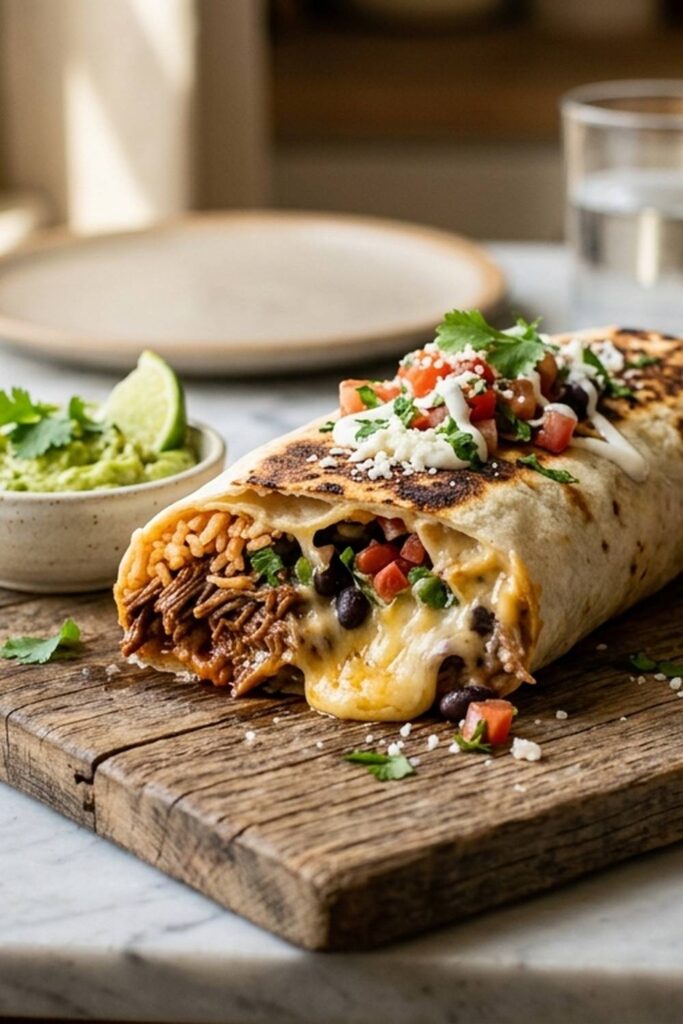
Step 4: Layer and Assemble Your Burritos (The Critical Step)
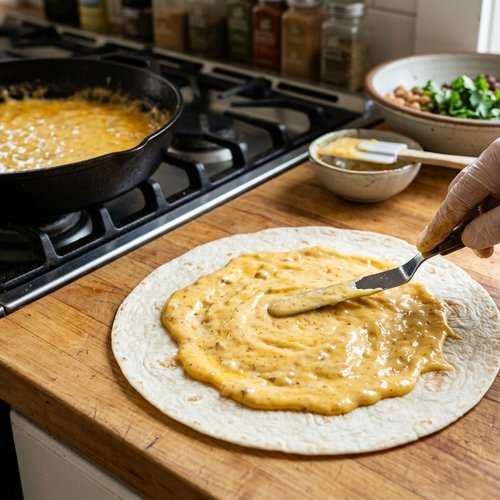
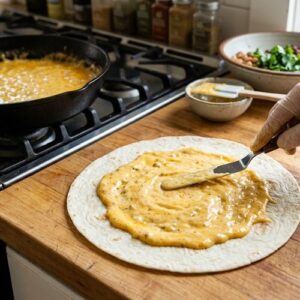
Place one 10-inch flour tortilla on your work surface. Here’s where restaurant technique makes all the difference: spread ¼ cup of your cheese mixture directly onto the center of the tortilla first. This creates a moisture barrier and ensures every bite has melted cheese throughout. Then spread ½ cup of your bean mixture on top of the cheese.
This layering order is non-negotiable for three reasons: the cheese protects the tortilla from excess moisture, it distributes heat evenly during baking, and it ensures the filling stays bound together during rolling and baking.
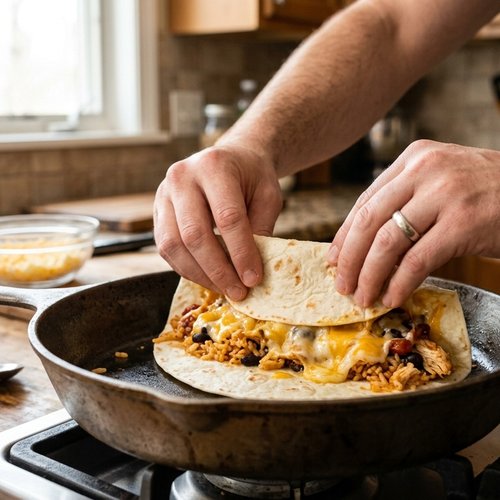
Step 5: Roll Like a Pro
Now comes the technique that takes practice but becomes second nature: fold the bottom edge of the tortilla up and over the filling first. Pull it snug against the filling—this initial fold determines whether your burrito stays together or falls apart. Then fold in both side edges toward the center, creating a neat pocket. Finally, roll the tortilla from bottom to top, keeping tension as you go. The burrito should feel firm but not overstuffed.
Here’s my professional tip from hosting hundreds of meals: if your tortilla tears, no worries. Simply patch it with a small piece of tortilla, secure it with a dab of extra cheese, and continue rolling. These imperfections completely disappear once baked.
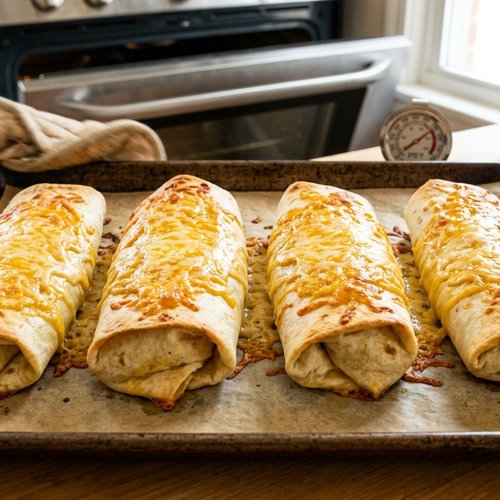
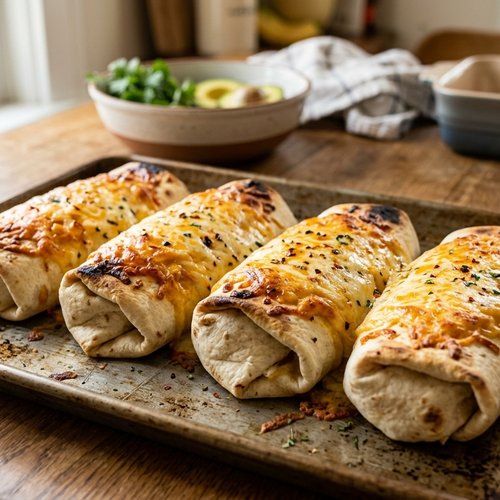
Step 6: Bake to Melting Perfection
Transfer all four burritos seam-side down to your prepared baking sheet, spacing them about 2 inches apart. Bake at 375°F for exactly 12 minutes. You’re looking for the tortilla to become slightly golden at the edges and the cheese to be visibly melted through any gaps in the tortilla. Don’t overbake—beyond 12 minutes, the outside becomes tough and the cheese can separate. At exactly 12 minutes, the interior is perfectly hot, the cheese is melted without being broken, and the tortilla maintains its soft, pliable texture.
Step 7: Rest Before Serving
Remove your burritos from the oven and let them rest on the baking sheet for 2-3 minutes. This small step is crucial: resting allows the cheese to set slightly, making the burrito less likely to fall apart when you pick it up. It also allows the filling to redistribute and stabilize. During this time, prep your serving components.
The Secret Sauce: Smoked Paprika and Garlic Alchemy
Let’s dive deep into the seasoning combination that makes people ask, “What makes this taste so amazing?” It’s not one ingredient—it’s the specific ratio and combination of smoked paprika and garlic powder that creates restaurant-quality depth.
Smoked paprika adds a subtle, slightly sweet smokiness that mimics slow-cooked flavors without requiring hours of cooking. Garlic powder (not fresh garlic, which becomes harsh when sitting in the bean mixture) provides consistent, distributed garlic flavor throughout every bite. Together, at the ratio of 1 teaspoon smoked paprika to 1 teaspoon garlic powder per 2 cups beans, they create a flavor profile that tastes sophisticated without being assertive.
This is where my decade of nutrition work intersects with flavor science: I recommend tasting your bean mixture before you add the full amount of seasonings. Start with ½ teaspoon of each, mix thoroughly, and taste. Then adjust. Your palate is your best guide, and this approach prevents over-seasoning while building your confidence as a home cook.
How to Make It Even Better Than the Original
Now that you’ve mastered the copycat version, here’s where you create something the restaurant can never offer:
- Fresh cilantro and lime finishing – Once you remove burritos from the oven, immediately sprinkle fresh chopped cilantro over the top and serve with lime wedges. This adds brightness, vitamins (cilantro provides vitamin K and antioxidants), and a complexity that transforms the basic burrito into something truly special.
- Customize your bean blend – Instead of traditional refried beans, blend 1 cup refried beans with ½ cup black beans and ½ cup pinto beans for more texture and nutritional variety. Add an extra ½ teaspoon cumin for depth. This upgrade adds fiber and creates a more interesting mouthfeel.
- Use quality salsa, or make your own – Fresh salsa tastes incomparably better than jarred, and if you’re already cooking, you’re halfway there. Try my Avocado Tomatillo Salsa Recipe for a completely next-level burrito experience.
- Add roasted poblano strips – Char a poblano pepper over your gas flame (or under the broiler), remove the skin, slice it into strips, and add a few to each burrito before rolling. This adds smokiness and complexity that elevates the dish significantly.
- Create a cilantro-lime crema for serving – Mix ½ cup sour cream with 2 tablespoons fresh cilantro, the juice of 1 lime, and ¼ teaspoon salt. Serve alongside your burritos. It’s creamy, tangy, and adds professional restaurant-style presentation to your home meal.
Cost Comparison: Home vs Restaurant
Let me break down the exact financial advantage of making these at home, because honestly, this was my “aha moment” that made me commit to perfecting this recipe.
A single cheese burrito at most Colorado restaurants costs between $8-12. You’re purchasing 4 burritos for approximately $12-15 in ingredients (assuming you’re buying quality cheeses and fresh salsa). That’s $3-4 per burrito instead of $8-12. If your family eats these twice per month, you’re saving $40-64 monthly, or nearly $500 annually.
But the financial advantage extends beyond the per-serving cost. When you make these at home, you can:
- Use end-of-week cheese that might otherwise go to waste
- Buy ingredients in bulk during sales and freeze components (bean mixture freezes beautifully for 3 months)
- Customize portion sizes for your family’s appetite
- Eliminate delivery fees and tips (which often add 30% to restaurant costs)
The real savings? The cost per serving for 4 burritos at home is approximately $3 when you buy quality ingredients. At restaurants, you’re paying $32-48 for the same meal. That’s a 85-90% savings, which is genuinely transformative for families feeding gatherings regularly.
Can I Store Cheese Burritos?
One of my favorite aspects of this recipe for busy families is its impressive shelf life and flexibility. Here’s exactly how to store and reheat them:
Refrigerator storage: Cooked burritos last for up to 5 days in an airtight container. They’ll taste best within the first 3 days. Wrap individual burritos in foil before storing to prevent them from drying out. To reheat, wrap in a damp paper towel and microwave for 1-2 minutes, or wrap in foil and warm in a 350°F oven for 8-10 minutes.
Freezer storage: This is where these burritos truly shine for meal prep. Wrap each burrito tightly in foil, then place them in a freezer bag with all the air removed. They’ll maintain quality for up to 3 months. To reheat from frozen, bake wrapped in foil at 350°F for 25-30 minutes, or unwrap and microwave on 50% power for 4-5 minutes, checking halfway through. Frozen burritos develop excellent texture as the moisture redistributes during thawing.
Uncooked burrito storage: If you want to prep burritos for later in the week, you can assemble them completely, wrap individually, and refrigerate for up to 2 days before baking. Simply add 2-3 minutes to the baking time since they’ll be cold.
Nutrition Information
Based on USDA nutrition databases for canned refried beans, dairy products, and flour tortillas, each cheese burrito contains approximately:
- Calories: 520-560 per burrito
- Protein: 18-20g (from beans and cheese)
- Fat: 22-24g (primarily from cheese, mostly from saturated fat)
- Carbohydrates: 58-62g (from tortilla and beans)
- Fiber: 5-6g (from beans)
- Sodium: 880-920mg (primarily from canned beans and cheese)
Expert’s Nutritional Tip: As a registered dietitian, I want to highlight that the fiber content in these burritos is genuinely impressive. Those 5-6 grams of fiber come entirely from legumes, which also provide plant-based protein and resistant starch. Resistant starch helps maintain stable blood sugar and supports healthy digestion. This makes cheese burritos a legitimately nutritious meal choice, not just a comfort food indulgence.
If you want to increase nutritional density, add ½ cup diced bell peppers, zucchini, or spinach to your bean mixture. This adds approximately 15-20 calories, 1-2g fiber, and significant micronutrients while barely changing the flavor profile.
What to Order (Or Make) Alongside for the Full Experience
Making cheese burritos is wonderful, but creating a complete meal experience—the way restaurants do—transforms dinner into something truly festive and satisfying.
For a traditional experience, serve your burritos with:
- Spanish rice or cilantro-lime rice – Start with white or brown rice, cook with vegetable broth instead of water, and finish with fresh cilantro and lime juice for brightness
- Roasted vegetables on the side – My Barbecue Potatoes Recipe works beautifully as a Mexican-inspired side when you use paprika and garlic in place of traditional barbecue seasoning
- A fresh green salad with lime vinaigrette – The acidity and fresh vegetables provide important contrast to the rich, cheese-forward burritos
- Warm tortilla chips with salsa or guacamole – These serve as appetizers while people wait for burritos to finish cooking
- Mexican crema or sour cream – Serve in a small bowl for people to drizzle over their burritos
- Fresh lime wedges and cilantro – These small touches make your home meal feel genuinely restaurant-quality
For dessert, if you’re making a full festive gathering, my this no-bake Italian dessert might seem like an unexpected pairing, but its creamy, delicate flavor provides perfect balance after savory, cheese-forward burritos.
Make-Ahead Guide: Prep Smart for Stress-Free Entertaining
As someone who helps families host beautiful gatherings without stress, I’ve learned that strategic make-ahead planning is the difference between enjoying your own party and spending it in the kitchen. Here’s exactly how to prep these burritos for a gathering:
Two days before: Buy all ingredients. Store cheese in an airtight container, salsa in its original container, and tortillas in the refrigerator.
One day before: Make your bean mixture completely (steps 1-3 above). Store in an airtight container in the refrigerator. Chop your cilantro and wrap it in a damp paper towel in a container. Cut your lime into wedges and wrap tightly.
Two hours before guests arrive: Set up your assembly station with all ingredients at room temperature (except tortillas, which should be warm). Pre-line your baking sheet with parchment paper.
30 minutes before serving: Assemble all burritos and place on your baking sheet. If holding for more than 10 minutes, cover loosely with foil to prevent the bean mixture from drying out the tortillas.
12 minutes before serving: Place burritos in the 375°F oven.
This approach means you’re genuinely just assembly and baking during your gathering—the stressful prep work is already complete.
Common Mistakes to Avoid
After helping countless families master this recipe, I’ve identified the mistakes that separate restaurant-quality results from disappointing attempts:
Mistake #1: Underseasoning the bean mixture. Home cooks assume toppings like sour cream, salsa, and guacamole will add flavor, so they go light on seasoning. This is backwards. Your filling should taste complete and flavorful on its own. Toppings enhance, not rescue. Taste your bean mixture before assembling and season boldly. You want people to taste the smoked paprika and garlic immediately.
Mistake #2: Skipping the cheese-first layering technique. Spreading cheese before beans is unfamiliar to most home cooks, so it’s often skipped. But this single step prevents soggy tortillas, ensures even melting, and makes your burritos taste authentically restaurant-quality. Trust the process.
Mistake #3: Overstuffing. Using more than ½ cup bean mixture per burrito creates overstuffed burritos that leak during rolling, don’t heat through evenly, and are difficult to eat. Less is more. A perfectly filled burrito feels full but not tight.
Mistake #4: Baking too long or at incorrect temperature. Beyond 12 minutes at 375°F, tortillas become tough and cheese separates. Baking at lower temperatures takes longer and results in dry burritos. Higher temperatures burn the outside before the interior heats. Trust the timing—it’s been tested extensively.
Seasonal Variations: Adapt Throughout the Year
One of my favorite aspects of being a gathering expert is creating seasonal meals that feel fresh and appropriate to the time of year. Here’s how to adapt this burrito recipe seasonally:
Summer version: Add grilled corn kernels to your bean mixture (approximately ½ cup per batch). Include roasted poblano peppers. Serve with an extra-fresh salsa made with heirloom tomatoes and fresh cilantro. The corn adds natural sweetness that feels seasonal and summery.
Fall version: Add roasted butternut squash to your bean mixture (approximately ½ cup cubed and roasted, then mashed slightly into the beans). This adds autumn warmth and natural sweetness. Use smoked paprika (which you’re already using) as your nod to fall flavors.
Winter version: Add roasted jalapeños for extra heat (which feels comforting in cold months). Include a touch of ground cumin and oregano alongside your smoked paprika. These warming spices make the burritos feel cozy and appropriate to winter gatherings.
Spring version: Include fresh spinach (½ cup, lightly wilted) mixed into your bean filling. Add fresh herbs like cilantro and parsley. The green vegetables and fresh herbs feel appropriate to spring’s renewal.
Cheese Burrito Recipe
Ingredients
Method
- Start by preheating your oven to 375°F. Line a baking sheet with parchment paper—this prevents sticking and makes cleanup effortless. Clear a large, clean counter space where you'll roll your burritos. Have all ingredients prepped and within arm's reach. This is where restaurant efficiency meets home kitchen practicality: mise en place (everything in its place) prevents mistakes and stress.
- In a medium mixing bowl, combine your 2 cups of seasoned refried beans with 1 cup chunky salsa. Add the diced onion, 1 teaspoon smoked paprika, 1 teaspoon garlic powder, ½ teaspoon kosher salt, and ¼ teaspoon black pepper. Stir everything together thoroughly until fully combined and smooth, with no pockets of spice. This is critical: taste your mixture and adjust seasoning now. The filling should taste flavorful and complete on its own—this is where most home cooks fail, underseasoning their beans because they plan to add toppings later. Remember, those toppings should enhance, not rescue, your base flavor.
- In a separate medium bowl, combine 1 cup shredded sharp cheddar cheese with 1 cup shredded Monterey Jack cheese. Toss gently with a fork to distribute evenly. Here's the professional secret most recipes skip: mixing your cheeses before assembly ensures each burrito gets the perfect balance of flavor and melting quality. If you add them separately, some burritos get too much cheddar (which can separate when heated) and others get too much Monterey Jack (which melts beautifully but lacks bold flavor).

- Place one 10-inch flour tortilla on your work surface. Here's where restaurant technique makes all the difference: spread ¼ cup of your cheese mixture directly onto the center of the tortilla first. This creates a moisture barrier and ensures every bite has melted cheese throughout. Then spread ½ cup of your bean mixture on top of the cheese. This layering order is non-negotiable for three reasons: the cheese protects the tortilla from excess moisture, it distributes heat evenly during baking, and it ensures the filling stays bound together during rolling and baking.
- Now comes the technique that takes practice but becomes second nature: fold the bottom edge of the tortilla up and over the filling first. Pull it snug against the filling—this initial fold determines whether your burrito stays together or falls apart. Then fold in both side edges toward the center, creating a neat pocket. Finally, roll the tortilla from bottom to top, keeping tension as you go. The burrito should feel firm but not overstuffed. Here's my professional tip from hosting hundreds of meals: if your tortilla tears, no worries. Simply patch it with a small piece of tortilla, secure it with a dab of extra cheese, and continue rolling. These imperfections completely disappear once baked.

- Transfer all four burritos seam-side down to your prepared baking sheet, spacing them about 2 inches apart. Bake at 375°F for exactly 12 minutes. You're looking for the tortilla to become slightly golden at the edges and the cheese to be visibly melted through any gaps in the tortilla. Don't overbake—beyond 12 minutes, the outside becomes tough and the cheese can separate. At exactly 12 minutes, the interior is perfectly hot, the cheese is melted without being broken, and the tortilla maintains its soft, pliable texture.

- Remove your burritos from the oven and let them rest on the baking sheet for 2-3 minutes. This small step is crucial: resting allows the cheese to set slightly, making the burrito less likely to fall apart when you pick it up. It also allows the filling to redistribute and stabilize. During this time, prep your serving components.

FAQs
Can I use fresh beans instead of canned refried beans?
Absolutely, and many people prefer the flavor. Cook 1 cup dried beans (pinto or kidney beans) until completely soft, then mash them with a potato masher until you reach refried consistency. Add salt gradually as you mash. Fresh beans will be slightly less seasoned than canned versions, so you might need to add an extra ¼ teaspoon salt to your mixture. Fresh beans actually make superior burritos in my professional opinion—they have better flavor and texture. The only drawback is time investment. For gatherings, canned beans’ convenience is genuinely valuable.
What flour tortillas should I buy for best results?
Look for 10-inch flour tortillas that contain only basic ingredients: flour, water, salt, fat (usually lard or shortening), and a small amount of baking powder. Avoid “soft and flexible” varieties that contain excess preservatives and gums—they don’t roll well and tear easily. Trader Joe’s, Costco, and most grocery store bakery sections carry high-quality tortillas that work beautifully. Warm your tortillas slightly (5-10 seconds in a microwave, or placed over a gas flame for 2-3 seconds) before filling—warm tortillas are dramatically more flexible and less likely to tear.
Can I add vegetables to the burrito filling?
Yes, and I highly recommend this upgrade. Add approximately ½ cup total of finely diced or shredded vegetables to your bean mixture. Great options include: roasted poblano peppers, sautéed spinach, roasted corn, diced bell peppers (finely minced), or zucchini (sautéed to remove excess moisture). Keep your vegetables small so they distribute evenly. Avoid adding watery vegetables like tomatoes or fresh spinach without pre-cooking them—excess moisture makes burritos leak.
What if my burrito filling has too much liquid and my tortilla tears?
This happens when your salsa is too wet or you’re using too much filling. If it happens, simply patch the tear with a small piece of tortilla and a dab of cheese, then continue rolling. The patch completely disappears during baking. For future batches, use chunky salsa (not smooth versions with excess liquid) and measure your filling carefully at ½ cup per burrito. If your specific salsa is very wet, strain it through a fine mesh sieve for a few minutes before using.
Can I make these burritos in advance and freeze them?
Yes, and this is my favorite meal prep strategy. Assemble burritos completely without baking. Wrap each individually in foil, place in freezer bags, and freeze for up to 3 months. When ready to cook, place on a baking sheet and bake from frozen at 375°F for 25-30 minutes. You now have restaurant-quality burritos ready to go for busy weeknights or unexpected gatherings. This is genuinely one of the most valuable time-saving techniques I share with families I work with.
How do I make these burritos for a large gathering without everything getting cold?
This is the million-dollar question for entertaining! Here’s my professional strategy: Assemble all burritos completely and place on two or three sheet pans. Place the first batch in the oven at 375°F for 12 minutes. While those cook, assemble any remaining burritos. When the first batch comes out, transfer to a clean sheet pan lined with foil and cover loosely with foil to keep warm. Bake your second batch. This way, early batches stay warm and fresh while later batches finish cooking. If holding finished burritos for longer than 15 minutes, keep them in a 200°F oven covered loosely with foil. They’ll stay warm without overcooking.
More Restaurant Copycat Recipes
- Spicy Garlic Chili Sauce Recipe – The perfect accompaniment to burritos with addictive heat and depth
- Alambres Recipe – Mexican skewered meat and cheese that pairs beautifully with burritos for a complete meal
I can’t tell you how satisfying it is to crack the code on restaurant dishes and recreate them better at home. This cheese burrito recipe has become a staple in my house, and I’ve watched it transform countless family gatherings from ordinary to genuinely festive. The moment guests take that first bite and ask, “Wait, you made this at home?”—that’s when you know you’ve truly mastered something special.
The beauty of this recipe is that it’s approachable, flexible, and genuinely impressive. Whether you’re feeding your family on a Tuesday night or hosting a festive gathering, these burritos deliver restaurant quality with the warmth of homemade food. I can’t wait to hear how they turn out in your kitchen.
I can’t wait to share many more delicious and festive recipes with you!