Cheddar Chive Biscuit Recipe

This post contains affiliate links. As an Amazon Associate I earn from qualifying purchases.
Getting kids and picky eaters to embrace savory biscuits feels impossible—until you try this approach. I’ve watched countless families transform their festive tables with these golden, buttery cheddar chive biscuits. What makes them special isn’t just the sharp cheese flavor or the fresh herb brightness; it’s how they bring people together around the table. These biscuits have become my go-to solution for holiday gatherings where I need something that appeals to everyone, from the youngest guest to the most adventurous eater. When you pair them with recipes like Alambres Recipe, you create a complete festive spread that honors Colorado’s diverse food traditions while keeping things budget-friendly and stress-free for the host.
Cheddar Chive Biscuits the Whole Family Will Actually Eat (Picky Eaters Included)
I’ll never forget the Thanksgiving when my nephew—who refused anything green on his plate—asked for a second biscuit specifically because of the “tiny green bits.” That was the moment I realized these biscuits could be a gateway food. The fresh chives are so finely sliced and baked into the tender crumb that they don’t register as threatening to hesitant eaters. The sharp cheddar adds umami and richness that makes everyone feel like they’re eating something special, not just “healthy food.”
That year, my sister told me these biscuits were the only thing her kids wanted seconds of during the entire meal. Now, a decade later, I’ve refined this recipe through countless gatherings in my Colorado home. I’ve learned exactly when to chill the buttermilk, how to handle the dough without overworking it, and why a gentle hand creates those coveted flaky layers. Every holiday season, I make these biscuits for family gatherings, and they consistently disappear first from the bread basket.
Why Kids Love This Version
These biscuits succeed with picky eaters because they check multiple sensory boxes. The golden-brown exterior provides satisfying crunch, while the interior stays tender and moist. The bright cheddar flavor is immediately recognizable to kids who might be cheese lovers, and the chives add a subtle onion-like note rather than an aggressive green vegetable taste.
- Golden, crispy exterior with tender, flaky interior – kids respond to texture contrasts that make eating fun and satisfying, not just nutritious
- Recognizable cheese flavor they can identify immediately – removes the “what is this?” hesitation that often stops picky eaters from trying new foods
- Fresh herbs that disappear into the biscuit rather than sitting visibly on top – families tell me their kids don’t even realize they’re eating fresh vegetables
- Hand-held, portable format – kids feel empowered eating something they can hold and control themselves
How to Get Kids Involved in Making This
One of my favorite aspects of holiday hosting is watching children develop confidence in the kitchen. These biscuits are perfect for multi-age family cooking because every step has a task suited to different developmental stages. When kids help create the food, they’re exponentially more likely to actually eat it—this is backed by my decade of nutrition counseling experience.
- Ages 3-5: Cheese shredding supervisor and chive washer – use pre-shredded cheese from your grocery store if you prefer, but young toddlers love helping you rinse fresh chives in a colander. They feel like true kitchen helpers, and it requires no sharp tools.
- Ages 6-9: Measuring ingredients and stirring the dry mixture – school-age children can handle measuring flour, baking powder, and salt into the large bowl. They can also stir the dry ingredients together with a whisk, which builds their confidence and muscle memory for baking.
- Ages 10+: Managing the buttermilk-butter mixture and kneading – older kids can handle the freezer timing for buttermilk, melting the butter in the microwave with supervision, and doing the kneading steps. This teaches them real baking technique.
The Ingredients – Hidden Nutrition, Visible Deliciousness
These biscuits contain fresh herbs and dairy that provide genuine nutritional benefits. Fresh chives deliver vitamin K and antioxidants that support immune function—especially valuable during cold Colorado winters. The sharp cheddar cheese provides calcium and protein for growing bodies. I’ve selected these ingredients specifically because they’re things kids will enthusiastically eat, not things you’re sneaking past them.
- 1 teaspoon granulated sugar (balances the sharp cheese flavor)
- ¾ teaspoon kosher salt (Diamond Crystal preferred for its lighter, fluffier crystal structure)
- ½ teaspoon baking soda (works with the buttermilk to create lift)
- 2 teaspoons baking powder (aluminum-free if you prefer)
- 9 tablespoons cold unsalted butter (divided into 8 tablespoons for dough plus 1 tablespoon for brushing)
- 1 cup cold buttermilk (full-fat creates superior tenderness and tang)
- 2 cups all-purpose flour (spooned and leveled, never packed down)
- ¾ cup finely shredded sharp cheddar cheese (freshly shredded if possible, not pre-shredded with anti-caking agents)
- 2 tablespoons honey (optional but adds subtle sweetness that rounds the flavors)
- ¼ cup fresh chives (finely sliced, plus extra for garnish)
Makes 12-16 biscuits depending on cutter size
How to Make Cheddar Chive Biscuits for the Whole Family
I approach biscuit-making as a mindful activity rather than a rushed task. When you’re present and intentional with each step, the results show. Your family will taste the difference between hurried biscuits and ones made with care. This entire process takes about 35-40 minutes from start to table, making it perfect for holiday gatherings where you want the main courses to shine but need something fresh and warm.
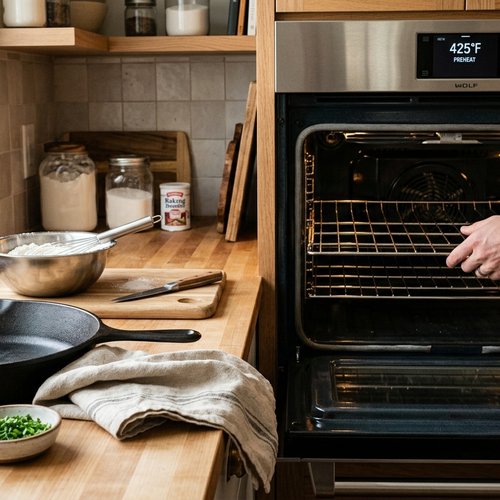
Step 1: Prepare Your Workspace and Preheat the Oven
Start by positioning your oven rack to the middle position and preheating to 425°F. This ensures even, golden-brown baking across the entire batch. While the oven heats, line a large baking sheet with parchment paper or lightly spray it with cooking spray. This prevents sticking and ensures your bottom crusts brown evenly. I always have my baking sheet ready before I touch any ingredients—preparation prevents stress during the baking process.
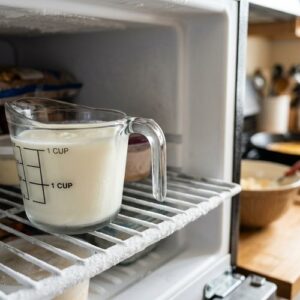
Step 2: Chill Your Buttermilk
Measure out 1 cup of buttermilk and place the entire measuring cup directly into your freezer. You want this to chill for exactly 10 minutes while you prepare the other ingredients. This step is crucial for creating flaky layers—the cold buttermilk and cold butter create pockets of steam that separate the dough layers during baking. Don’t skip this step or rush it. Set a timer on your phone so you remember to pull it out at exactly 10 minutes.
Step 3: Melt the Butter Carefully
Place 8 tablespoons of cold butter in a microwave-safe bowl. Cover the bowl loosely with a paper towel and microwave on high power for 30 seconds. Check if the butter is completely melted. If not, return it to the microwave for 10-second intervals until it’s fully melted. Never microwave butter longer than necessary, as overheated butter loses its structure and affects biscuit texture. Set the melted butter aside to cool slightly while you prepare the remaining dry ingredients.
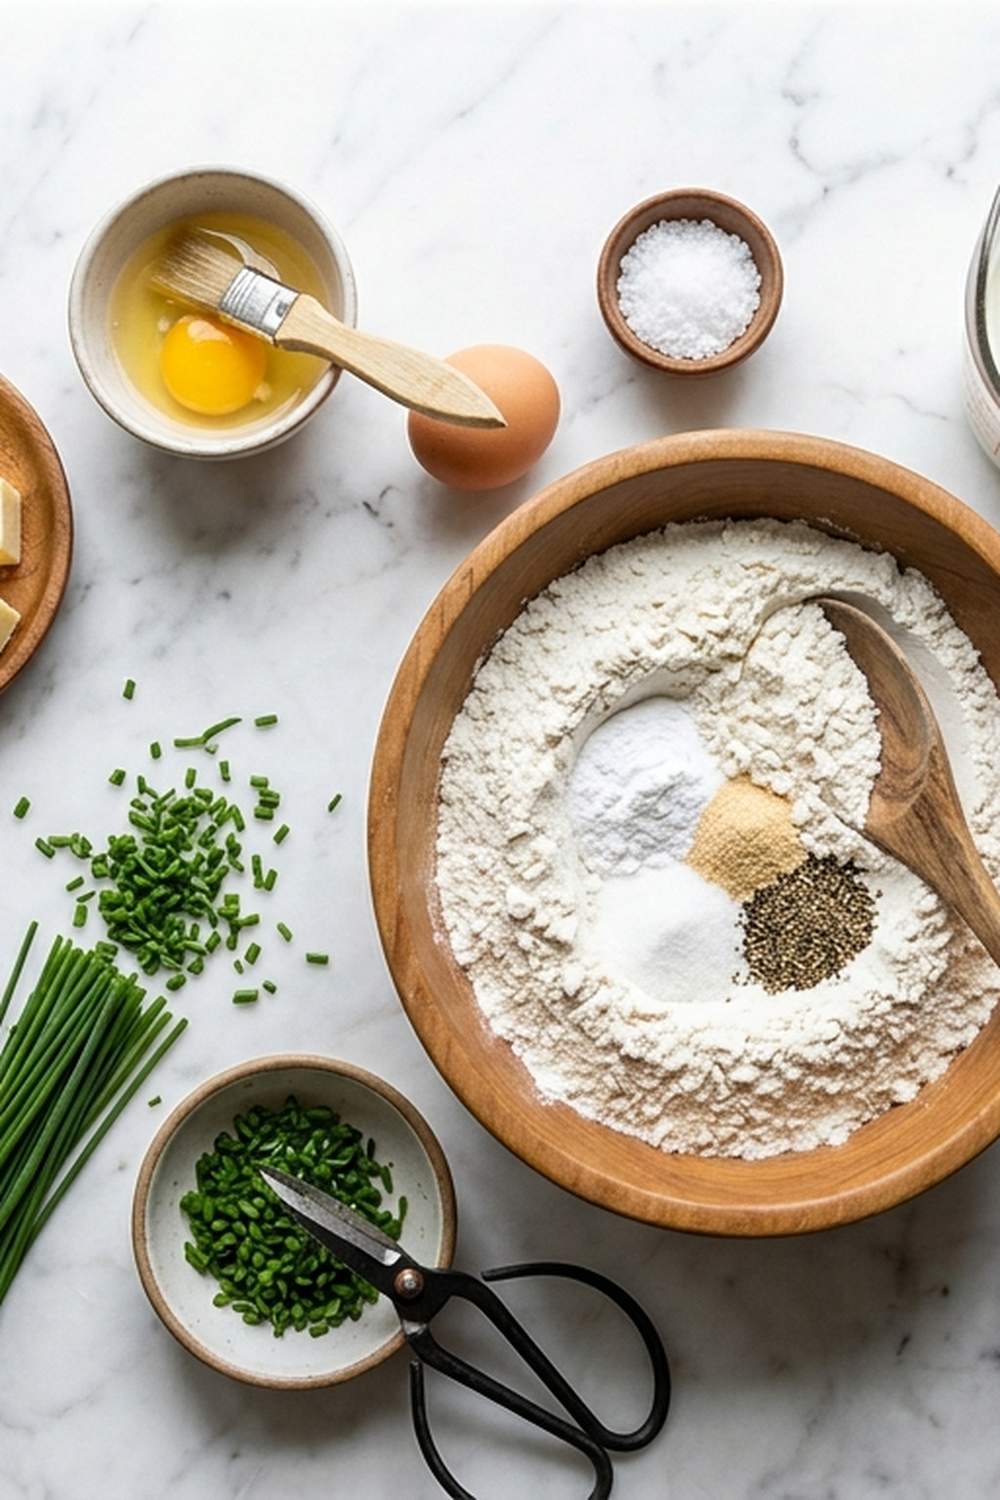
Step 4: Whisk Together Your Dry Ingredients
In a large mixing bowl, whisk together the flour, baking powder, baking soda, sugar, and kosher salt. This is a job perfect for kids ages 6 and up—they love using whisks, and it helps them develop real baking skills. Whisking aerates the flour and distributes the leavening agents evenly, which creates more consistent rise across all your biscuits. After whisking, add the freshly shredded cheddar cheese and finely sliced fresh chives. Stir gently with a fork to distribute the cheese and herbs throughout the flour mixture. Make sure the cheese doesn’t clump together—if it does, gently break it apart with your fingers.

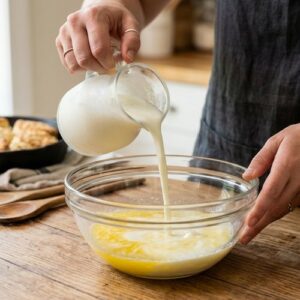
Step 5: Create the Buttermilk-Butter Mixture
This is where biscuit magic happens. Remove your chilled buttermilk from the freezer and pour it into the bowl with your slightly cooled melted butter. Using a fork, stir this mixture vigorously until the butter forms small clumps and globules throughout the buttermilk. You’ll see visible butter pieces suspended in the liquid—this is exactly what you want. These butter pockets create steam during baking, which produces those beautiful, tender, flaky layers everyone loves about homemade biscuits.
Step 6: Combine Wet and Dry Ingredients Gently
Pour the buttermilk-butter mixture into your bowl of dry ingredients. Using a sturdy spatula, stir gently and deliberately until all the flour is incorporated and the mixture pulls away from the sides of the bowl. Stop stirring as soon as you don’t see any white flour streaks—overmixing develops gluten and creates tough, dense biscuits instead of tender ones. The dough should feel stiff and shaggy, not wet or sticky. If it seems too wet, add more flour 1 tablespoon at a time, stirring gently until the dough reaches the right consistency.

Step 7: Knead Your Dough Minimally
Generously dust your work surface with flour. Dump the entire dough onto this floured surface and gently turn it to coat all surfaces with flour. This is where younger kids can really help under your supervision. Now comes the most important rule: knead this dough only 5 to 6 times, taking about 20-30 seconds total. We’re not making bread here. We want minimal gluten development. Fold the dough over itself gently, rotate slightly, and repeat. After those 5-6 gentle folds, flip the dough over to coat the other side with flour, then pat it into a 6-inch square approximately 1½ to 2 inches tall.
Step 8: Cut Your Biscuits
Using a biscuit cutter (I prefer 2-inch cutters for perfect-sized biscuits), cut as many biscuits as you can from your dough square. Push straight down without twisting—twisting seals the edges and prevents proper rising. Transfer each biscuit to your prepared baking sheet, spacing them about 1½ inches apart. After cutting your first round, gather the scraps gently, knead them just a few times until they hold together, pat into a small circle, and cut more biscuits. These second-round biscuits might not be quite as flaky, but they’re still delicious. Transfer all remaining biscuits to the sheet pan.

Step 9: Bake Until Golden Brown
Place your baking sheet in the preheated 425°F oven. Bake for 10 to 15 minutes, but start checking for doneness after about 8 minutes since every oven bakes differently. You’re looking for tops that are medium golden brown and feel crisp to the touch. The edges should be slightly darker than the tops. If your biscuits are pale, they need more time. Trust your eyes more than the clock—every oven runs differently, especially in Colorado’s elevation.
Step 10: Finish with Butter and Fresh Chives
The moment your biscuits come out of the oven, melt the remaining 1 tablespoon of butter and brush it generously across the tops of the hot biscuits. This creates that beautiful, shiny finish and adds richness. Sprinkle with additional finely sliced fresh chives while the butter is still warm—the heat will slightly soften the chives and distribute their flavor beautifully. Serve immediately while they’re still warm. These biscuits are best enjoyed within the first hour of baking, though they’re still pleasant at room temperature.
Expert’s Nutritional Tip from My Practice
In my decade of nutrition counseling with families, I’ve found that the biggest barrier to getting kids to eat vegetables is how they’re presented. These chives aren’t presented as “greens you must eat for your health”—they’re integrated into a beloved comfort food. This is called food exposure in nutritional psychology. When children encounter foods repeatedly in positive contexts (like a delicious biscuit they helped make), their acceptance and consumption increase significantly. The chives in this recipe provide vitamin K for bone health and blood clotting, plus quercetin, an antioxidant that supports immune function. Your child doesn’t taste medicine; they taste cheese and buttery richness. This is how we build lifelong healthy eating habits.
Make-Ahead Guide: Stress-Free Holiday Hosting
As someone who manages multiple holiday gatherings each season, I’ve perfected the make-ahead strategy for these biscuits. You have three options depending on your timeline and kitchen capacity:
- Prepare dough the night before: Mix all dry ingredients and store in an airtight container at room temperature. Prepare the buttermilk-butter mixture separately, cover it, and refrigerate overnight. In the morning, combine wet and dry ingredients, shape, and bake. This saves you 20 minutes on the day of your gathering.
- Shape biscuits up to 4 hours ahead: Complete through Step 8 (cutting your biscuits), then arrange them on the baking sheet. Cover loosely with plastic wrap and refrigerate. About 15 minutes before you want to serve them, remove from the fridge and let them come to room temperature slightly, then bake as directed. Cold dough actually creates slightly flakier biscuits.
- Bake completely and reheat: Bake your biscuits up to 8 hours ahead, cool completely, then store in an airtight container at room temperature. About 10 minutes before serving, wrap them in foil and warm in a 350°F oven for 5-7 minutes. Brush with melted butter and fresh chives as you would with fresh-baked biscuits. Your guests won’t know the difference.
My preference for holiday gatherings? I prepare the dough the night before and shape the biscuits that morning. This gives me flexibility if timing shifts during the day, and fresh-baked biscuits arriving warm at the table create a magical moment that stored biscuits can’t replicate.
Common Mistakes to Avoid
After teaching countless families to make these biscuits, I’ve noticed patterns in what creates disappointment. Here are the four most common mistakes I see, along with how to prevent them:
- Overmixing the dough: This is the number-one reason biscuits turn out tough and dense instead of flaky and tender. The moment you see no white flour streaks, stop stirring. Your instinct will say “keep going a bit more,” but resist it. Trust that the dough is ready.
- Skipping the buttermilk-chilling step: Cold buttermilk and cold butter create those steam pockets that make biscuits flaky. If your buttermilk is room temperature, those pockets don’t form, and you end up with cake-like biscuits. That 10-minute freezer step is non-negotiable.
- Twisting the biscuit cutter: Twisting seals the edges and prevents proper rising and layering. Push straight down, then pull straight out. Your kids might instinctively twist—gently redirect them before they cut.
- Baking in a too-hot oven or for too long: At 425°F, these biscuits brown quickly. If your oven runs hot, lower it to 400°F. Check at 8 minutes rather than waiting the full 15. Golden brown is the target; dark brown means overdone and dry.
Customization Station: Let Everyone Build Their Own
One of my favorite party hosting strategies is setting up a “customize your biscuit” station. This gives picky eaters control and agency, which dramatically increases the likelihood they’ll actually eat what they’ve chosen. Here’s how I set this up at my Colorado gatherings:
- Spread options: Offer fresh whipped butter, herbed butter (I mix butter with fresh rosemary and thyme), cream cheese, or honey butter. Let guests choose their own flavor profile. Kids love being given choices rather than being told what to eat.
- Add-on options: Set out small bowls of extra fresh chives, crispy bacon bits, sliced jalapeños for the adventurous eaters, and fleur de sel for those who want extra salt. Everyone creates their perfect bite.
- Topping options: Some guests love biscuits plain; others want everything. Having a variety of toppings lets everyone feel satisfied rather than like they’re missing out.
This approach transformed my Thanksgiving last year. A visiting teenager who “doesn’t eat vegetables” created a jalapeño-bacon-chive biscuit because she got to customize it herself. Her parents couldn’t believe she actually ate something with fresh herbs without complaint.
Scaling for Different Family Sizes
I work with families ranging from two-person Colorado households to large extended families gathering for the holidays. This recipe easily scales:
- For 2-4 people (one meal): Cut the entire recipe in half. Use 1 cup flour, 4½ tablespoons butter, ½ cup buttermilk, ⅜ cup cheddar, 2 tablespoons chives, and halve all the leavening agents and salt. This yields about 6-8 biscuits and takes the same baking time.
- For 5-8 people (small gathering): Use the full recipe as written, which yields 12-16 biscuits depending on cutter size.
- For 9-16 people (larger holiday gathering): Double the entire recipe. You’ll need two large baking sheets (or bake in two batches). Double-batch baking actually goes faster than you’d think since you’re not significantly increasing prep time—you’re just making more dough. The oven time stays the same for each batch.
- For 17+ people (major gathering): Triple the recipe and plan on two oven batches unless you have two ovens. This yields about 36-48 biscuits. Prepare dough the night before to spread out your work and reduce day-of stress.
Can I Store Cheddar Chive Biscuits?
These biscuits are best enjoyed warm and fresh, but real life with families means you often have leftovers. Here’s how to store them so they maintain the best texture:
- Room temperature (up to 8 hours): Store in an airtight container or wrapped tightly in foil. These stay relatively soft and fresh-tasting for most of a day. This is perfect for lunchboxes the morning after a gathering.
- Refrigerator (up to 5 days): Transfer cooled biscuits to an airtight container. Before eating, wrap in foil and warm in a 350°F oven for 5-7 minutes. This revives them beautifully—they taste nearly fresh-baked.
- Freezer (up to 3 months): Cool completely, wrap individually in plastic wrap, then place in a freezer-safe bag with the air pressed out. Thaw at room temperature for 30 minutes, then warm in foil in a 350°F oven for 10 minutes. Frozen biscuits work wonderfully for unexpected guests or quick weeknight meals.
- For lunchboxes: Pack a room-temperature biscuit in your child’s lunch box. They’re delicious cold and provide sustained energy from the cheese and fat. Pair with cream cheese or a slice of turkey for a complete lunch.
Seasonal Variations: Keeping These Fresh Year-Round
While these cheddar chive biscuits are perfect as-is, I love adapting them seasonally. This keeps them from becoming routine and gives me reasons to make them more often throughout the year:
- Summer version: Replace chives with fresh dill and add finely diced sun-dried tomatoes. Use sharp white cheddar instead of regular cheddar for brightness. Serve alongside grilled meats and fresh salads.
- Fall version: Keep the chives but add ¼ teaspoon cayenne pepper for warmth. Replace ¼ cup of the cheddar with sharp aged gouda. These pair beautifully with autumn soups and stews.
- Winter version: Add ½ teaspoon smoked paprika and 2 tablespoons crispy, crumbled bacon pieces. Replace some of the chives with fresh rosemary. Perfect alongside holiday ham or turkey.
- Spring version: Use fresh tarragon instead of chives (or do half and half). Replace cheddar with creamy fontina. Serve alongside fresh spring vegetables and lean proteins.
Nutrition Information
Based on USDA nutrition database analysis, each biscuit contains approximately 180 calories, 10g protein, 18g carbohydrates, and 8g fat, with about 200mg calcium and meaningful amounts of vitamin K from the fresh chives. For growing children and teens, this provides real nutritional value rather than empty calories. The protein helps build strong muscles and supports satiety—kids stay fuller longer, reducing the constant snacking requests many parents experience.
The calcium from sharp cheddar supports bone development during critical growth years, especially important in Colorado where our dry climate and active outdoor lifestyle puts demands on growing bodies. The vitamin K from chives supports proper blood clotting and bone metabolism—nutrients kids rarely get enough of from their regular diet. I specifically chose these ingredients because they nourish developing bodies while tasting indulgent and special.
What to Serve Alongside for a Complete Family Meal
These biscuits shine as part of a complete meal rather than standing alone. Here’s how I build gatherings around them:
- Hearty soups or stews: Creamy tomato soup, butternut squash soup, or beef stew. Kids love dipping warm biscuits into soup. The warm bread balances acidic soups beautifully.
- Roasted vegetables and lean proteins: Pair with roasted chicken, baked fish like Lemon Baked Cod Recipe, or turkey. The richness of the biscuits complements lean proteins perfectly.
- Fresh green salads: A simple arugula salad with lemon vinaigrette balances the buttery biscuits. Kids appreciate having something fresh and light alongside the richness.
- Seasonal vegetables: Steamed broccoli with garlic, roasted Brussels sprouts, or simple green beans. The herbed biscuits already add flavor, so vegetables can stay simple.
Cheddar Chive Biscuit Recipe
Ingredients
Method
- Start by positioning your oven rack to the middle position and preheating to 425°F. This ensures even, golden-brown baking across the entire batch. While the oven heats, line a large baking sheet with parchment paper or lightly spray it with cooking spray. This prevents sticking and ensures your bottom crusts brown evenly. I always have my baking sheet ready before I touch any ingredients—preparation prevents stress during the baking process.

- Measure out 1 cup of buttermilk and place the entire measuring cup directly into your freezer. You want this to chill for exactly 10 minutes while you prepare the other ingredients. This step is crucial for creating flaky layers—the cold buttermilk and cold butter create pockets of steam that separate the dough layers during baking. Don't skip this step or rush it. Set a timer on your phone so you remember to pull it out at exactly 10 minutes.
- Place 8 tablespoons of cold butter in a microwave-safe bowl. Cover the bowl loosely with a paper towel and microwave on high power for 30 seconds. Check if the butter is completely melted. If not, return it to the microwave for 10-second intervals until it's fully melted. Never microwave butter longer than necessary, as overheated butter loses its structure and affects biscuit texture. Set the melted butter aside to cool slightly while you prepare the remaining dry ingredients.
- In a large mixing bowl, whisk together the flour, baking powder, baking soda, sugar, and kosher salt. This is a job perfect for kids ages 6 and up—they love using whisks, and it helps them develop real baking skills. Whisking aerates the flour and distributes the leavening agents evenly, which creates more consistent rise across all your biscuits. After whisking, add the freshly shredded cheddar cheese and finely sliced fresh chives. Stir gently with a fork to distribute the cheese and herbs throughout the flour mixture. Make sure the cheese doesn't clump together—if it does, gently break it apart with your fingers.
- This is where biscuit magic happens. Remove your chilled buttermilk from the freezer and pour it into the bowl with your slightly cooled melted butter. Using a fork, stir this mixture vigorously until the butter forms small clumps and globules throughout the buttermilk. You'll see visible butter pieces suspended in the liquid—this is exactly what you want. These butter pockets create steam during baking, which produces those beautiful, tender, flaky layers everyone loves about homemade biscuits.
- Pour the buttermilk-butter mixture into your bowl of dry ingredients. Using a sturdy spatula, stir gently and deliberately until all the flour is incorporated and the mixture pulls away from the sides of the bowl. Stop stirring as soon as you don't see any white flour streaks—overmixing develops gluten and creates tough, dense biscuits instead of tender ones. The dough should feel stiff and shaggy, not wet or sticky. If it seems too wet, add more flour 1 tablespoon at a time, stirring gently until the dough reaches the right consistency.
- Generously dust your work surface with flour. Dump the entire dough onto this floured surface and gently turn it to coat all surfaces with flour. This is where younger kids can really help under your supervision. Now comes the most important rule: knead this dough only 5 to 6 times, taking about 20-30 seconds total. We're not making bread here. We want minimal gluten development. Fold the dough over itself gently, rotate slightly, and repeat. After those 5-6 gentle folds, flip the dough over to coat the other side with flour, then pat it into a 6-inch square approximately 1½ to 2 inches tall.
- Using a biscuit cutter (I prefer 2-inch cutters for perfect-sized biscuits), cut as many biscuits as you can from your dough square. Push straight down without twisting—twisting seals the edges and prevents proper rising. Transfer each biscuit to your prepared baking sheet, spacing them about 1½ inches apart. After cutting your first round, gather the scraps gently, knead them just a few times until they hold together, pat into a small circle, and cut more biscuits. These second-round biscuits might not be quite as flaky, but they're still delicious. Transfer all remaining biscuits to the sheet pan.

- Place your baking sheet in the preheated 425°F oven. Bake for 10 to 15 minutes, but start checking for doneness after about 8 minutes since every oven bakes differently. You're looking for tops that are medium golden brown and feel crisp to the touch. The edges should be slightly darker than the tops. If your biscuits are pale, they need more time. Trust your eyes more than the clock—every oven runs differently, especially in Colorado's elevation.
- The moment your biscuits come out of the oven, melt the remaining 1 tablespoon of butter and brush it generously across the tops of the hot biscuits. This creates that beautiful, shiny finish and adds richness. Sprinkle with additional finely sliced fresh chives while the butter is still warm—the heat will slightly soften the chives and distribute their flavor beautifully. Serve immediately while they're still warm. These biscuits are best enjoyed within the first hour of baking, though they're still pleasant at room temperature.
Notes
FAQs
Can I Make These Biscuits Ahead for a Weekday Dinner, or Are They Just for Special Occasions?
Absolutely make them during the week! I prepare the dough on Sunday for our Tuesday dinner. These biscuits don’t require special occasion timing. Actually, having them on busy weekday nights reduces stress because you’re offering something homemade and nourishing rather than defaulting to processed bread. Set a timer while the kids do homework, pull them out when they’re golden, and suddenly dinner feels special without requiring hours of preparation.
My Cheese Always Clumps When I Mix It In. How Do I Prevent This?
This is super common, and the solution is simple: make sure your cheese is shredded as finely as possible, and it should be at room temperature (not cold from the fridge) when you mix it in. If clumping still happens, gently break apart the clumps with your fingers after adding the cheese to the flour. The cheese will separate during baking anyway, so tiny clumps won’t affect the final result. Some people also lightly toss the shredded cheese in a teaspoon of flour before adding it to the dough; this prevents clumping by keeping individual strands separated.
My Biscuits Turn Out Cake-like Instead of Flaky. What Am I Doing Wrong?
Ninety percent of the time, this is because the dough is being overmixed. The other 10 percent is because the buttermilk and butter weren’t cold enough, or because you have an oven temperature issue. Here’s my troubleshooting order: First, review Step 6 and commit to stopping immediately when you see no white flour streaks—overmixing is the most common culprit. Second, ensure you’re chilling your buttermilk for the full 10 minutes. Third, check your oven temperature with an oven thermometer; if it’s running hot, lower it by 25°F. If you’ve checked all three and still have issues, your flour might be too wet for Colorado’s dry climate; try adding another tablespoon of flour.
What’s the Difference Between These Biscuits and Scones?
Great question that comes up constantly! Biscuits use less sugar and are meant to be savory, though they can be slightly sweet. Scones typically contain more sugar and are served with sweet toppings like jam and cream. Biscuits prioritize flakiness and tenderness with visible butter pockets, while scones can be slightly more structured. These are definitely biscuits—they’re savory vehicles for breakfast, lunch, or dinner rather than dessert components.
My Kids Want to Help, But My Kitchen is Tiny. Can I Adapt This for Limited Space?
Absolutely! I work with many families in smaller Colorado apartments. Here’s how: Prepare all ingredients in advance and set them on a small table or even a chair next to your cooking area. Kids can do measuring and mixing at this separate station, then you transfer to your kitchen when it’s time for kneading and shaping. This actually makes the process less chaotic and gives kids a defined workspace where they feel ownership. For the kneading step, use a small cutting board instead of the full counter. It takes practice, but it absolutely works.
Are There Dairy-Free or Egg-Free Substitutions I Can Make?
These specific biscuits are naturally egg-free already! For dairy-free, this becomes more complex because both the buttermilk and cheddar are crucial to the flavor and texture. I’d recommend making a different biscuit recipe specifically formulated for dairy-free needs rather than adapting these. The acid in buttermilk reacts with the baking soda to create lift, and the cheddar contributes irreplaceable flavor. Substituting these fundamentally changes what makes these biscuits special. If you have dairy-free guests at your gathering, I’d suggest making both regular and dairy-free versions rather than compromising the originals.
More Family-Friendly Recipes
- Alambre Mexican Food Recipe – festive skewers that involve kids in assembly and feel special for family gatherings
- HK Styled Baked Pork Chop on Rice – one-pan main dishes that reduce cooking stress on busy nights
- Agedashi Tofu Recipe – introduces vegetarian proteins in ways kids actually enjoy eating
Final Thoughts: Building Food Memories One Biscuit at a Time
As I’ve worked with families across Colorado over the past decade, I’ve learned that the most important ingredient in any recipe isn’t listed in the measurements. It’s the intention you bring to feeding your family. These cheddar chive biscuits represent more than just food to me—they represent the moment a picky eater tried something with fresh herbs and realized they liked it. They represent a child realizing they made something delicious with their own hands. They represent gathering around a table together, tearing apart warm bread, and creating memories that last far longer than the meal itself.
That’s why I’m so passionate about sharing recipes that are genuinely accessible for busy families, affordable to make repeatedly, and inclusive for various taste preferences and dietary needs. Every time you make these biscuits—whether it’s for a major holiday gathering, a weeknight dinner, or a quiet Sunday brunch—you’re building food confidence in your family. You’re creating positive associations with cooking and eating together. You’re contributing to lifelong healthy eating habits in ways that no lecture or mandated vegetable could achieve.
I can’t wait to share many more delicious and festive recipes with you!