
Ingredients
Method
Step 1: Prepare Your Workspace and Preheat the Oven
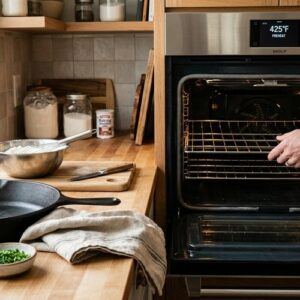
- Start by positioning your oven rack to the middle position and preheating to 425°F. This ensures even, golden-brown baking across the entire batch. While the oven heats, line a large baking sheet with parchment paper or lightly spray it with cooking spray. This prevents sticking and ensures your bottom crusts brown evenly. I always have my baking sheet ready before I touch any ingredients—preparation prevents stress during the baking process.
Step 2: Chill Your Buttermilk
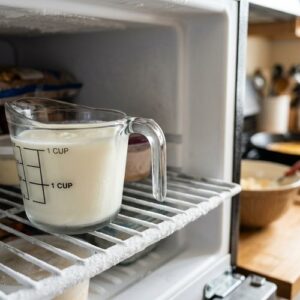
- Measure out 1 cup of buttermilk and place the entire measuring cup directly into your freezer. You want this to chill for exactly 10 minutes while you prepare the other ingredients. This step is crucial for creating flaky layers—the cold buttermilk and cold butter create pockets of steam that separate the dough layers during baking. Don't skip this step or rush it. Set a timer on your phone so you remember to pull it out at exactly 10 minutes.
Step 3: Melt the Butter Carefully
- Place 8 tablespoons of cold butter in a microwave-safe bowl. Cover the bowl loosely with a paper towel and microwave on high power for 30 seconds. Check if the butter is completely melted. If not, return it to the microwave for 10-second intervals until it's fully melted. Never microwave butter longer than necessary, as overheated butter loses its structure and affects biscuit texture. Set the melted butter aside to cool slightly while you prepare the remaining dry ingredients.
Step 4: Whisk Together Your Dry Ingredients
- In a large mixing bowl, whisk together the flour, baking powder, baking soda, sugar, and kosher salt. This is a job perfect for kids ages 6 and up—they love using whisks, and it helps them develop real baking skills. Whisking aerates the flour and distributes the leavening agents evenly, which creates more consistent rise across all your biscuits. After whisking, add the freshly shredded cheddar cheese and finely sliced fresh chives. Stir gently with a fork to distribute the cheese and herbs throughout the flour mixture. Make sure the cheese doesn't clump together—if it does, gently break it apart with your fingers.
Step 5: Create the Buttermilk-Butter Mixture
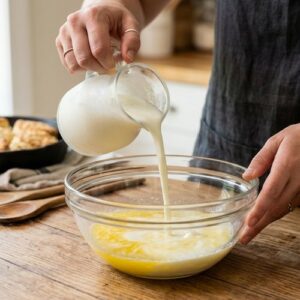
- This is where biscuit magic happens. Remove your chilled buttermilk from the freezer and pour it into the bowl with your slightly cooled melted butter. Using a fork, stir this mixture vigorously until the butter forms small clumps and globules throughout the buttermilk. You'll see visible butter pieces suspended in the liquid—this is exactly what you want. These butter pockets create steam during baking, which produces those beautiful, tender, flaky layers everyone loves about homemade biscuits.
Step 6: Combine Wet and Dry Ingredients Gently
- Pour the buttermilk-butter mixture into your bowl of dry ingredients. Using a sturdy spatula, stir gently and deliberately until all the flour is incorporated and the mixture pulls away from the sides of the bowl. Stop stirring as soon as you don't see any white flour streaks—overmixing develops gluten and creates tough, dense biscuits instead of tender ones. The dough should feel stiff and shaggy, not wet or sticky. If it seems too wet, add more flour 1 tablespoon at a time, stirring gently until the dough reaches the right consistency.
Step 7: Knead Your Dough Minimally
- Generously dust your work surface with flour. Dump the entire dough onto this floured surface and gently turn it to coat all surfaces with flour. This is where younger kids can really help under your supervision. Now comes the most important rule: knead this dough only 5 to 6 times, taking about 20-30 seconds total. We're not making bread here. We want minimal gluten development. Fold the dough over itself gently, rotate slightly, and repeat. After those 5-6 gentle folds, flip the dough over to coat the other side with flour, then pat it into a 6-inch square approximately 1½ to 2 inches tall.
Step 8: Cut Your Biscuits
- Using a biscuit cutter (I prefer 2-inch cutters for perfect-sized biscuits), cut as many biscuits as you can from your dough square. Push straight down without twisting—twisting seals the edges and prevents proper rising. Transfer each biscuit to your prepared baking sheet, spacing them about 1½ inches apart. After cutting your first round, gather the scraps gently, knead them just a few times until they hold together, pat into a small circle, and cut more biscuits. These second-round biscuits might not be quite as flaky, but they're still delicious. Transfer all remaining biscuits to the sheet pan.

Step 9: Bake Until Golden Brown
- Place your baking sheet in the preheated 425°F oven. Bake for 10 to 15 minutes, but start checking for doneness after about 8 minutes since every oven bakes differently. You're looking for tops that are medium golden brown and feel crisp to the touch. The edges should be slightly darker than the tops. If your biscuits are pale, they need more time. Trust your eyes more than the clock—every oven runs differently, especially in Colorado's elevation.
Step 10: Finish with Butter and Fresh Chives
- The moment your biscuits come out of the oven, melt the remaining 1 tablespoon of butter and brush it generously across the tops of the hot biscuits. This creates that beautiful, shiny finish and adds richness. Sprinkle with additional finely sliced fresh chives while the butter is still warm—the heat will slightly soften the chives and distribute their flavor beautifully. Serve immediately while they're still warm. These biscuits are best enjoyed within the first hour of baking, though they're still pleasant at room temperature.
Notes
- Overmixing the dough: This is the number-one reason biscuits turn out tough and dense instead of flaky and tender. The moment you see no white flour streaks, stop stirring. Your instinct will say "keep going a bit more," but resist it. Trust that the dough is ready.
- Skipping the buttermilk-chilling step: Cold buttermilk and cold butter create those steam pockets that make biscuits flaky. If your buttermilk is room temperature, those pockets don't form, and you end up with cake-like biscuits. That 10-minute freezer step is non-negotiable.
- Twisting the biscuit cutter: Twisting seals the edges and prevents proper rising and layering. Push straight down, then pull straight out. Your kids might instinctively twist—gently redirect them before they cut.
- Baking in a too-hot oven or for too long: At 425°F, these biscuits brown quickly. If your oven runs hot, lower it to 400°F. Check at 8 minutes rather than waiting the full 15. Golden brown is the target; dark brown means overdone and dry.