Black Bean Nacho Recipe
This post contains affiliate links. As an Amazon Associate I earn from qualifying purchases.
There’s one ingredient in this Black Bean Nacho Recipe that does all the heavy lifting—and honestly, it’s transformed how I approach festive gathering food. Once you understand it, you’ll find yourself reaching for it everywhere. I’m talking about black beans. For over a decade as a registered dietitian, I’ve watched people transform their relationship with plant-based proteins through this humble legume. Whether you’re hosting a Friendsgiving, a casual get-together, or feeding a crowd on a shoestring budget, black beans are your secret weapon. They’re affordable, nutritious, and they carry flavor like almost no other ingredient I know.
The One Ingredient That Makes This Black Bean Nacho Recipe Unforgettable
I’ll never forget the moment black beans shifted from being “just another ingredient” in my kitchen to becoming my obsession. I was testing recipes for a community event—a Friendsgiving celebration with a tight budget and zero room for waste. I had this beautiful can of black beans, and instead of just mashing them into refried beans (which is wonderful, don’t get me wrong), I decided to treat them like the star they actually are.
I sautéed them with spices, letting them simmer until the starchy liquid thickened into a luxurious sauce. That’s when it clicked. The beans weren’t just a side player—they were carrying an entire dish on their shoulders. The starch they naturally release creates this incredibly satisfying, creamy texture without any heavy cream or complicated technique. My guests that day kept asking what made those nachos taste so restaurant-quality. I pointed to my pantry. “These $1 cans,” I said, “and knowing how to treat them right.”
That moment changed everything about how I teach nutrition and hospitality. Black beans prove that inclusive, accessible eating doesn’t mean sacrificing flavor or sophistication. They’re the reason this recipe works so beautifully on every level.
Everything You Need to Know About Black Beans
Black beans are legumes that originated in Central and South America, where they’ve been a dietary staple for thousands of years. They’re now cultivated globally, with significant production in the United States, primarily in Montana and North Dakota. You’ll find them year-round in three main forms: dried (which require soaking and cooking), canned (convenient and shelf-stable), and occasionally fresh in specialty markets.
When selecting black beans, I always recommend looking at the ingredient list on canned versions—you want just beans, water, and salt. Nothing else. Some brands add unnecessary preservatives, and as a dietitian, I’ve learned that simpler is always better. The color should be deep, almost black, with a slight sheen. If you’re buying dried beans, look for beans that are uniform in size and free from cracks or discoloration.
- Canned black beans – the hero of weeknight cooking and budget-conscious entertaining. They’re pre-cooked, require no advance planning, and work beautifully in this recipe. They’re my go-to for festive gatherings when I want maximum flavor with minimum stress.
- Dried black beans – these require soaking overnight and cooking for 1-2 hours, but they’re more economical if you’re buying in bulk. The texture is slightly firmer and the flavor a bit earthier. They’re perfect when you’re planning ahead.
- Fresh black beans – rarely found outside specialty markets, these have a delicate, creamy texture and mild flavor. They’re beautiful but require quick cooking to preserve their texture.
Storage matters. Dried beans keep for years in a cool, dark pantry. Canned beans stay shelf-stable for 2-5 years, though I always check the expiration date before using. Once opened, transfer canned beans to an airtight container and refrigerate for up to 4 days. Cooked dried beans freeze beautifully in ice cube trays or freezer bags for up to 3 months—a make-ahead strategy I use constantly.
The Nutritional Power of Black Beans
One cup of cooked black beans contains approximately 15 grams of protein, making them a legitimate plant-based protein powerhouse. What amazes me most about black beans is their fiber content—about 15 grams per cooked cup—which means they’re actively supporting digestive health, blood sugar stability, and satiety. According to USDA nutritional data, black beans are also rich in folate, a B vitamin that supports energy metabolism and cellular function.
But here’s the nutrition insight I share with every client: black beans contain polyphenols and anthocyanins, which are antioxidants that give them their dark color and provide anti-inflammatory benefits. When you eat black beans regularly—and I mean truly regularly, not just once a month—you’re giving your body tools to manage inflammation naturally. This is especially important during the holiday season when stress and rich foods can trigger inflammatory responses.
The mineral profile is equally impressive. One serving of black beans provides significant amounts of magnesium, manganese, and iron—minerals that are often deficient in American diets, especially among plant-based eaters. A cup of canned black beans (drained) contains roughly 3.6 mg of iron and 60 mg of magnesium. The type of iron in legumes is non-heme iron, which absorbs better when paired with vitamin C (which this recipe includes through tomatoes and jalapeños). That’s not accidental—that’s nutritional synergy.
Calorie-wise, black beans are remarkably efficient. A half-cup serving contains only about 110 calories but delivers serious satiation because of that protein and fiber combination. This is why serving nachos as a shared appetizer works beautifully—people feel satisfied with smaller portions because black beans trigger fullness signals in the brain.
The Ingredients – Supporting Cast for the Star
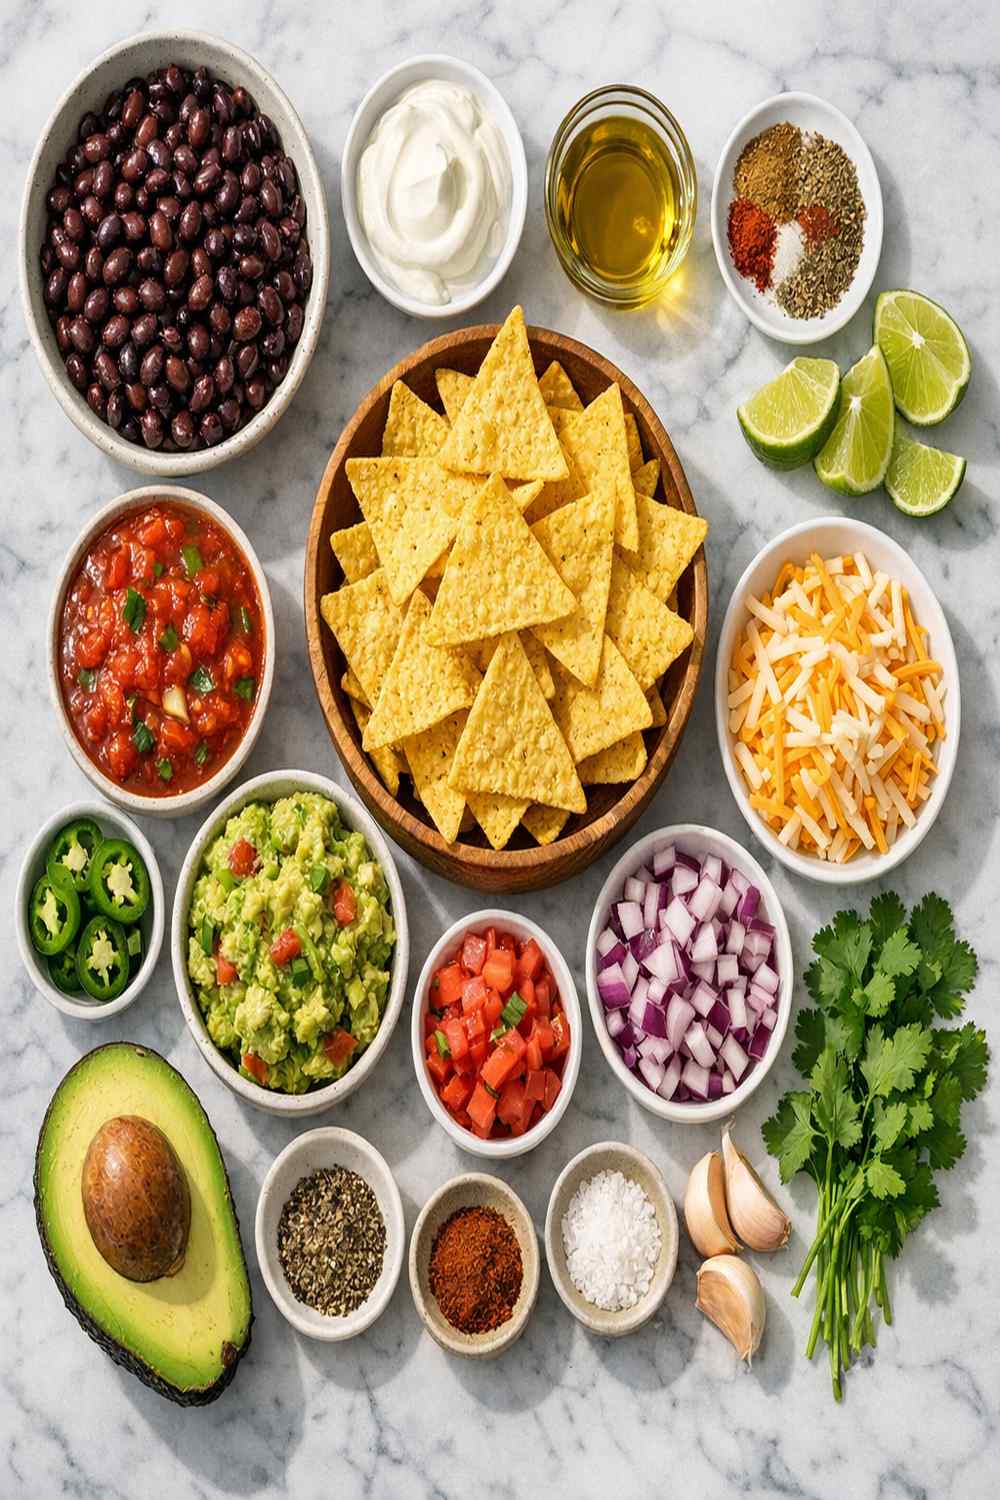
Every single ingredient in this recipe exists to amplify what black beans do best. Let me walk you through how the supporting cast elevates the star.
- 8 ounces sturdy corn tortilla chips (structural foundation and textural contrast)
- ½ teaspoon chipotle powder (amplifies smokiness and complexity)
- ¼ cup full-fat sour cream (coolness, creaminess, and tanginess)
- 1 fresh Roma tomato, diced (bright, fresh element that cuts through richness)
- 1 handful fresh cilantro, chopped (herbal brightness, aids digestion)
- ½ teaspoon ground cumin (earthy warmth that complements beans perfectly)
- 1 (10-ounce) can diced tomatoes with roasted green chiles (the tomatoes’ acidity brightens the beans while chiles add smoky heat)
- 2 (15-ounce) cans black beans, drained but not rinsed (our hero ingredient, with starchy liquid reserved for sauce)
- 1 small yellow onion, finely minced (adds natural sweetness and depth that balances the beans’ earthiness)
- 4 ounces sharp cheddar cheese, shredded (creamy richness that melts into bean mixture)
- ¼ teaspoon sea salt (draws out bean flavor)
- 1 jalapeño pepper, thinly sliced (heat and herbaceousness)
- ¼ teaspoon garlic powder (savory depth without adding moisture)
- ⅓ cup quick-pickled red onions (acid and sweetness that balance everything)
- 1 tablespoon extra virgin olive oil (provides healthy fats for nutrient absorption and silky mouthfeel)
Expert’s Nutritional Tip: Notice that I recommend not rinsing the canned beans? That starchy liquid is liquid gold nutritionally and culinarily. It contains resistant starch, which feeds beneficial gut bacteria. It also naturally thickens your bean mixture, eliminating the need for cream or butter. This is the kind of kitchen wisdom that comes from understanding nutrition deeply.
How to Make Black Bean Nacho Recipe Letting the Hero Ingredient Shine
The technique here is about respecting black beans enough to cook them intentionally. This isn’t throwing ingredients together—it’s building layers of flavor that let the beans be exactly what they’re meant to be. The key is creating a thick, luxurious sauce that coats every chip and delivers flavor in every single bite.
Step 1: Build Your Aromatic Base
Heat 1 tablespoon of olive oil in a large skillet over medium heat. While the oil warms, finely mince your small onion—I’m talking almost paste-like texture, not just rough chop. Once the oil shimmers slightly, add your minced onion and let it cook undisturbed for about 2 minutes. This develops sweetness. Then stir occasionally, cooking until the onion becomes completely translucent and soft, about 3-4 more minutes total. Your kitchen should smell absolutely incredible at this point. You’re not looking for color on the onion—you want it soft and surrendered. This is your foundation for everything that follows.

Step 2: Introduce Your Hero Ingredient Properly
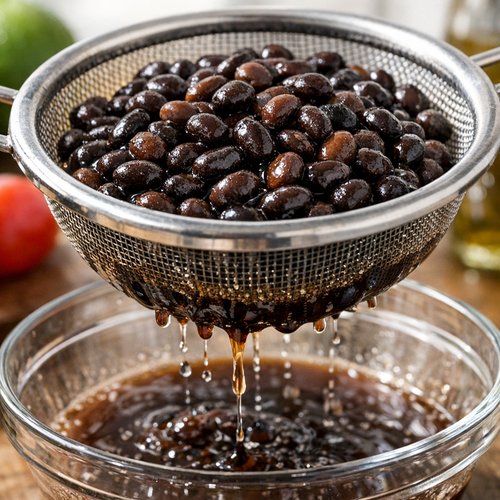
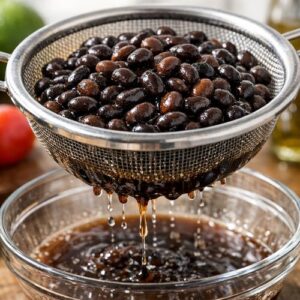
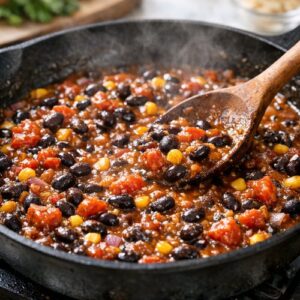
Drain your black beans in a fine-mesh strainer, but here’s the critical part: do not rinse them. Let that starchy liquid fall through the holes and into a small bowl. You’re going to use it. Pour your drained beans directly into the skillet with your soft onions. Pour in your can of diced tomatoes with green chiles—liquid and all, don’t drain it. The acidity of the tomatoes and the starch from the beans are about to create something magical.
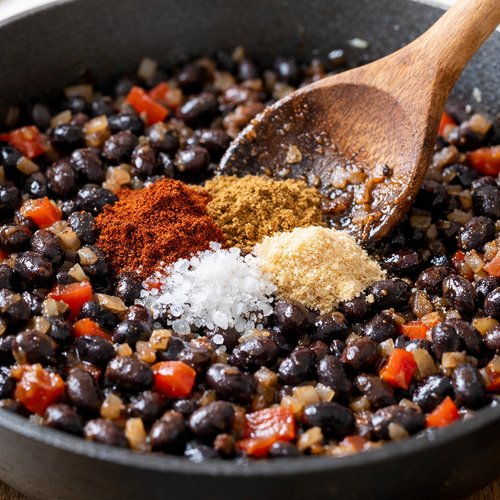
Step 3: Season With Intention
Add ½ teaspoon of chipotle powder, ½ teaspoon of ground cumin, ¼ teaspoon of garlic powder, and ¼ teaspoon of sea salt. Stir everything together thoroughly, making sure the dried spices dissolve into the liquid rather than clumping on the surface. This is where your beans go from simple to sophisticated. The spices aren’t just flavoring—they’re creating a flavor profile that says “someone who knows what they’re doing made this.”
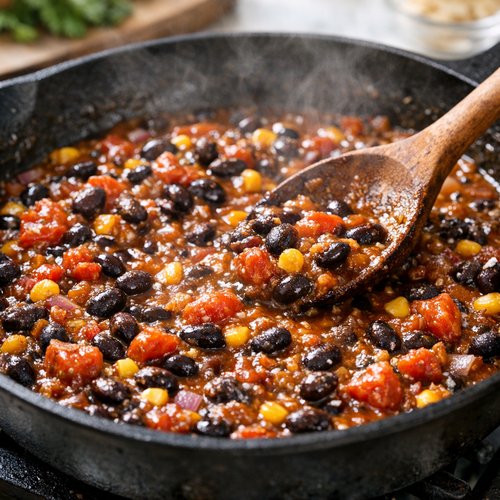
Step 4: Simmer Until the Magic Happens
Reduce heat to medium-low and let everything simmer gently, stirring occasionally. You’re cooking this for about 8-10 minutes, until something remarkable happens: the liquid reduces and thickens into a sauce that barely pools on the bottom of the pan. The bean starches are releasing and creating this luxurious texture naturally. If it’s reducing too quickly, add a splash of that reserved bean liquid. If it’s still too thin after 10 minutes, let it go another 2-3 minutes. This is not a race. You want a sauce that clings to a spoon, not something that runs off immediately.
This is the moment I always pause and remind myself why I love cooking. Black beans, tomatoes, and spices have transformed into something that tastes like it took hours of work but required just 20 minutes and a single pan.
Step 5: Prepare Your Oven and Toppings
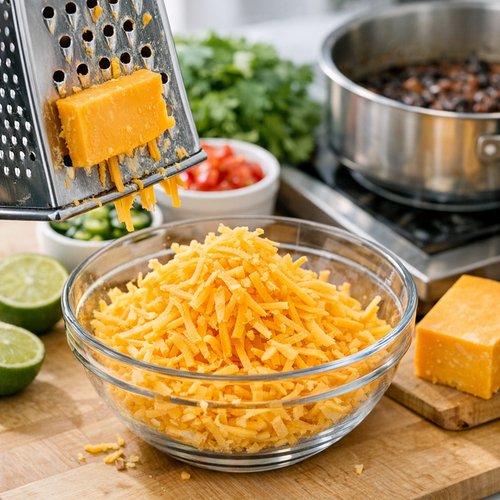
While your beans are simmering, preheat your oven to 350°F. Shred your cheddar cheese into a bowl—use the large holes on your box grater for the best melt. Finely dice your Roma tomato, removing excess seeds so you don’t end up with soggy nachos. Thinly slice your jalapeño (remove seeds if you prefer less heat, or leave them in if your crowd appreciates significant spice). Roughly chop your fresh cilantro. Have your jar of quick-pickled red onions nearby and your sour cream ready. Everything prepped and at the ready is the difference between stressed hosting and joyful gathering.
Step 6: Build Your Nachos With Purpose
Line a large baking sheet with parchment paper or foil for easy cleanup (a make-ahead consideration I always think about). Spread approximately one-third of your tortilla chips in a single layer across the sheet, trying to avoid overlapping—overlapped chips cook unevenly and some will burn while others stay soft. You want each chip to have contact with the oven heat.
Spoon about half of your black bean mixture over the chips, then sprinkle half of your shredded cheddar evenly on top. Repeat with another layer: chips, then remaining bean mixture, then remaining cheese. Don’t go beyond three layers—you want cheese on top so it gets beautifully golden.
Step 7: Bake and Watch Carefully
Place your assembled nachos in the preheated 350°F oven for 5-7 minutes. You’re not looking for heavily browned or crispy chips—you want the cheese completely melted and the chips just beginning to show color at their edges. The residual heat from the beans and oven is enough to crisp them slightly without burning. Set a timer because this is the window where everything comes together perfectly. Too short and your cheese won’t be melted. Too long and you’ll have tough, burnt chips.

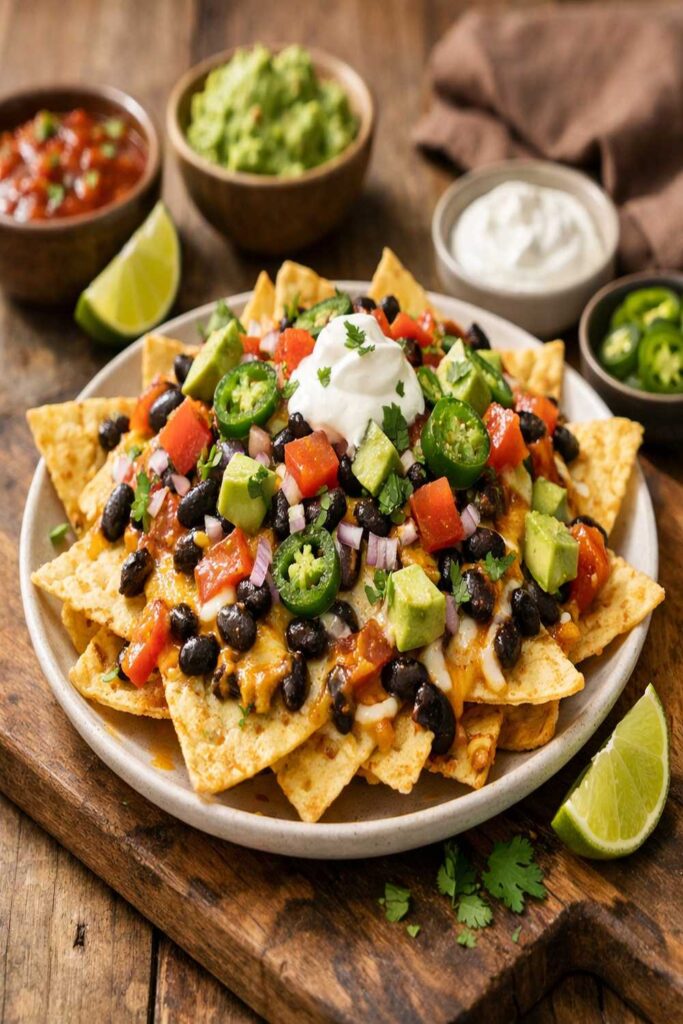
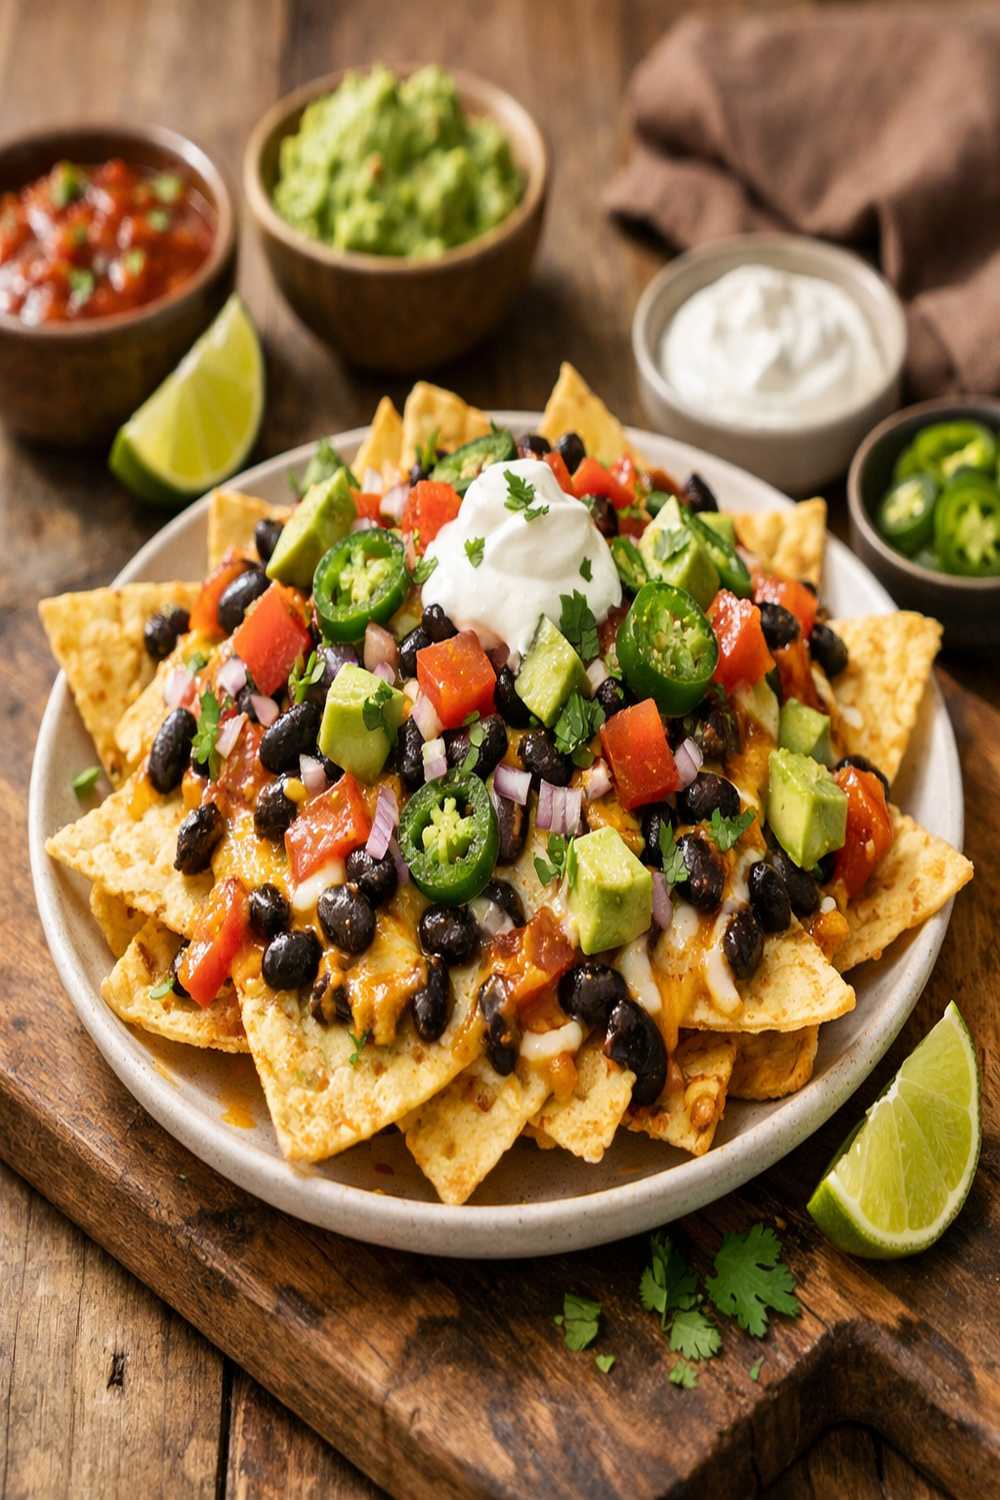
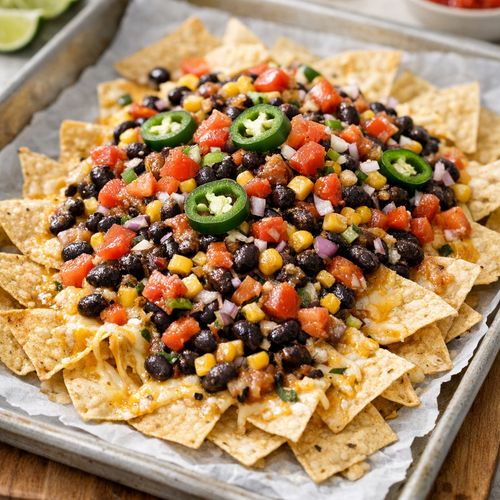
Step 8: Final Garnish Is Everything
Remove your nachos from the oven and work quickly while everything is hot. Drizzle or dollop your sour cream across the top—not a thin, invisible drizzle, but actual visible dollops that people can enjoy. Scatter your diced fresh tomato, sliced jalapeño, pickled red onions, and fresh cilantro across the top. This is where color, texture, and fresh flavor enter the picture. You’ve gone from something hot and melty to something with brightness and dimension.
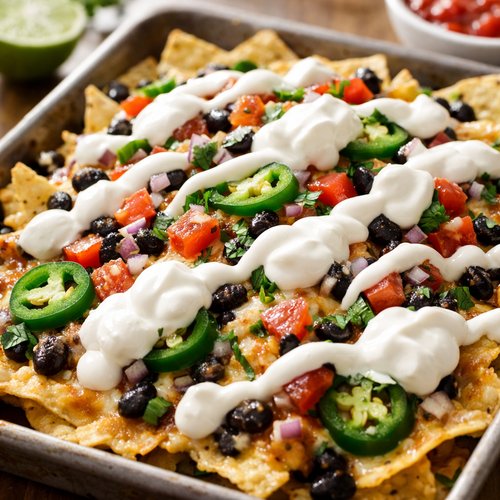
Make-Ahead Guide: You can prepare your black bean mixture up to 2 days ahead and refrigerate it. Reheat gently on the stove before assembling. You can also assemble the nachos completely (including raw toppings) up to 4 hours ahead, cover with plastic wrap, and bake them when guests arrive. The texture stays beautiful. If you’re serving a large crowd, bake them in batches—fresh, hot nachos are always worth the small effort.
5 Other Ways to Use Black Beans
- Black Bean Soup – puree half the beans with broth and aromatics for a silky, protein-rich soup that freezes beautifully for meal prep throughout the month
- Black Bean Burgers – mash beans with breadcrumbs, spices, and an egg binder for vegetarian patties that satisfy even committed meat-eaters at your festive gatherings
- Buddha Bowls – layer seasoned black beans with quinoa, roasted vegetables, and your choice of fresh toppings for a nutritionally complete lunch that’s budget-friendly
- Black Bean Dip – blend beans with lime, garlic, and cilantro for a party appetizer that’s naturally plant-based and remarkably creamy without dairy
- Black Bean Chili – combine beans with tomatoes, peppers, and spices for a warming, make-ahead crowd-pleaser that only improves with time
How to Buy and Store Black Beans
I’m going to be honest with you: for gatherings and entertaining, I reach for canned black beans almost exclusively. Yes, dried beans are more economical if you’re buying in bulk and planning ahead. Yes, they have a slightly superior texture. But when you’re juggling multiple dishes, coordinating timing, and trying to reduce stress during hosting, canned beans are not a compromise—they’re strategy.
When shopping, look for canned beans on the international aisle (usually cheaper than the organic section), or buy them at ethnic markets where they’re even more affordable. I’ve found that store-brand black beans are nutritionally identical to name-brand versions—save your money. Check the ingredient list: you want just beans, water, and salt. Some brands add calcium chloride or other stabilizers, which aren’t harmful but unnecessary.
If you prefer dried beans, buy them from bulk bins where possible (less packaging, more affordable, and you can buy exactly what you need). Store dried beans in airtight containers in a cool, dark pantry. They’ll keep for 2-3 years, though beans older than a year take progressively longer to cook. Once cooked, beans keep refrigerated for 4-5 days or frozen for up to 3 months. I freeze cooked beans in ice cube trays, then pop out cubes into labeled freezer bags—instant portions whenever I need them.
Opened cans of black beans must be transferred to airtight containers (never leave them in the can) and refrigerated for up to 4 days. Shelf-stable unopened cans last 2-5 years from purchase date, but I always use the oldest cans first.
Can I Store Black Bean Nacho Recipe?
Assembled nachos are best enjoyed immediately—the chips get soggy if they sit more than 15-20 minutes with toppings. However, the components store beautifully separately. Your black bean mixture keeps refrigerated in an airtight container for up to 4 days. Reheat gently on the stove or in the microwave before serving.
Tortilla chips stay crispy in an airtight container at room temperature for up to 3 days after opening (I always keep extras because people inevitably want more). Shredded cheese lasts up to 2 weeks refrigerated. Fresh toppings—tomato, jalapeño, cilantro—are best used within 1-2 days. Pickled red onions actually improve with time and keep refrigerated for 2-3 weeks.
Here’s my practical strategy: prep the black bean mixture ahead, shred your cheese, and have all your fresh toppings washed and prepped. When guests arrive, you’re just assembling and baking—a 10-minute task that feels effortless and yields restaurant-quality results. This is the kind of hosting ease that comes from understanding your ingredients and planning intentionally.
Nutrition Information
Per serving (approximately 1 generous nacho with toppings and bean mixture): 185 calories, 8 grams protein, 18 grams carbohydrates, 9 grams fat, 4 grams fiber, 320 mg sodium, 42 mg calcium, 1.8 mg iron.
The black beans are contributing the majority of the protein and fiber, creating a surprisingly nutritious snack or appetizer. The beans provide roughly 12 grams of protein per serving (about 65% of the total), which is why these nachos keep people satisfied rather than hungry 30 minutes later. The fiber content—primarily from the beans—supports digestion and blood sugar stability.
The cheddar cheese adds saturated fat and bioavailable calcium, making these nachos a legitimate source of bone-supporting minerals. The fresh toppings (tomato, cilantro, jalapeño) add negligible calories but significant micronutrients including vitamin C, vitamin A, and antioxidants. According to USDA nutritional data, one serving delivers approximately 18% of daily iron needs (from beans), 8% of daily calcium needs (from cheese), and 25% of daily vitamin C needs (from fresh toppings).
This is the nutritional profile that makes me confident recommending these nachos at any gathering, from casual Friendsgiving to formal entertaining. You’re serving something that tastes indulgent while actually delivering solid nutrition.
Common Mistakes to Avoid
Mistake 1: Rinsing Your Canned Beans – I see this constantly, and it always breaks my heart a little. That starchy liquid is your secret ingredient for creating a thick, luxurious sauce without cream or butter. If you rinse the beans, you’re literally washing away the magic. Save yourself the trouble—don’t rinse.
Mistake 2: Not Letting the Bean Mixture Actually Thicken – Some people rush this step. They add beans and tomatoes, cook for 2 minutes, and call it done. You need that 8-10 minute simmer so the liquid reduces and transforms into an actual sauce. Patience here is what separates mediocre nachos from ones people ask you to make again.
Mistake 3: Overlapping Your Chips – I know it’s tempting to crowd the baking sheet, but overlapped chips cook unevenly and some will definitely burn. Spread them in a single layer. If you have a lot of chips, bake in batches. It takes five extra minutes but changes everything about the final result.
Mistake 4: Not Actually Prepping Toppings Ahead – The nachos come out of the oven hot and ready, and if you’re still dicing tomatoes, your nachos are getting soggy. Prep everything 30 minutes before serving. It’s the difference between elegant hosting and looking rushed.
Seasonal Variations
Summer Version: Increase the cilantro, use fresh corn tortilla chips if you can find them, and add diced fresh corn to the topping mixture. Reduce chipotle powder to ¼ teaspoon and add a pinch of lime zest to brighten everything.
Fall/Winter Version: Keep the recipe exactly as written—the warmth of chipotle and cumin fits the season perfectly. Add roasted pumpkin seeds (pepitas) to the topping for crunch and autumn flavor. Consider crispy sage leaves scattered on top.
Spring Version: Use fresh diced spring onion in place of pickled red onions, add fresh pea shoots to the topping, and include fresh mint alongside cilantro. Add ¼ teaspoon cumin instead of ½ so the spices feel lighter.
Year-Round Variations: Try crumbled queso fresco instead of cheddar for a lighter, more delicate flavor. Add crispy bacon to the cheese layer for non-vegetarians. Substitute Greek yogurt for sour cream if serving health-conscious guests. Add a jalapeño slice or two directly into the bean mixture during cooking for deeper heat.
What Pairs Perfectly With Black Bean Nacho Recipe?
Black beans have a rich, earthy flavor that benefits from bright, fresh elements and specific complementary foods. The beauty of this recipe is that it already includes those elements, but when you’re planning a full gathering, these pairings enhance the experience.
- Fresh Avocado Tomatillo Salsa – the bright acidity cuts through the richness of cheese and beans while adding creaminess from avocado that complements rather than competes
- Lime Crema – whisk sour cream with lime juice and cilantro for a tangy sauce that echoes the flavors already present in the nachos while adding brightness
- Grilled Corn With Lime and Cotija – the sweetness of corn balances the spice and earthiness of beans perfectly
- Black Bean Soup – if you’re making extra bean mixture, blend some with vegetable broth for a starter course that echoes the nachos’ flavors
- Horchata or Agua Fresca – a cool, sweet beverage cuts through the richness beautifully and aids digestion
- Jicama Slaw With Lime Dressing – the cool crunch and bright acid balance hot, savory nachos perfectly
Black Bean Nacho Recipe
Method
- Heat 1 tablespoon of olive oil in a large skillet over medium heat. While the oil warms, finely mince your small onion—I'm talking almost paste-like texture, not just rough chop. Once the oil shimmers slightly, add your minced onion and let it cook undisturbed for about 2 minutes. This develops sweetness. Then stir occasionally, cooking until the onion becomes completely translucent and soft, about 3-4 more minutes total. Your kitchen should smell absolutely incredible at this point. You're not looking for color on the onion—you want it soft and surrendered. This is your foundation for everything that follows.

- Drain your black beans in a fine-mesh strainer, but here's the critical part: do not rinse them. Let that starchy liquid fall through the holes and into a small bowl. You're going to use it. Pour your drained beans directly into the skillet with your soft onions. Pour in your can of diced tomatoes with green chiles—liquid and all, don't drain it. The acidity of the tomatoes and the starch from the beans are about to create something magical.
- Add ½ teaspoon of chipotle powder, ½ teaspoon of ground cumin, ¼ teaspoon of garlic powder, and ¼ teaspoon of sea salt. Stir everything together thoroughly, making sure the dried spices dissolve into the liquid rather than clumping on the surface. This is where your beans go from simple to sophisticated. The spices aren't just flavoring—they're creating a flavor profile that says "someone who knows what they're doing made this."

- Reduce heat to medium-low and let everything simmer gently, stirring occasionally. You're cooking this for about 8-10 minutes, until something remarkable happens: the liquid reduces and thickens into a sauce that barely pools on the bottom of the pan. The bean starches are releasing and creating this luxurious texture naturally. If it's reducing too quickly, add a splash of that reserved bean liquid. If it's still too thin after 10 minutes, let it go another 2-3 minutes. This is not a race. You want a sauce that clings to a spoon, not something that runs off immediately. This is the moment I always pause and remind myself why I love cooking. Black beans, tomatoes, and spices have transformed into something that tastes like it took hours of work but required just 20 minutes and a single pan.
- While your beans are simmering, preheat your oven to 350°F. Shred your cheddar cheese into a bowl—use the large holes on your box grater for the best melt. Finely dice your Roma tomato, removing excess seeds so you don't end up with soggy nachos. Thinly slice your jalapeño (remove seeds if you prefer less heat, or leave them in if your crowd appreciates significant spice). Roughly chop your fresh cilantro. Have your jar of quick-pickled red onions nearby and your sour cream ready. Everything prepped and at the ready is the difference between stressed hosting and joyful gathering.

- Line a large baking sheet with parchment paper or foil for easy cleanup (a make-ahead consideration I always think about). Spread approximately one-third of your tortilla chips in a single layer across the sheet, trying to avoid overlapping—overlapped chips cook unevenly and some will burn while others stay soft. You want each chip to have contact with the oven heat. Spoon about half of your black bean mixture over the chips, then sprinkle half of your shredded cheddar evenly on top. Repeat with another layer: chips, then remaining bean mixture, then remaining cheese. Don't go beyond three layers—you want cheese on top so it gets beautifully golden.

- Place your assembled nachos in the preheated 350°F oven for 5-7 minutes. You're not looking for heavily browned or crispy chips—you want the cheese completely melted and the chips just beginning to show color at their edges. The residual heat from the beans and oven is enough to crisp them slightly without burning. Set a timer because this is the window where everything comes together perfectly. Too short and your cheese won't be melted. Too long and you'll have tough, burnt chips.

- Remove your nachos from the oven and work quickly while everything is hot. Drizzle or dollop your sour cream across the top—not a thin, invisible drizzle, but actual visible dollops that people can enjoy. Scatter your diced fresh tomato, sliced jalapeño, pickled red onions, and fresh cilantro across the top. This is where color, texture, and fresh flavor enter the picture. You've gone from something hot and melty to something with brightness and dimension. Make-Ahead Guide: You can prepare your black bean mixture up to 2 days ahead and refrigerate it. Reheat gently on the stove before assembling. You can also assemble the nachos completely (including raw toppings) up to 4 hours ahead, cover with plastic wrap, and bake them when guests arrive. The texture stays beautiful. If you're serving a large crowd, bake them in batches—fresh, hot nachos are always worth the small effort.

FAQs
Can I Make This Recipe Vegan?
Absolutely. Replace the cheddar with your favorite dairy-free melting cheese (nutritional yeast works beautifully too, offering additional B vitamins), and use dairy-free sour cream or cashew cream instead of regular sour cream. The star of this recipe—the black beans—is naturally plant-based and protein-rich, so you’re not compromising nutrition or flavor one bit. This is honestly why black beans are so valuable in inclusive entertaining.
What If I Don’t Have Canned Tomatoes With Green Chiles?
Use regular canned diced tomatoes (1 can) and add one fresh or canned roasted green chile, minced. Or substitute with salsa verde for a completely different but equally delicious flavor profile. The key is maintaining that acidity and moisture that helps the beans create a sauce. Don’t skip the tomatoes—they’re doing important work.
How Can I Make This Less Spicy for a Mixed Crowd?
Reduce the chipotle powder to ¼ teaspoon and remove jalapeño seeds before slicing (or omit them entirely from some portions). Keep a plain bowl of sour cream nearby so people can dollop extra—it cools heat immediately. The beauty of serving nachos as a communal dish is that people can customize their own spice level with fresh toppings.
Can I Use Frozen Black Beans Instead of Canned?
Yes, with one adjustment. Thaw frozen black beans completely and drain them well. They won’t have as much starchy liquid as canned beans, so you might need to add a tablespoon of vegetable broth while simmering to achieve the right consistency. Frozen beans are often fresher than canned and work beautifully for this recipe.
How Far Ahead Can I Prep the Black Bean Mixture?
Up to 2 days. Store it in an airtight container refrigerated. Reheat gently on the stove (stir occasionally to prevent sticking) or in the microwave, adding a splash of water or broth if it’s thickened too much. The flavors actually deepen with time as spices continue to infuse, making ahead-of-time prep not just convenient but potentially beneficial to flavor.
More Recipes Featuring Black Beans
- Alambres Recipe – skewered grilled vegetables and beans that pair beautifully as a complementary main dish
- Bacon and Brie Recipe – while not bean-based, this creates an elegant contrast to the earthiness of black bean dishes
I can’t wait for you to experience what happens when you approach black beans with genuine respect and intention. This recipe is my way of showing you exactly how ingredient mastery transforms festive gathering food from adequate to absolutely memorable. Black beans deserve a place at every table—they’re proof that inclusive, budget-friendly, accessible cooking can be deeply satisfying and genuinely sophisticated.
When you’re next hosting a gathering, remember that this single recipe gives you a legitimate appetizer, a protein source, a conversation piece, and nutrition all at once. That’s the kind of smart, generous cooking that makes hosting feel less like a burden and more like joy.
Happy Cooking!