
Method
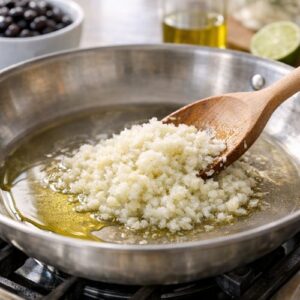
Step 1: Build Your Aromatic Base
- Heat 1 tablespoon of olive oil in a large skillet over medium heat. While the oil warms, finely mince your small onion—I'm talking almost paste-like texture, not just rough chop. Once the oil shimmers slightly, add your minced onion and let it cook undisturbed for about 2 minutes. This develops sweetness. Then stir occasionally, cooking until the onion becomes completely translucent and soft, about 3-4 more minutes total. Your kitchen should smell absolutely incredible at this point. You're not looking for color on the onion—you want it soft and surrendered. This is your foundation for everything that follows.
Step 2: Introduce Your Hero Ingredient Properly
- Drain your black beans in a fine-mesh strainer, but here's the critical part: do not rinse them. Let that starchy liquid fall through the holes and into a small bowl. You're going to use it. Pour your drained beans directly into the skillet with your soft onions. Pour in your can of diced tomatoes with green chiles—liquid and all, don't drain it. The acidity of the tomatoes and the starch from the beans are about to create something magical.

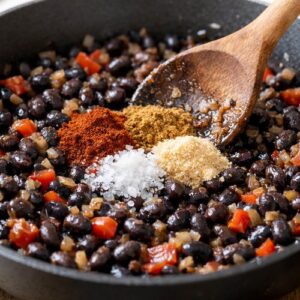
Step 3: Season With Intention
- Add ½ teaspoon of chipotle powder, ½ teaspoon of ground cumin, ¼ teaspoon of garlic powder, and ¼ teaspoon of sea salt. Stir everything together thoroughly, making sure the dried spices dissolve into the liquid rather than clumping on the surface. This is where your beans go from simple to sophisticated. The spices aren't just flavoring—they're creating a flavor profile that says "someone who knows what they're doing made this."
Step 4: Simmer Until the Magic Happens
- Reduce heat to medium-low and let everything simmer gently, stirring occasionally. You're cooking this for about 8-10 minutes, until something remarkable happens: the liquid reduces and thickens into a sauce that barely pools on the bottom of the pan. The bean starches are releasing and creating this luxurious texture naturally. If it's reducing too quickly, add a splash of that reserved bean liquid. If it's still too thin after 10 minutes, let it go another 2-3 minutes. This is not a race. You want a sauce that clings to a spoon, not something that runs off immediately. This is the moment I always pause and remind myself why I love cooking. Black beans, tomatoes, and spices have transformed into something that tastes like it took hours of work but required just 20 minutes and a single pan.

Step 5: Prepare Your Oven and Toppings
- While your beans are simmering, preheat your oven to 350°F. Shred your cheddar cheese into a bowl—use the large holes on your box grater for the best melt. Finely dice your Roma tomato, removing excess seeds so you don't end up with soggy nachos. Thinly slice your jalapeño (remove seeds if you prefer less heat, or leave them in if your crowd appreciates significant spice). Roughly chop your fresh cilantro. Have your jar of quick-pickled red onions nearby and your sour cream ready. Everything prepped and at the ready is the difference between stressed hosting and joyful gathering.

Step 6: Build Your Nachos With Purpose
- Line a large baking sheet with parchment paper or foil for easy cleanup (a make-ahead consideration I always think about). Spread approximately one-third of your tortilla chips in a single layer across the sheet, trying to avoid overlapping—overlapped chips cook unevenly and some will burn while others stay soft. You want each chip to have contact with the oven heat. Spoon about half of your black bean mixture over the chips, then sprinkle half of your shredded cheddar evenly on top. Repeat with another layer: chips, then remaining bean mixture, then remaining cheese. Don't go beyond three layers—you want cheese on top so it gets beautifully golden.

Step 7: Bake and Watch Carefully
- Place your assembled nachos in the preheated 350°F oven for 5-7 minutes. You're not looking for heavily browned or crispy chips—you want the cheese completely melted and the chips just beginning to show color at their edges. The residual heat from the beans and oven is enough to crisp them slightly without burning. Set a timer because this is the window where everything comes together perfectly. Too short and your cheese won't be melted. Too long and you'll have tough, burnt chips.

Step 8: Final Garnish Is Everything
- Remove your nachos from the oven and work quickly while everything is hot. Drizzle or dollop your sour cream across the top—not a thin, invisible drizzle, but actual visible dollops that people can enjoy. Scatter your diced fresh tomato, sliced jalapeño, pickled red onions, and fresh cilantro across the top. This is where color, texture, and fresh flavor enter the picture. You've gone from something hot and melty to something with brightness and dimension. Make-Ahead Guide: You can prepare your black bean mixture up to 2 days ahead and refrigerate it. Reheat gently on the stove before assembling. You can also assemble the nachos completely (including raw toppings) up to 4 hours ahead, cover with plastic wrap, and bake them when guests arrive. The texture stays beautiful. If you're serving a large crowd, bake them in batches—fresh, hot nachos are always worth the small effort.