Banana Blueberry Smoothie Recipe
This post contains affiliate links. As an Amazon Associate I earn from qualifying purchases.

If you’ve always wanted to make a banana blueberry smoothie but felt intimidated by the idea of blending, this is your starting point. I promise you, this is the most forgiving recipe you’ll ever encounter—and it’s the gateway to so much more. When I was first building my nutrition practice a decade ago, I realized that smoothies weren’t just delicious; they were my secret weapon for helping busy families sneak whole fruits, leafy greens, and protein into their mornings without stress or fuss. This recipe has become my most-recommended starting point for anyone who’s never used a blender before, and today, I’m thrilled to walk you through every single step.
How to Make a Banana Blueberry Smoothie Recipe for the First Time (You’ve Got This)
I’ll never forget my own first smoothie attempt. It was a chaotic Saturday morning in my college dorm, and I’d just invested in my first real blender with money I’d saved from work-study. I threw everything in—banana, some frozen berries I’d found in the freezer, milk, and honestly, I wasn’t even sure what I was doing. I hit the button with more confidence than skill, and about thirty seconds later, I had the most vibrant, delicious drink I’d ever tasted. I remember standing there in amazement that something so beautiful and nutritious could come together so quickly, with almost no real effort. That moment sparked something in me—a realization that feeding ourselves and our families well didn’t have to be complicated or time-consuming. It just had to be intentional.
That philosophy has guided my entire career as a registered dietitian and gathering expert. Now, after working with hundreds of families across Colorado, I know that smoothies are often the first real cooking success people experience. There’s something magical about that first blend, and I want you to feel that same confidence and joy.
What to Expect Before You Start
Let me set your expectations so there are absolutely no surprises. This smoothie takes about five minutes from start to finish, including cleanup. The difficulty level is genuinely beginner-friendly—I’m talking about the easiest thing you could make in your kitchen. You’ll need just one piece of equipment (a blender), and success looks like a thick, creamy, pourable drink with no visible chunks and a gorgeous purple-pink color.
- Blending time is super short – This isn’t like baking where timing precision matters. You’re just looking for smooth texture, and even if you blend for an extra 10 seconds, you’ll be fine. No measuring spoons or temperature checks required.
- You can’t really mess this up – Unlike cooking, where heat and chemistry matter enormously, smoothie-making is forgiving. Too much liquid? You’ve got a thinner smoothie (still delicious). Too little? It’s thicker (also delicious). This ingredient flexibility is what makes smoothies perfect for beginners.
Equipment You’ll Need (And What You Can Skip)
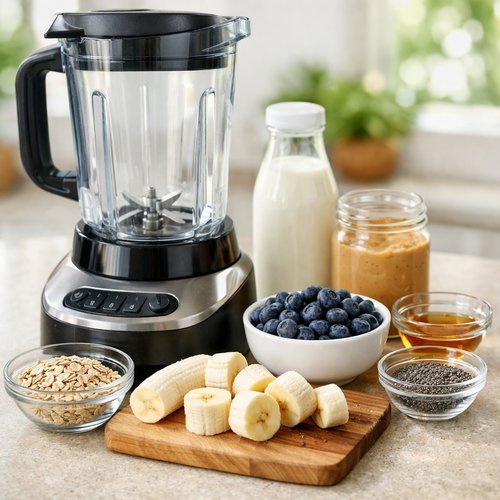
Here’s the beautiful truth: you need exactly one piece of equipment to make this smoothie. If you don’t have it yet, you don’t need anything fancy or expensive. I’ve seen people make smoothies with $25 blenders from big-box stores, and they work beautifully.
- A blender – This is your only essential tool. You’re looking for anything with a motor and blades that can pulverize fruit and liquid together. Don’t feel pressured to buy a high-powered blender costing hundreds of dollars. A basic model does exactly what you need. If you’re borrowing one, even better—try it out before you invest.
- A measuring cup or spoon – Nice to have for accuracy, but honestly, you can use any cup you have around your kitchen. A coffee mug works perfectly fine for measuring liquid.
- A tall glass – For serving your finished smoothie immediately. If you’re storing it, any container with a tight-fitting lid works.
The Ingredients – A Beginner’s Shopping Guide
Let me walk you through each ingredient you’ll need, exactly where to find it, what to look for, and how to adapt it to what you have on hand. One of the best parts about smoothie-making is that it’s incredibly flexible—you’re not locked into exact ingredients the way you are with baking. If your store doesn’t have one exact item, I’ll show you how to substitute confidently.
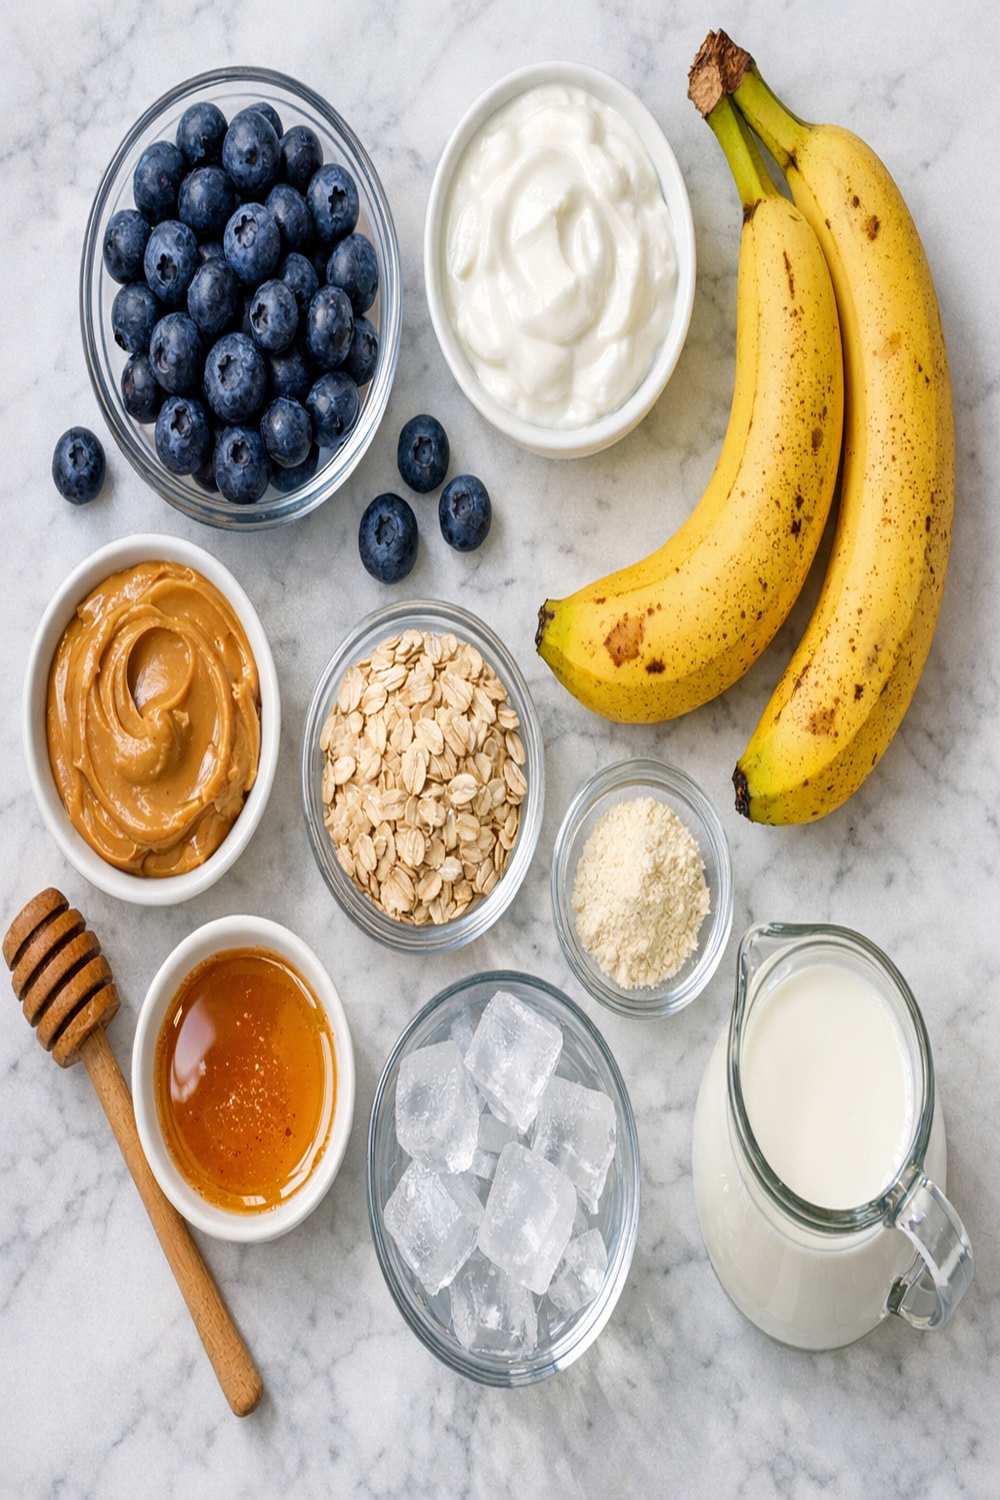
- ½ cup ice cubes, if using fresh fruit (optional but recommended for a thicker, more refreshing texture)
- 1 cup baby spinach, lightly packed (this adds nutrition without changing the taste; it totally disappears into the smoothie, I promise)
- 1 cup blueberries, fresh or frozen (frozen actually work beautifully here and are often less expensive; look for no added sugar on the label)
- 1 to 2 tablespoons nut or seed butter such as peanut, almond, cashew, or sunflower seed butter, optional (this adds creaminess, protein, and healthy fats; also optional, and adds a tiny bit more richness)
- 1 to 2 teaspoons ground flaxseed, chia seed, or hemp seed, optional (these add omega-3 fatty acids and fiber; totally optional, but wonderful if you have them)
- 1 cup unsweetened milk of your choice (dairy milk, almond milk, oat milk, soy milk—whatever you have works; I personally love oat milk for creaminess, but it’s entirely your preference)
- 1 ripe banana, fresh or frozen and sliced (if frozen, slice it before freezing so you can grab pieces easily; ripe means some brown spots on the peel, which means more natural sweetness)
Step-by-Step: Your First Banana Blueberry Smoothie Recipe
Here we go. You’re about to make something delicious, and I’m walking you through every single step like you’ve never blended anything before. Take your time, and trust the process. This is genuinely impossible to mess up.
Step 1: Prep Your Blender and Gather Everything in One Spot
Before you touch anything, place your blender on a flat, stable counter surface. Make sure the pitcher (the container part) is securely attached to the base. You’ll know it’s secure when it twists clockwise and sits snugly. Now, gather all your ingredients in front of you so you’re not hunting around mid-process. Having everything visible and ready is called mise en place in the kitchen, and it’s a professional habit that makes everything smoother.
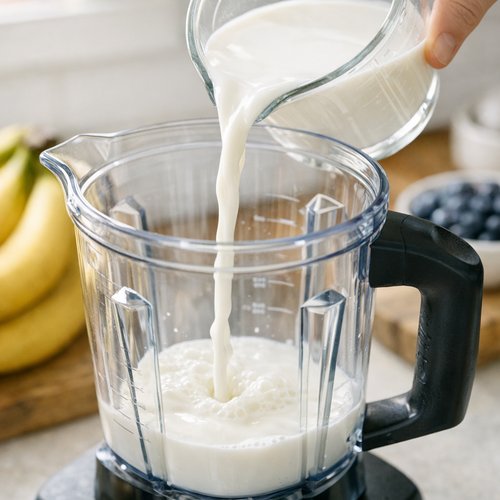
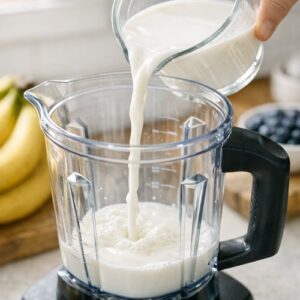
Step 2: Add Your Liquid First
This step matters more than you might think. Pour your 1 cup of milk directly into the blender pitcher first. I always recommend adding liquid before solids because it helps the blades move more freely and prevents them from getting stuck on dry fruit. Don’t add ice yet—just the milk. Make sure the pitcher is sitting on the base and secured properly.
Step 3: Add Your Greens
Now add your 1 cup of baby spinach. It looks like a lot, but trust me—it completely dissolves. You might need to press it down gently into the milk, and that’s perfectly fine. The spinach won’t do anything except add nutrition and a gorgeous color; it won’t taste spinachy at all because the fruit completely covers any flavor.
Step 4: Layer Your Fruit
Add your 1 cup of blueberries next, whether they’re fresh or frozen. If they’re fresh, that’s wonderful. If they’re frozen, even better—they’ll make your smoothie thicker and colder. Then add your sliced banana. If your banana was fresh, I recommend breaking it into three or four chunks so the blender can work with it more easily. If it was frozen, the pieces should already be manageable.
Step 5: Optional Add-Ins for Extra Nutrition
This is where you can add the extras if you have them. Sprinkle in your 1 to 2 teaspoons of ground flaxseed, chia seed, or hemp seed if you’re using them. Add your 1 to 2 tablespoons of nut or seed butter if you want extra creaminess and protein. You can skip both of these entirely and still have a delicious smoothie—they’re just bonuses.
Step 6: Add Ice (Optional but Recommended)
If you’re using fresh fruit and want a thicker, colder result, add ½ cup of ice cubes. If you’re using frozen fruit, you probably don’t need ice—the frozen berries and banana will give you that texture and cold temperature already. More ice means a thicker smoothie; less ice means something more drinkable. Your choice.
Step 7: Secure the Lid and Start Blending
Place the lid securely on your blender pitcher—twist it clockwise until it’s snug. This is important because you don’t want any splashes. Now, this is the moment. Place your hand on top of the lid (gentle pressure, not forceful), and press the Low button or turn the dial to the lowest setting. You’re going to let it run for about 30 seconds.
What you’re listening for is the sound of the blender smoothly whirring. You might hear the fruit being broken down—that’s exactly right. Don’t be alarmed; that’s the sound of success.
Step 8: Increase Speed and Blend Until Smooth
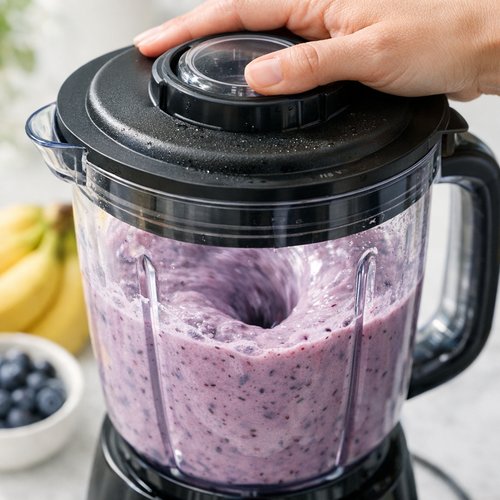
After those first 30 seconds on low, turn the dial up to High or press the High button. Now let it run for another 30 to 60 seconds. This is where the magic happens. You’ll notice the color become more uniform, the texture become creamier, and any visible fruit chunks disappear. Stop blending when you see absolutely no chunks and the mixture looks uniform throughout.
How do you know when you’re done? Peek through the blender pitcher—if you see any small fruit pieces, keep it running for another 10 to 15 seconds. If it looks completely smooth and creamy, you’re finished.
Step 9: Turn Off and Remove the Lid Carefully
Press the Off button or turn the dial to the Off position. Let the blender come to a complete stop—don’t try to remove the lid while it’s still spinning. Wait a few seconds. Now, gently twist the lid counterclockwise and remove it carefully. Be mindful because the contents are cold but the blender might feel slightly warm from friction.
Step 10: Pour and Serve Immediately
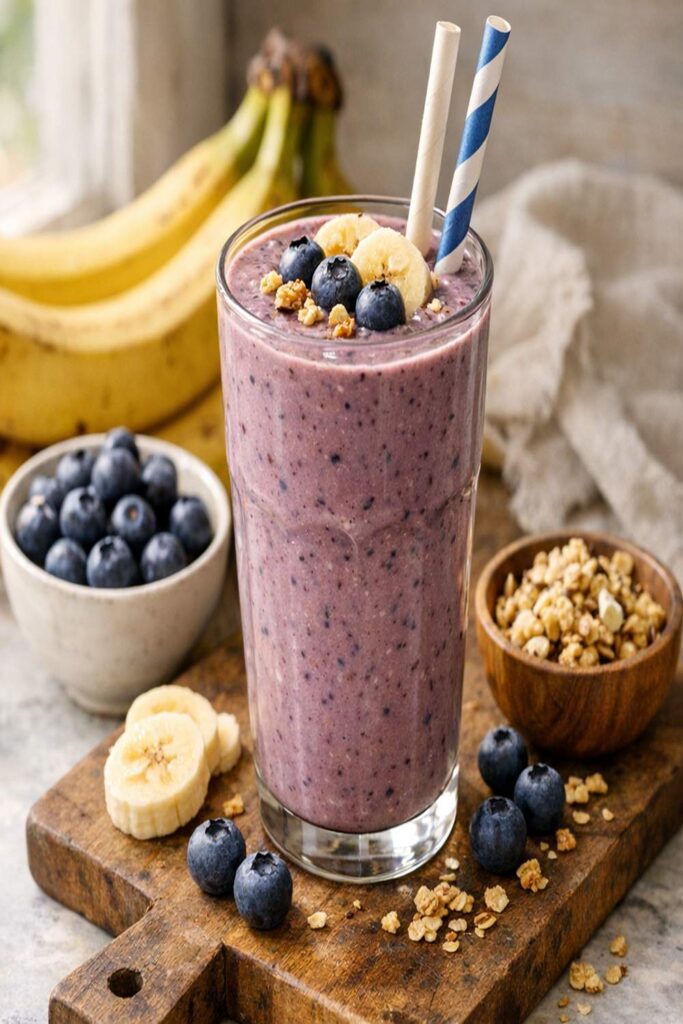
Pour your beautiful smoothie into a tall glass. Serve immediately and drink right away for the best texture and flavor. The smoothie will start to separate and settle after a few minutes, but it’s still delicious. If you want to store it, pour it into a container with a tight lid and refrigerate.
How to Tell If You Did It Right
Success with smoothies isn’t mysterious. Here’s exactly what you’re looking for at each stage to know you nailed it:
- The color should be a beautiful deep purple or violet – This tells you that your blueberries and banana have combined completely. If it looks streaky or has lighter and darker areas, blend for another 10 seconds.
- The texture should be completely smooth, with absolutely no visible fruit chunks – When you look at your finished smoothie, it should look uniform and creamy, like a thick shake. You should be able to drink it through a regular straw without any resistance.
- The consistency should be pourable but thick – It shouldn’t be watery like juice, but it also shouldn’t be so thick that you need a spoon. Think of the consistency of a milkshake or creamy yogurt drink.
- The taste should be naturally sweet with a subtle fruit flavor – You shouldn’t taste the spinach at all (unless you’re really looking for it). The blueberries and banana should be the stars, with a mild sweetness that feels fresh and energizing.
What Went Wrong? Beginner Fixes
I’ve made thousands of smoothies, and I’ve also made plenty that didn’t turn out exactly how I wanted. Here are the most common issues beginners encounter, exactly why they happen, and how to fix them:
- My smoothie is too thick and hard to drink – This happens when you use too much fruit or ice relative to liquid. Solution: Add ¼ cup more milk, stir it in with a spoon (you can’t blend it once it’s poured), or next time, use less ice or slightly thawed frozen fruit. This isn’t a failure; it’s actually delicious eaten with a spoon like soft-serve ice cream.
- My smoothie is too thin and watery – This means you used too much liquid or not enough frozen fruit. Solution: Add a handful of frozen blueberries or banana slices and blend again for 20 seconds. Next time, use a bit less milk or add ice cubes.
- I can see chunks of fruit floating around – Your blender didn’t run long enough or your fruit pieces were too large. Solution: Blend for another 30 seconds on high. Next time, cut your banana into smaller pieces before adding it.
- My spinach is still visible as green specks – Blend longer. Sometimes spinach takes a few extra seconds to completely incorporate. Run it for another 20 seconds on high.
Your Next Steps After Mastering This
Congratulations—you’ve just learned one of the most foundational blending skills in the kitchen, and this knowledge transfers everywhere. You now understand how to work with a blender, how to layer ingredients, and how to read texture cues. These skills are going to open doors for you.
Once you’ve made this smoothie a few times and feel confident, you’re ready to try other recipes. You could explore our this simple cake if you’re feeding little ones, or if you want to stay in the smoothie world, you could experiment with different flavor combinations. You could try adding yogurt for tanginess, different berries, or even nut butters. The technique you’ve just learned—layering liquid first, then solids, then blending at low then high speeds—will work for any smoothie you ever want to make.
Expert’s Nutritional Tip: Why This Smoothie Is Perfect for Your Body
As a registered dietitian, I want you to understand what you’re actually drinking when you have this smoothie. The banana provides potassium and natural carbohydrates that fuel your brain and muscles. The blueberries contain anthocyanins, which are powerful antioxidants that support heart and brain health. The spinach adds folate, iron, and magnesium without adding any taste—it’s like getting a multivitamin inside your breakfast. The milk provides calcium and protein for bone health and satiety, meaning you’ll stay fuller longer.
If you add the nut butter, you’re adding healthy monounsaturated fats that help your body absorb the fat-soluble vitamins in the spinach. If you add the seeds, you’re adding omega-3 fatty acids and fiber. This isn’t just a treat—this is legitimate nutrition science in a glass, and it tastes like dessert.
Can I Store Banana Blueberry Smoothie Recipe?
Yes, and this is where the make-ahead magic happens. I often make smoothies ahead of time for my family’s busy mornings, and here’s exactly how to do it right:
In the Refrigerator: Pour your finished smoothie into an airtight container (a mason jar works beautifully) and refrigerate immediately. It will keep for up to 4 hours. Before serving, give it a good shake or stir because the ingredients naturally separate. You might notice the spinach settling to the bottom and the liquid rising to the top—completely normal and still delicious.
In the Freezer (Make-Ahead Prep): Here’s my professional trick: prepare smoothie ingredient packs ahead of time. Put your measured blueberries, banana slices, spinach, and any optional seeds or nut butter into individual freezer bags or containers. Label them with the date. When you’re ready to make the smoothie, dump the contents of one pack into your blender, add your milk, and blend. These packs keep for up to 3 months in the freezer, which means you always have a healthy breakfast ready to go. This is what I do for my family during the busy holiday season when mornings get chaotic.
Pro Tip: If you’re freezing banana slices, slice them first, spread them on a baking sheet to freeze individually (about 2 hours), then transfer to a freezer bag. This prevents them from clumping together into one big frozen block.
Make-Ahead Guide for Busy Gatherings
When I’m hosting gatherings or managing busy family seasons, I often prepare smoothies ahead for guests. Here’s my exact system:
The Day Before: Prepare 4 to 6 individual smoothie ingredient packs as described above. Store them in the freezer in labeled bags or small containers.
The Morning Of: About 30 minutes before guests arrive, blend each smoothie individually (takes 5 minutes each) and pour into glasses. Keep them in the refrigerator. They’ll stay fresh and beautifully separated for up to 4 hours. When you’re ready to serve, give each glass a quick stir.
Alternative For Groups: Make one large batch by multiplying the recipe by the number of servings you need. Blend in batches if your blender isn’t huge. Serve immediately or store in a large pitcher in the refrigerator for up to 4 hours, stirring before each pour.
Seasonal Variations
One of my favorite things about this recipe is how easily it adapts to what’s fresh and available. As a Colorado resident who celebrates seasonal eating, I love these variations:
Spring and Summer: Replace the frozen blueberries with fresh strawberries, raspberries, or blackberries. Add a handful of fresh mint for brightness. Use fresh spinach and fresh fruit for the best flavor.
Fall: Keep the blueberries but add a quarter teaspoon of ground cinnamon and a tiny pinch of nutmeg. Use frozen banana and blueberries for a more frozen-smoothie-bowl consistency. The spices warm things up emotionally.
Winter: This is when I love the frozen fruit flexibility most. Use whatever frozen berries you have. Add a small piece of ginger (about a half-inch) for warmth and digestive support. A splash of vanilla extract adds comfort.
Year-Round Adaptability: The beauty of smoothie-making is that you can use whatever fruit you have. Don’t have blueberries? Use blackberries, raspberries, or even mango. The technique stays exactly the same; you’re just swapping ingredients.
Nutrition Information
Based on USDA nutritional data, a single serving of this smoothie (made with whole milk and without optional add-ins) contains approximately:
- Calories: 180-210 (depending on your exact banana size)
- Protein: 8-9 grams (from the milk)
- Carbohydrates: 35-38 grams (from the fruit)
- Healthy Fat: 1-2 grams (from the fruit)
- Fiber: 3-4 grams (from the fruit and spinach)
- Potassium: 450-500mg (from the banana)
- Calcium: 300mg (from the milk)
If you add 2 tablespoons of almond butter, add approximately 95 calories, 3.5 grams of protein, and 8 grams of healthy fat. If you add 1 teaspoon of flaxseed, add about 15 calories and 1 gram of fiber.
What Can I Serve With Banana Blueberry Smoothie Recipe?
Smoothies are beautiful standalone, but they’re also wonderful as part of a larger gathering. Here’s how I like to serve them:
- With whole grain toast and almond butter – The smoothie provides fruit, greens, and protein; the toast adds fiber and satisfying carbs. Together, it’s a complete, balanced breakfast.
- With a simple green salad – If you’re serving smoothies at a gathering, a light salad alongside keeps things fresh and balanced.
- With Greek yogurt parfait components – Serve the smoothie alongside granola and yogurt so guests can build their own parfait or enjoy the smoothie on its own.
- With fresh pastries or Banana Pancakes – For a brunch gathering, smoothies are the perfect fresh, light complement to heartier dishes.
- As a palate cleanser between courses – A small smoothie after a rich main course (like before dessert) refreshes the palate beautifully. It’s lighter than heavy desserts but still feels like a treat.
Banana Blueberry Smoothie Recipe
Ingredients
Method
- Before you touch anything, place your blender on a flat, stable counter surface. Make sure the pitcher (the container part) is securely attached to the base. You'll know it's secure when it twists clockwise and sits snugly. Now, gather all your ingredients in front of you so you're not hunting around mid-process. Having everything visible and ready is called mise en place in the kitchen, and it's a professional habit that makes everything smoother.

- This step matters more than you might think. Pour your 1 cup of milk directly into the blender pitcher first. I always recommend adding liquid before solids because it helps the blades move more freely and prevents them from getting stuck on dry fruit. Don't add ice yet—just the milk. Make sure the pitcher is sitting on the base and secured properly.
- Now add your 1 cup of baby spinach. It looks like a lot, but trust me—it completely dissolves. You might need to press it down gently into the milk, and that's perfectly fine. The spinach won't do anything except add nutrition and a gorgeous color; it won't taste spinachy at all because the fruit completely covers any flavor.
- Add your 1 cup of blueberries next, whether they're fresh or frozen. If they're fresh, that's wonderful. If they're frozen, even better—they'll make your smoothie thicker and colder. Then add your sliced banana. If your banana was fresh, I recommend breaking it into three or four chunks so the blender can work with it more easily. If it was frozen, the pieces should already be manageable.
- This is where you can add the extras if you have them. Sprinkle in your 1 to 2 teaspoons of ground flaxseed, chia seed, or hemp seed if you're using them. Add your 1 to 2 tablespoons of nut or seed butter if you want extra creaminess and protein. You can skip both of these entirely and still have a delicious smoothie—they're just bonuses.
- If you're using fresh fruit and want a thicker, colder result, add ½ cup of ice cubes. If you're using frozen fruit, you probably don't need ice—the frozen berries and banana will give you that texture and cold temperature already. More ice means a thicker smoothie; less ice means something more drinkable. Your choice.
- Place the lid securely on your blender pitcher—twist it clockwise until it's snug. This is important because you don't want any splashes. Now, this is the moment. Place your hand on top of the lid (gentle pressure, not forceful), and press the Low button or turn the dial to the lowest setting. You're going to let it run for about 30 seconds. What you're listening for is the sound of the blender smoothly whirring. You might hear the fruit being broken down—that's exactly right. Don't be alarmed; that's the sound of success.
- After those first 30 seconds on low, turn the dial up to High or press the High button. Now let it run for another 30 to 60 seconds. This is where the magic happens. You'll notice the color become more uniform, the texture become creamier, and any visible fruit chunks disappear. Stop blending when you see absolutely no chunks and the mixture looks uniform throughout. How do you know when you're done? Peek through the blender pitcher—if you see any small fruit pieces, keep it running for another 10 to 15 seconds. If it looks completely smooth and creamy, you're finished.

- Press the Off button or turn the dial to the Off position. Let the blender come to a complete stop—don't try to remove the lid while it's still spinning. Wait a few seconds. Now, gently twist the lid counterclockwise and remove it carefully. Be mindful because the contents are cold but the blender might feel slightly warm from friction.
- Pour your beautiful smoothie into a tall glass. Serve immediately and drink right away for the best texture and flavor. The smoothie will start to separate and settle after a few minutes, but it's still delicious. If you want to store it, pour it into a container with a tight lid and refrigerate.
Notes
FAQs
Can I make this smoothie without a blender?
Technically yes, though it’s not ideal. You could mash the banana and blueberries together in a bowl using a fork, then stir vigorously with the milk and spinach. However, you’ll end up with a chunky mixture rather than a smooth smoothie. If you’re in a situation without a blender, an immersion blender works beautifully—put everything in a tall bowl or measuring cup and use the immersion blender for 60 to 90 seconds until smooth. This is actually how I make smoothies when I’m traveling in a small space.
What if my blender is really weak or old?
Start with the low speed for a full minute instead of 30 seconds, then high for 60 to 90 seconds instead of 30 to 60. Older blenders just need more time. Also, make sure to cut your banana into very small pieces and consider using frozen berries, which are softer than fresh ones. If your blender truly struggles, it might be time for an upgrade, but many older models still work beautifully.
Can I use canned or frozen blueberries instead of fresh?
Absolutely. Frozen blueberries are actually fantastic for smoothies because they’re picked at peak ripeness and frozen immediately, locking in nutrients. They also make the smoothie thicker and colder without needing extra ice. Canned blueberries work too, though I’d drain them first and avoid ones packed in heavy syrup. Look for “blueberries in juice” instead of “blueberries in syrup.” Fresh blueberries are wonderful, but frozen might actually be better for smoothies.
My spinach wilted or looks brown—can I still use it?
If it’s just wilted but not slimy or smelly, yes, absolutely use it. Wilted spinach is actually easier to blend than crisp spinach because it’s already soft. Just check that there’s no smell—fresh spinach should smell mild and slightly earthy. Brown or slimy spinach should be discarded. If you’re unsure, it’s better to grab fresh spinach from the fridge.
The smoothie separated after I stored it—is it still okay to drink?
Completely normal and totally fine. Separation happens because the liquid naturally settles away from the solids. Just give it a shake in the container or a good stir with a spoon, and you’re back to a smooth mixture. Shake it before serving every time you store smoothies in the refrigerator. The flavor and nutrition haven’t changed at all—it just looks different for a few hours.
Can I add protein powder or Greek yogurt to make it more filling?
Absolutely. Add up to ½ cup plain Greek yogurt for extra protein and a tangier flavor, or follow your protein powder’s directions (usually one scoop). Both will make the smoothie thicker and more filling, keeping you satisfied longer. I often add Greek yogurt when I’m making smoothies for my family, especially before busy days. Add yogurt or protein powder before blending with your other ingredients.
More Beginner-Friendly Recipes
- Banana Pie Recipe With Pudding – A no-bake dessert that teaches you layering and texture combinations
- Barbecue Potatoes Recipe – A side dish that’s perfect for gatherings and teaches you about caramelization
- this no-bake Italian dessert – An elegant dessert that’s simpler than you’d expect
You did it. You just learned to make a delicious, nutritious smoothie that your whole family will love. This isn’t just a recipe; it’s the beginning of confidence in your kitchen. Every time you make this smoothie, you’re building skills that transfer everywhere. You’re learning to read texture cues, to layer flavors, to adapt recipes to what you have on hand. These are the skills that professional cooks use every single day.
I’m so proud of you for trying something new, and I absolutely cannot wait to share more delicious and festive recipes with you! Happy Cooking!