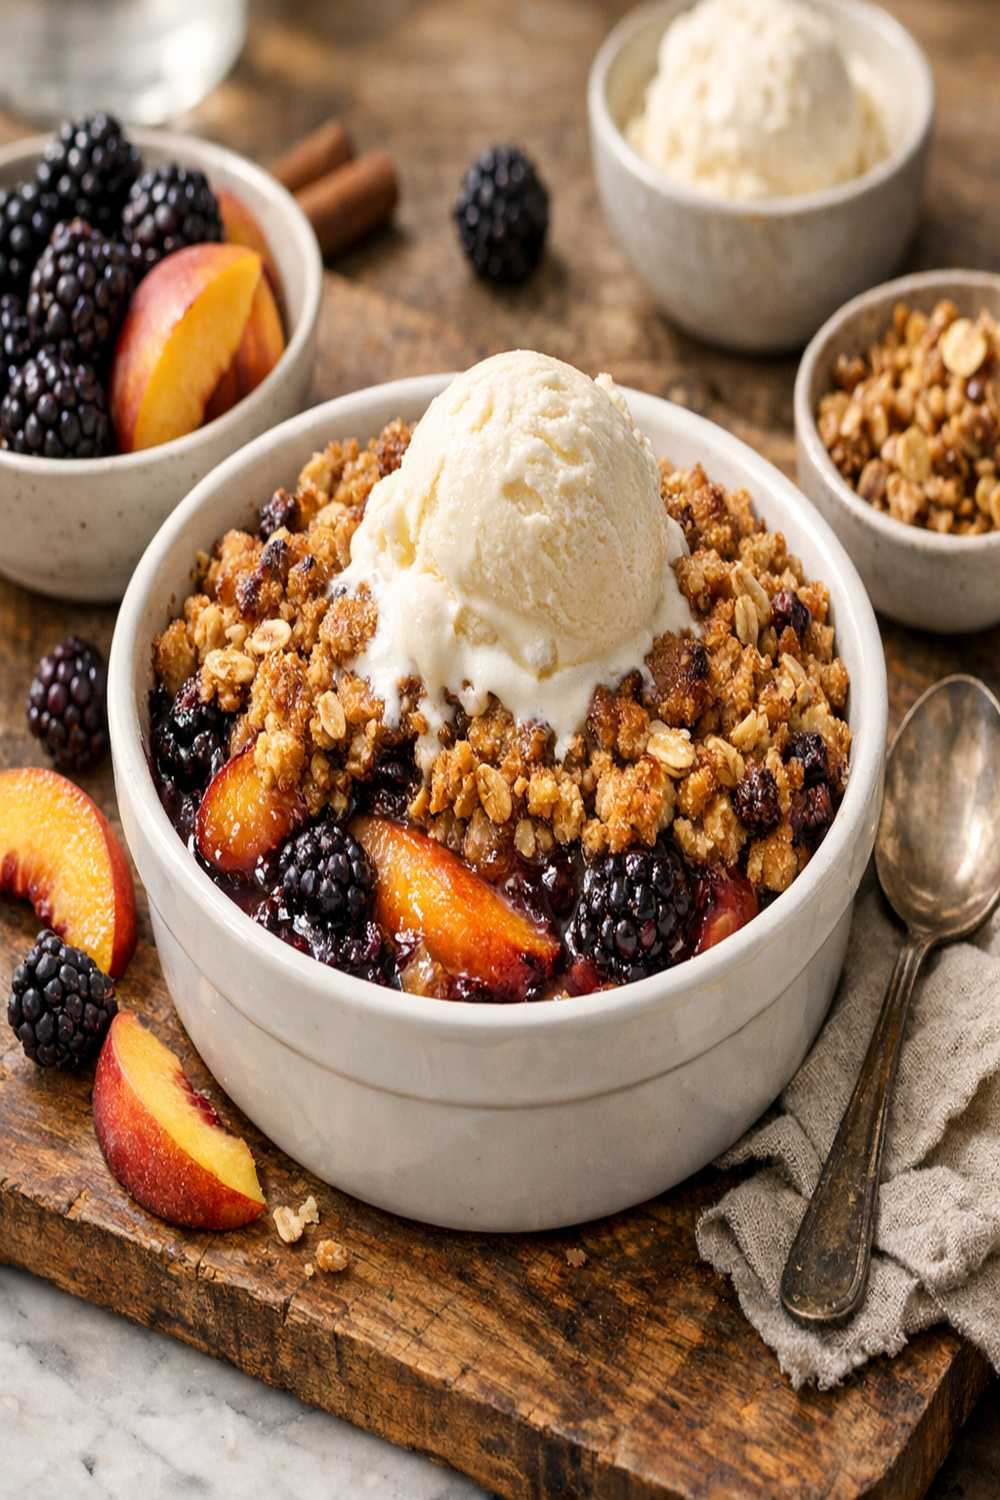
Blackberry Peach Crisp Recipe

This post contains affiliate links. As an Amazon Associate I earn from qualifying purchases.
Learning to make blackberry peach crisp isn’t just about creating one beautiful dessert—it’s about mastering a fundamental technique that transforms simple fruit into something truly memorable. When I discovered the magic of layering fresh fruit with a buttery oat topping during my early years as a dietitian, I realized this single skill would unlock dozens of other recipes and elevate every festive gathering I hosted.
The technique behind a perfect fruit crisp has taught me more about intuitive cooking than almost anything else in my kitchen. It’s forgiving enough for beginners yet offers endless opportunities for refinement, and it’s the foundation for creating inclusive, budget-friendly desserts that impress everyone at your table. Whether you’re hosting a summer celebration or a cozy autumn gathering, mastering this approach means you’ll never stress about ending a meal without something special.
Master the Technique Behind Blackberry Peach Crisp Recipe (And Never Struggle in the Kitchen Again)
I’ll never forget the moment this technique truly clicked for me. It was mid-July, and my sister was visiting with her family. I had fresh Colorado peaches from the farmer’s market and blackberries at their peak ripeness, but I was stressed about creating something healthy and satisfying that would work for everyone—including my nephew with dietary restrictions.
As I stood in my kitchen that afternoon, tossing the fruit with just enough cornstarch to thicken the natural juices, I realized something profound: this wasn’t complicated. The fruit would release its own moisture, thicken naturally with minimal intervention, and the buttery oat topping would create textural contrast that made people slow down and actually taste what they were eating. When we pulled it from the oven and the kitchen filled with that warm, fragrant aroma, my whole family gathered without being called. No one was scrolling through phones or talking about work stress—they were completely present, waiting for the ice cream to melt into warm fruit and crispy oats.
That’s when I understood: mastering fruit crisps isn’t about impressing people with complicated techniques. It’s about creating moments of genuine connection through accessible, nourishing food.
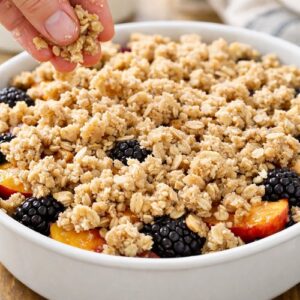
[FEATURED IMAGE PLACEHOLDER]The Core Technique Explained
The fundamental cooking technique at the heart of every exceptional fruit crisp is controlled fruit thickening through starch suspension and moisture management. Unlike pies that rely on flour-based roux or custard, crisps use minimal starch combined with the natural pectin already present in fruit to create a cohesive filling that isn’t gummy or runny.
Here’s the science: when fruit heats, its cell walls break down and release moisture. That liquid contains natural sugars and pectin. Cornstarch molecules absorb this liquid and swell, creating a gel-like consistency that’s thick enough to hold together yet still lets you taste individual fruit pieces. The acid from citrus (I use orange juice and zest) activates the pectin further while brightening the overall flavor profile. This happens in the oven without any stovetop cooking, which means the fruit maintains its fresh character and nutritional integrity.
The topping technique is equally important. By pulsing frozen butter into oats and flour, you’re creating tiny pockets of fat distributed throughout. As the crisp bakes, these butter pockets melt, creating steam that makes the topping light and crispy rather than dense or cookie-like. This is different from a cake because we want textural contrast—the firm, buttery crunch against soft, juicy fruit.
What This Technique Unlocks
Once you master the art of fruit thickening and buttery topping construction, you’ll be amazed at how many desserts suddenly become accessible. This single technique is the foundation for:
- Stone fruit galettes and tarts – uses the same starch-based fruit thickening to prevent soggy pastry bottoms
- Berry compotes and jams – demonstrates how to control pectin activation for different consistency levels
- Fruit cobblers with drop biscuits – teaches you how much thickening you need when covering fruit with different topping styles
- Layered fruit parfaits and trifles – shows how to prepare thickened fruit that holds its shape when layered with other components
- Fruit hand pies and turnovers – applies the same moisture-control principles to prevent filling from bursting through pastry
- Smoothie bowls and breakfast parfaits – demonstrates how to balance fruit and thickeners for different textures
- Fruit-forward sheet pan desserts – teaches scaling and timing principles you can apply to any fruit-based bake
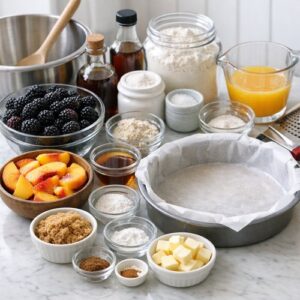
The Ingredients – Chosen to Teach the Technique
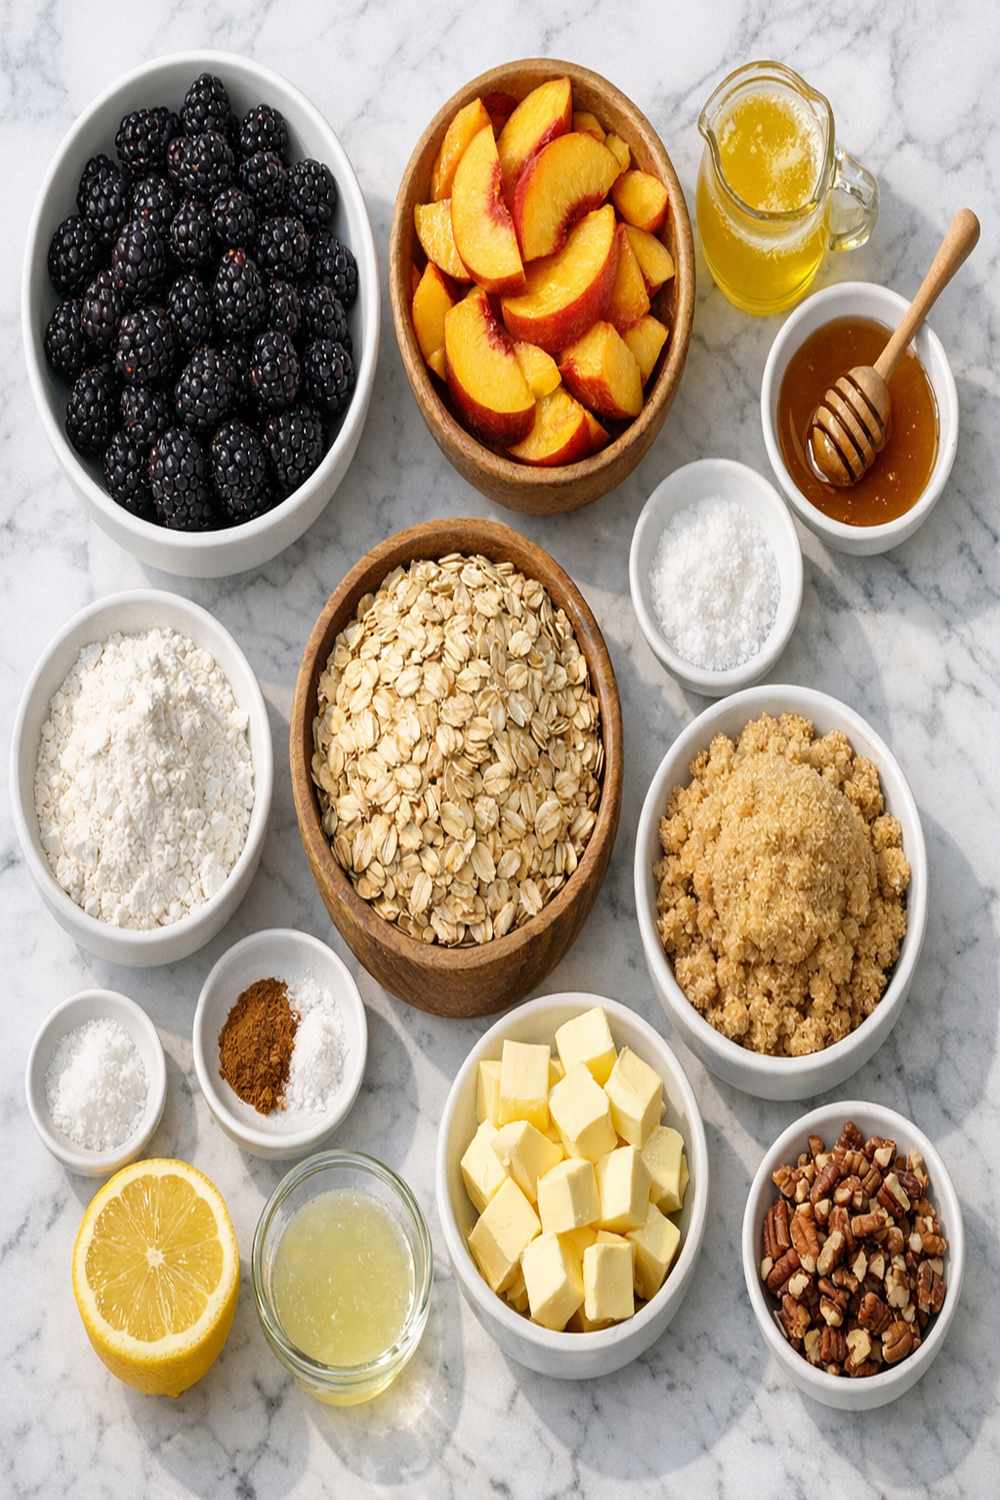
I’ve selected each ingredient specifically to teach you how fruit crisps work. Nothing here is arbitrary—every element demonstrates a principle you’ll use again and again in your kitchen.
For the Fruit Filling
- ¼ teaspoon fine sea salt (amplifies fruit flavor and balances sweetness)
- 2 cups blackberries, fresh or frozen (smaller berries that break down slightly and release pectin quickly)
- 2 tablespoons cornstarch (the primary thickening agent that prevents runny filling)
- 6 cups peaches, peeled and sliced into ½-inch thick pieces (fresh stone fruit with natural pectin content)
- 1 teaspoon finely grated orange zest (acid and brightness to enhance natural fruit flavor)
- 2 tablespoons fresh orange juice (additional acid to activate pectin and prevent cloying sweetness)
- ¾ cup coconut sugar or muscovado sugar (deeper molasses notes than regular brown sugar)
For the Buttery Oat Topping
- ½ teaspoon vanilla extract (optional but adds warming depth)
- 1 cup all-purpose flour, spooned and leveled (structure without overdevelopment of gluten)
- 1 cup old-fashioned rolled oats, divided in two portions (provides nutty flavor and distinct texture)
- 1¼ cups unsalted butter, frozen and cut into ½-inch cubes (creates steam pockets for crispy texture)
- 1 cup light brown sugar (granulated texture incorporates air when pulsed with fat)
Expert’s Nutritional Tip: I choose old-fashioned rolled oats specifically because they contain beta-glucans, a type of soluble fiber that supports heart health and steady blood sugar. Quick oats have been processed too much and won’t give you the same nutritional benefit or textural crunch. The peach and blackberry combination gives you over 8 grams of fiber per serving plus natural polyphenols from the berries that act as antioxidants. This isn’t just delicious—it’s genuinely good for your body.
The Masterclass: How to Make Blackberry Peach Crisp Recipe
This isn’t just a recipe—it’s a teaching moment. Pay attention to the sensory cues at each step, and you’ll develop the intuition that separates confident cooks from those who follow instructions anxiously.
Step 1: Prepare Your Equipment and Mise en Place
Before you do anything else, gather every ingredient and position everything you’ll need within arm’s reach. Preheat your oven to 375°F. Line a 9-by-13-inch baking dish with parchment paper, or simply grease it well with butter—I prefer parchment because it makes cleanup infinitely easier and means you can lift the finished crisp out cleanly.
Cut your frozen butter into small cubes and place it directly in the freezer while you prepare the fruit. This matters more than you might think. Cold butter creates steam pockets; warm butter creates a dense, greasy topping. If your kitchen is particularly warm, keep the butter cubes in the freezer until the exact moment you need them.

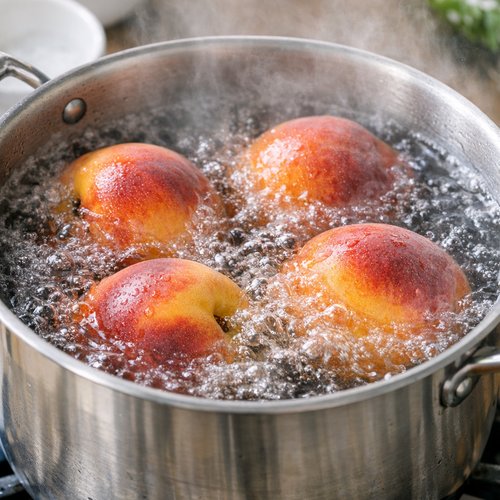
Step 2: Prepare the Fruit with Intention
Fresh peaches are wonderful, but they need respect. To peel them, bring a large pot of water to boil, then carefully lower your peaches into the boiling water for exactly 30 seconds. Remove them with a slotted spoon and immediately submerge them in ice water. The skin should slip off easily. Slice each peach into ½-inch thick pieces—this thickness is specific because it allows the fruit to soften completely during baking while maintaining distinct pieces rather than becoming applesauce.
Place the sliced peaches and blackberries in a large mixing bowl. If your blackberries are frozen, that’s perfectly fine—don’t thaw them first. The frozen berries will help keep the filling cool and prevent over-thickening before it reaches the oven.
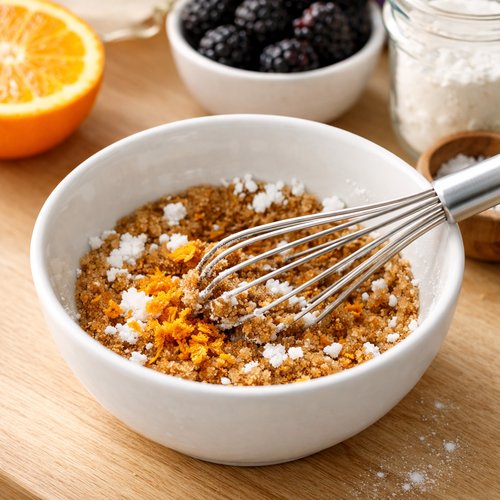
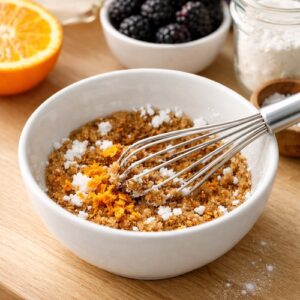
Step 3: Create the Thickening Mixture
In a small bowl, whisk together your cornstarch, coconut sugar, orange zest, and salt. This is where many people make a critical mistake—they try to mix cornstarch directly into the wet fruit and create lumps. Instead, combine the cornstarch with the sugar first. The sugar granules separate the cornstarch particles, preventing them from clumping when liquid is introduced.
Add the orange juice to this mixture and stir until you have a smooth slurry with no visible cornstarch lumps. This slurry will distribute evenly through the fruit.
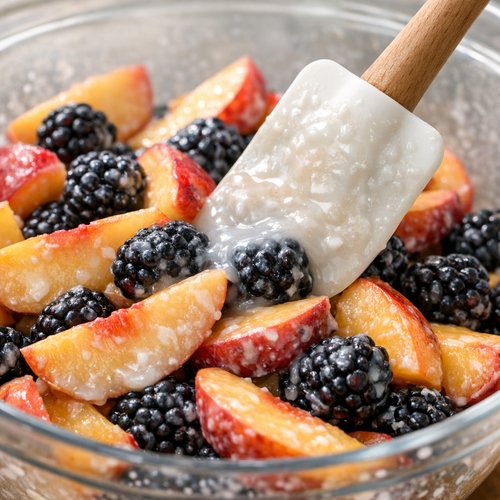
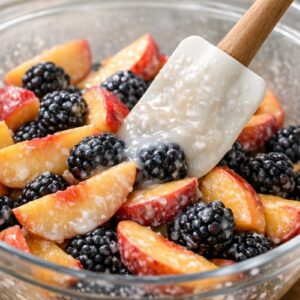
Step 4: Toss the Fruit Properly
Pour the cornstarch mixture over your fruit and fold gently with a rubber spatula. Don’t stir vigorously—aggressive stirring breaks down the fruit and creates mush. Instead, use a folding motion: push your spatula to the bottom of the bowl, fold the bottom over the top, rotate the bowl slightly, and repeat until the cornstarch mixture is evenly distributed. You should see flecks of orange zest throughout and every piece of fruit should be lightly coated.
Transfer this mixture to your prepared baking dish, spreading it in an even layer. If you have time, let this sit for 15-20 minutes while you prepare the topping. This resting period allows the fruit to begin releasing its moisture naturally, which means less liquid will seep from the sides of the baking dish during baking.
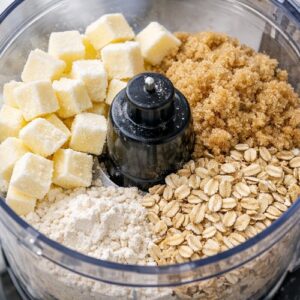
Step 5: Build Your Buttery Oat Topping
This step requires a food processor and your full attention. Add the frozen butter cubes, brown sugar, ¾ cup of the oats, and flour to your food processor. Pulse—don’t run continuously—until the mixture resembles coarse sand with some pea-sized pieces of butter still visible. This should take about 8-12 pulses. This texture is crucial. If you process too long, the butter warms up and the topping becomes dense instead of crispy.
Transfer this mixture to a bowl and add the remaining ¼ cup of oats. Use your hands to gently toss until the raw oats are distributed throughout. You want some portions that are more flour-based and crispy and some portions that are more oat-forward and chewy. This variation in texture is what makes a really exceptional crisp.

Step 6: Apply the Topping and Bake
Scatter the oat topping over your fruit filling, breaking up any large clumps as you go. Don’t press it down—you want it to be loose and airy so steam can circulate underneath. The fruit will expand as it bakes and gently push against the topping, creating its own leverage.
Place the baking dish in your preheated 375°F oven and bake for 50-60 minutes, until the topping is deep golden brown and you can see fruit juice just beginning to bubble around the edges of the pan. A few dark bits on top are perfect—this indicates proper caramelization. If your topping seems to be browning too quickly after 30 minutes, lower the oven temperature to 350°F for the remaining time.
When the crisp comes out of the oven, let it rest for at least 10 minutes before serving. This resting period allows the filling to set slightly so it won’t run all over your plate. Even better, let it cool for 30 minutes—it will be warm and wonderful, and the flavors will have time to integrate.

Step 7: Serve with Intention
Scoop the crisp into bowls while it’s still warm and top with a generous scoop of vanilla ice cream. That cold ice cream melting into warm, spiced fruit and crispy oats is not just delicious—it’s the moment people relax and actually enjoy your gathering.
How to Know You’ve Mastered the Technique
Professional bakers and experienced home cooks recognize mastery through specific sensory signals. Once you understand what these signals are, you’ll never need to nervously check a recipe again—you’ll be cooking intuitively.
- The topping is deep golden brown, almost mahogany in places – this indicates proper caramelization of the sugar and butter, which creates complex flavor and satisfying crunch. Pale golden means it’s underbaked; dark brown with burnt edges means your oven runs hot and you should reduce heat earlier next time.
- You see fruit juice bubbling gently around the edges – this shows the filling has thickened enough that the liquid isn’t running everywhere, yet it’s still actively cooking. No bubbles means it needs more time; vigorous bubbling with dark liquid pooling means it’s overdone.
- The topping springs back slightly when you gently press it – this means steam has created proper texture. If it feels dense and hard, you processed it too long or packed it down too much.
- The aroma fills your entire home with warmth and complexity – when you smell butterscotch, caramelized fruit, and toasted oats blending together, you know the chemical reactions have done their work perfectly.
Common Technique Mistakes and How to Fix Them
- Runny filling that seeps all over the plate – you didn’t use enough cornstarch or didn’t let it cook long enough. Next time, add 1 additional tablespoon of cornstarch and ensure the crisp bakes the full 60 minutes with visible bubbling around the edges. If using frozen berries, increase cornstarch by another ½ tablespoon since they release more liquid.
- Dense, heavy, cake-like topping – you either over-processed the butter mixture (butter warmed up) or pressed the topping down too firmly. Keep your butter frozen, pulse instead of process, and scatter the topping loosely so it’s airy and light.
- Topping burned while fruit underneath is still hard – your oven is too hot. Lower to 350°F after 25-30 minutes, or use an oven thermometer to verify your oven’s actual temperature. Many home ovens run 25 degrees hot.
- Fruit tastes one-dimensional and overly sweet – you forgot the salt or citrus, both of which are essential for flavor balance. Salt doesn’t make food taste salty—it enhances sweetness and makes flavors pop. Orange juice and zest add brightness that prevents cloying sweetness.
Practice Variations to Build Your Skill
Once you’ve made this recipe successfully, challenge yourself with these progressively more complex variations. Each one teaches you something new about the technique.
Beginner Variation: Summer Berry Crisp with All Blackberries – Replace half the peaches with additional blackberries (use 4 cups peaches, 4 cups blackberries). Berries release more liquid than stone fruit, so increase cornstarch to 2.5 tablespoons. This teaches you how to adjust thickening for different fruit water content. It’s simpler because you skip the peeling step, but it teaches the critical lesson of ingredient variation.
Intermediate Variation: Stone Fruit Trio with Almonds – Make the crisp with 2 cups peaches, 2 cups nectarines, and 2 cups plums. Add ½ cup sliced almonds to your oat topping along with a pinch of almond extract. This variation teaches you how different stone fruits have slightly different moisture and pectin levels, requiring you to observe the filling and adjust baking time accordingly. The topping variation teaches texture layering.
Advanced Variation: Spiced Blackberry Peach with Whole Grains – Add ½ teaspoon ground cardamom, ¼ teaspoon ground cinnamon, and a pinch of ground black pepper to the fruit mixture. Replace half your all-purpose flour in the topping with whole wheat flour or spelt flour. Reduce the white sugar in the topping to ¾ cup and add ¼ cup maple syrup. This variation teaches flavor complexity, whole grain incorporation (which requires slightly different hydration balance), and how sweeteners affect texture and browning.
Can I Store Blackberry Peach Crisp Recipe?
Yes, and I actually think this recipe improves over time. The filling continues thickening as it cools, and the flavors deepen beautifully.
Room temperature storage: Cover your crisp loosely with foil and leave it on the counter for up to 8 hours. It’s wonderful at room temperature with ice cream, but the topping will begin to soften after this time.
Refrigerator storage: Cover with foil or transfer to an airtight container. Your crisp will keep for 4-5 days in the refrigerator. Reheat gently in a 300°F oven for 10-15 minutes before serving to restore crispness to the topping.
Freezer storage: I recommend freezing the unbaked crisp. Prepare the entire recipe through Step 6 (topping applied, not baked), cover tightly with plastic wrap and foil, and freeze for up to 3 months. When you’re ready to bake, add 10-15 minutes to the baking time—no need to thaw first. You can also freeze leftover baked crisp for up to 2 months in an airtight container, though the topping texture will be softer when reheated.
Make-Ahead Guide for Gatherings: This is one of my favorite parts about this recipe as a gathering expert. You can prepare the fruit filling up to 24 hours ahead—combine the fruit with the cornstarch mixture, cover, and refrigerate. Prepare the topping separately up to 8 hours ahead and store in an airtight container at room temperature. About an hour before your guests arrive, assemble the crisp and bake it. This way, your home smells amazing as people arrive, and you have a fresh, warm dessert ready to serve. For larger gatherings, you can bake two crisps: one to serve immediately and one that’s been cooling so you have options for those who arrive late.
Nutrition Information
Based on USDA nutrient database analysis, one serving of blackberry peach crisp (approximately ¾ cup of the finished crisp with ice cream) contains:
- Calories: 285
- Total Fat: 14g (of which 8g are saturated)
- Protein: 3g
- Carbohydrates: 38g (of which 8g are fiber and 24g are sugars)
- Sodium: 95mg
- Vitamin C: 18% of daily value (from both the fruit and orange zest)
- Fiber: 8g (impressive for a dessert—this comes from both the fruit and the rolled oats)
The berries and stone fruit provide natural antioxidants called anthocyanins and carotenoids. The rolled oats contribute beta-glucans that support cholesterol management. While this is still dessert—enjoy it as such—it’s genuinely more nourishing than many alternatives.
Healthier Ingredient Swaps I Recommend: If you want to reduce sugar, replace 3 tablespoons of the brown sugar with honey or maple syrup—your cornstarch will still thicken the filling, and you’ll reduce total refined sugar. For a lower-fat topping, swap 4 tablespoons of the butter for coconut oil or additional oats, though you’ll lose some richness. Instead of vanilla ice cream, serve with Greek yogurt whipped with honey and vanilla, which adds protein and reduces added sugar significantly.
What to Serve With Blackberry Peach Crisp Recipe?
As a gathering expert, I know that how you serve a dessert matters as much as the dessert itself. Here’s what creates the perfect ending to any meal:
- Vanilla ice cream or whipped cream – the contrast of cold against warm fruit and hot spices is what makes this work. If serving for a gathering, set out a selection: traditional vanilla, Greek yogurt sweetened with honey, or even a homemade whipped coconut cream for those avoiding dairy.
- Aged bourbon or dessert wine – a small pour of bourbon with vanilla notes, or a late-harvest Riesling, echoes the warm spice notes and pairs beautifully. This is what I serve at adult gatherings.
- Toasted nuts on the side – crushed pecans or sliced almonds scattered over the top add richness and something to chew. They also make the dessert feel more intentional and special.
- Fresh mint leaves for garnish – a few tender mint leaves add color and brightness that cuts through the richness. This is a professional touch that takes 10 seconds and elevates everything.
- A simple green salad to finish the meal – if you’re serving this after a rich main course, precede it with a light salad with acidic vinaigrette to cleanse the palate. Consider pairing with lighter patriotic desserts for summer gatherings.
I also love serving this alongside other fruit-forward desserts to create a small display. Pair it with something like a delicate apple galette for autumn gatherings, or offer it as one of several options so guests can choose based on their preferences.
Blackberry Peach Crisp Recipe
Ingredients
Method
- Before you do anything else, gather every ingredient and position everything you'll need within arm's reach. Preheat your oven to 375°F. Line a 9-by-13-inch baking dish with parchment paper, or simply grease it well with butter—I prefer parchment because it makes cleanup infinitely easier and means you can lift the finished crisp out cleanly. Cut your frozen butter into small cubes and place it directly in the freezer while you prepare the fruit. This matters more than you might think. Cold butter creates steam pockets; warm butter creates a dense, greasy topping. If your kitchen is particularly warm, keep the butter cubes in the freezer until the exact moment you need them.
- Fresh peaches are wonderful, but they need respect. To peel them, bring a large pot of water to boil, then carefully lower your peaches into the boiling water for exactly 30 seconds. Remove them with a slotted spoon and immediately submerge them in ice water. The skin should slip off easily. Slice each peach into ½-inch thick pieces—this thickness is specific because it allows the fruit to soften completely during baking while maintaining distinct pieces rather than becoming applesauce. Place the sliced peaches and blackberries in a large mixing bowl. If your blackberries are frozen, that's perfectly fine—don't thaw them first. The frozen berries will help keep the filling cool and prevent over-thickening before it reaches the oven.

- In a small bowl, whisk together your cornstarch, coconut sugar, orange zest, and salt. This is where many people make a critical mistake—they try to mix cornstarch directly into the wet fruit and create lumps. Instead, combine the cornstarch with the sugar first. The sugar granules separate the cornstarch particles, preventing them from clumping when liquid is introduced. Add the orange juice to this mixture and stir until you have a smooth slurry with no visible cornstarch lumps. This slurry will distribute evenly through the fruit.
- Pour the cornstarch mixture over your fruit and fold gently with a rubber spatula. Don't stir vigorously—aggressive stirring breaks down the fruit and creates mush. Instead, use a folding motion: push your spatula to the bottom of the bowl, fold the bottom over the top, rotate the bowl slightly, and repeat until the cornstarch mixture is evenly distributed. You should see flecks of orange zest throughout and every piece of fruit should be lightly coated. Transfer this mixture to your prepared baking dish, spreading it in an even layer. If you have time, let this sit for 15-20 minutes while you prepare the topping. This resting period allows the fruit to begin releasing its moisture naturally, which means less liquid will seep from the sides of the baking dish during baking.
- This step requires a food processor and your full attention. Add the frozen butter cubes, brown sugar, ¾ cup of the oats, and flour to your food processor. Pulse—don't run continuously—until the mixture resembles coarse sand with some pea-sized pieces of butter still visible. This should take about 8-12 pulses. This texture is crucial. If you process too long, the butter warms up and the topping becomes dense instead of crispy. Transfer this mixture to a bowl and add the remaining ¼ cup of oats. Use your hands to gently toss until the raw oats are distributed throughout. You want some portions that are more flour-based and crispy and some portions that are more oat-forward and chewy. This variation in texture is what makes a really exceptional crisp.
- Scatter the oat topping over your fruit filling, breaking up any large clumps as you go. Don't press it down—you want it to be loose and airy so steam can circulate underneath. The fruit will expand as it bakes and gently push against the topping, creating its own leverage. Place the baking dish in your preheated 375°F oven and bake for 50-60 minutes, until the topping is deep golden brown and you can see fruit juice just beginning to bubble around the edges of the pan. A few dark bits on top are perfect—this indicates proper caramelization. If your topping seems to be browning too quickly after 30 minutes, lower the oven temperature to 350°F for the remaining time. When the crisp comes out of the oven, let it rest for at least 10 minutes before serving. This resting period allows the filling to set slightly so it won't run all over your plate. Even better, let it cool for 30 minutes—it will be warm and wonderful, and the flavors will have time to integrate.
- Scoop the crisp into bowls while it's still warm and top with a generous scoop of vanilla ice cream. That cold ice cream melting into warm, spiced fruit and crispy oats is not just delicious—it's the moment people relax and actually enjoy your gathering.
Notes
FAQs
Can I Make This Crisp With Frozen Fruit Year-Round?
Absolutely, and this is one of my favorite techniques for inclusive gathering. Frozen peaches and blackberries are often picked at peak ripeness and frozen immediately, so they’re nutritionally identical to fresh. However, they release more liquid because the freezing process breaks down cell walls slightly. When using frozen fruit, increase your cornstarch by an additional ½ tablespoon (total 2.5 tablespoons) and don’t thaw the fruit first—bake from frozen and add 5-10 minutes to your baking time. This technique means you can make this crisp in January with the same quality fruit you’d use in July.
What If My Oven Runs Hot or Cold?
Invest in an oven thermometer—it’s one of the best $8 you’ll spend on kitchen equipment. Place it in the center of your oven and preheat for 15 minutes. If your oven’s actual temperature differs from what the dial says, adjust accordingly. If your oven runs 25 degrees hot (very common), set it to 350°F instead of 375°F. If it runs cold, set it higher. This single adjustment will solve 80% of baking frustrations.
How Do I Prevent the Topping From Absorbing Too Much Moisture?
Keep the topping loose and airy—don’t press it into the fruit. Use the food processor properly with pulses instead of continuous processing so the texture stays rough. If you’re making the crisp ahead of time, keep the assembled unbaked crisp uncovered in the refrigerator rather than covered, so moisture doesn’t condense onto the topping. Bake from cold, which means adding 10-15 minutes to the bake time but results in a crisper topping because the butter starts from frozen.
Can I Scale This Recipe for Large Gatherings?
Yes, and I do this frequently. Double the recipe exactly as written and use two 9-by-13-inch baking dishes. Both will bake at the same time with minimal adjustment. If you’re tripling the recipe, I recommend baking in shifts or using a larger sheet pan with raised sides, though you may need to add 5-10 minutes to the baking time due to the larger surface area. Never try to fit three times the filling into one dish—you’ll end up with either an overflowing oven or undercooked filling.
What’s the Best Way to Serve This at a Large Gathering?
Bake your crisps about an hour before guests arrive so they’re warm but not piping hot when you serve them. Set up a dessert station with the crisp in its baking dish, ice cream in a small cooler with an ice cream scoop, and optional toppings (nuts, whipped cream, fresh mint). Let guests serve themselves—it feels casual and inclusive, and people get exactly the ratio of crisp to ice cream they prefer. For very large gatherings, you can bake one crisp the night before, refrigerate it, and reheat it in a 300°F oven for 15 minutes while baking a fresh one. This way you always have dessert available without running out.
More Recipes Using This Technique
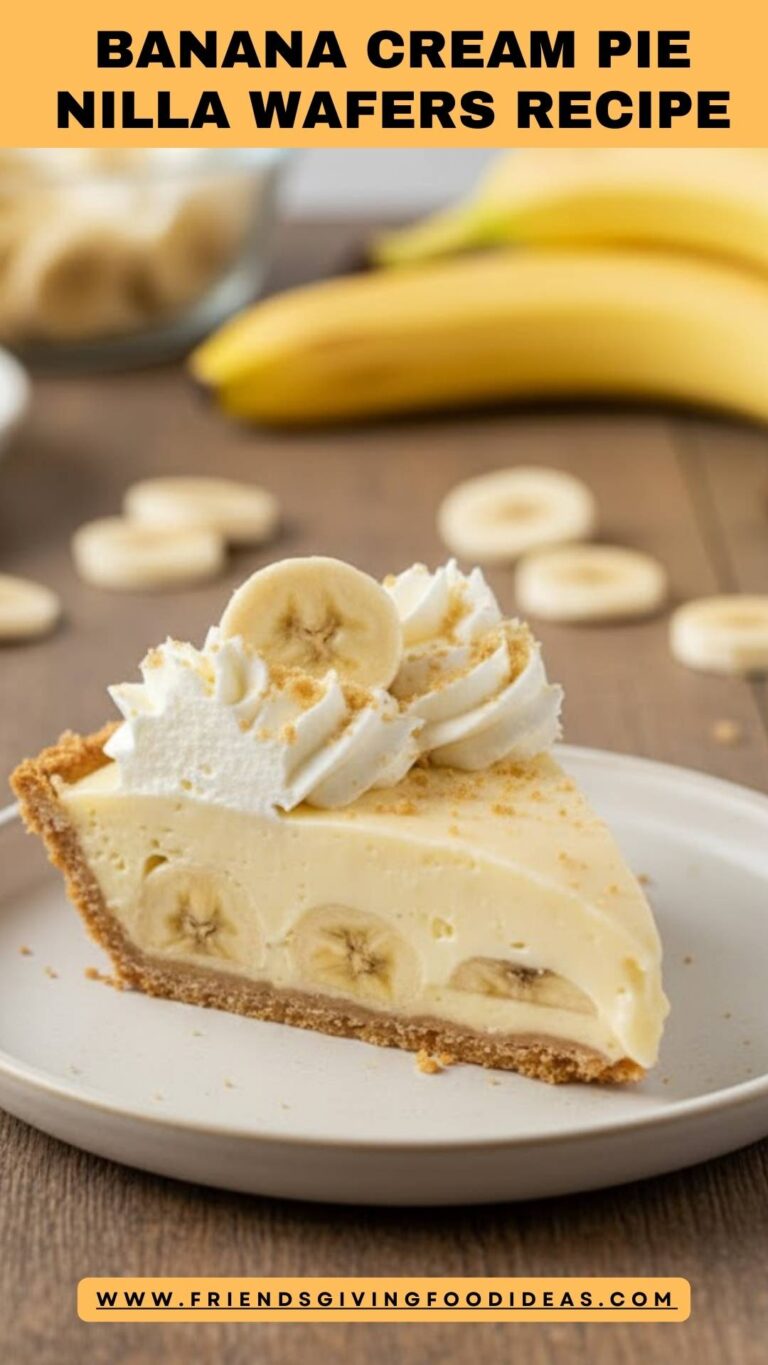
- Banana Cream Pie with Nilla Wafers – uses starch-based thickening for creamy fruit-forward filling that holds its shape in slices
- this simple cake – demonstrates layering techniques for building impressive multi-component desserts that serve large gatherings
- Barbecue Potatoes Recipe – teaches sauce creation and glazing techniques that complement fruit-based desserts in casual gatherings
Seasonal Variations to Expand Your Repertoire
Spring: Replace peaches with fresh rhubarb (use 5 cups rhubarb, 3 cups strawberries). Rhubarb is tart, so reduce orange juice to 1 tablespoon and add 1 tablespoon honey to the fruit mixture. The cooking time remains the same.
Summer: This is the recipe as written—peak peach and blackberry season. Make extra and freeze unbaked crisps to enjoy later.
Autumn: Use 4 cups peaches, 2 cups blackberries, and 2 cups diced pears. Add ½ teaspoon ground ginger and ¼ teaspoon ground nutmeg. The pear adds subtle sweetness and requires only 2 tablespoons cornstarch (slightly less water content than berries).
Winter: Combine 4 cups frozen peaches, 2 cups frozen blackberries, and 1 cup fresh pomegranate arils. Add ½ teaspoon ground cinnamon and the grated zest of one lemon instead of orange. This variation adds jewel-tone color and brightness when other fresh fruit is scarce.
No matter the season, this technique remains constant—only the fruit and subtle seasonings change. This is the power of mastering a core cooking method.
You’ve just learned one of the most valuable techniques in home cooking: creating a perfectly balanced fruit crisp with a crispy, buttery topping and filled that’s thickened but not gummy. More importantly, you understand the why behind every step, which means you can adapt this technique to any fruit, any season, and any gathering with confidence.
This is what I love most about cooking as a dietitian and gathering expert. Once you understand the fundamentals, you’re not following recipes anymore—you’re creating them. You’re the one making confident decisions about ingredients, adjustments for your oven, and adaptations for your guests’ needs and preferences.
The blackberry peach crisp you make next time won’t just be delicious. It’ll be yours, made with intention and understanding, served to people you care about in a moment you’ve thoughtfully created. That’s what festive gathering is really about.
I can’t wait to hear about the crisps you make and the gatherings you host. Come back and tell me about your experience with this recipe, the variations you tried, and the moments it created at your table. That’s what makes this work meaningful to me.
Happy Cooking!